Every WordPress installation comes with Akismet plugin pre-installed, but it’s not activated by default.
Often users ask us what is Akismet and whether you really need to activate this plugin on your WordPress.
In this article, we will explain what is Akismet and why you should start using it right away.
What is Akismet?
Akismet is a comment spam filtering service for WordPress. Automattic is the company behind Akismet and it was founded by the WordPress co-founder Matt Mullenweg.
Akismet goes through the blog comments and filters out spam using its algorithms. The algorithm learns from its mistakes and the actions taken by other websites.
For example, when several websites start reporting similar-looking content as spam, then Akismet will learn to identify that kind of content as spam in the future.
As of today, Akismet has caught more than 523 billion spam comments, and the number is still growing.
Why You Should Use Akismet?
On popular WordPress websites, the number of spam comments could get as high as 85%. This means that out of every 100 comments, only 15 are legitimate.
Besides that, comment moderation is a time-consuming task. You would have to spend countless hours filtering spam comments manually.
This is where Akismet can save you hours. The WordPress plugin will automatically catch spam comments before it lands in your moderation queue as pending. This allows you to focus your energy on moderating comments by real users.
When a comment is marked as spam by Akismet, it will not show the Awaiting Moderation notice like you normally see with other comments. Instead, it will automatically move them to the spam folder.
Now, let’s look at how you can configure Akismet on your website.
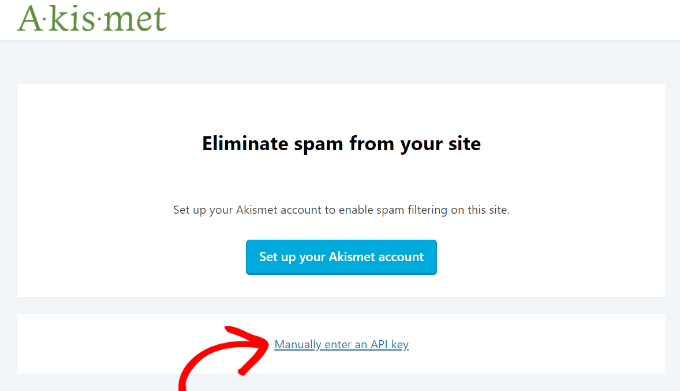
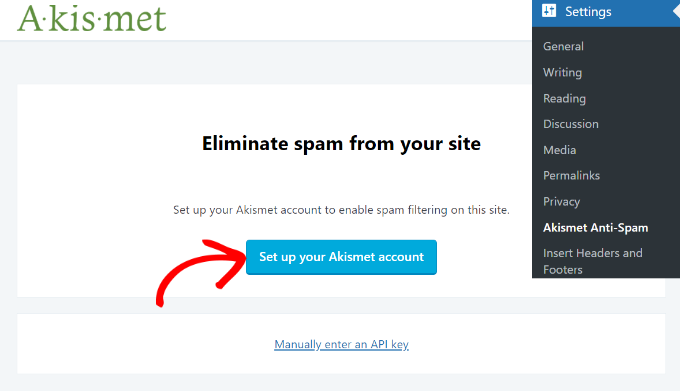
Upon activation, you can navigate to Settings » Akismet Anti-Spam from your WordPress dashboard. Next, go ahead and click the ‘Set up your Akismet account’ button.
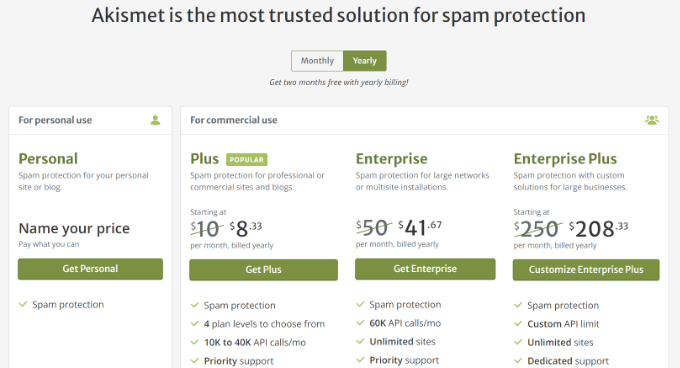
Now, a new tab or window will open in your browser, and you’ll see the Akismet pricing page. Akismet offers free and premium pricing plans.
If your site is not for commercial purposes, like it doesn’t run ads, then you can choose the Personal plan. Otherwise, you’ll need to select one of the commercial plans.
For the sake of this tutorial, we’ll be using the Personal plan.
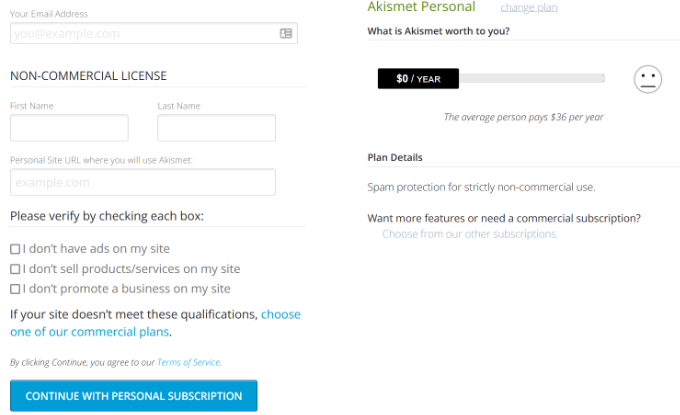
On the next screen, you’ll need to enter your email address, name, and website URL to create an account, along with choosing a price you want to pay for your account.
By default, the price will be set to $36 per year. However, you can move the pricing slider under ‘What is Akismet worth to you’ to any price from 0 to $120 per year.
Aside from that, Akismet will also ask you to check the boxes if you’re not running ads, selling products and services, or promoting a business on your site.
Once that’s done, simply click the ‘Continue with Personal Subscription’ button.
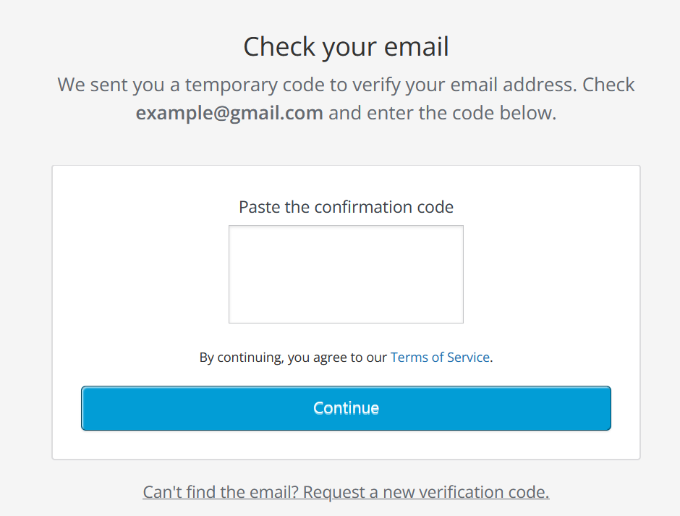
Next, you’ll need to enter the confirmation code that you received in the email address provided upon signup. After entering the code, click the ‘Continue’ button.
Akismet will verify the code and then show you a page with additional instructions to complete the signup process.
To complete the configuration, you can head back to your site’s WordPress dashboard and navigate to the Settings » Akismet Anti-Spam page.
Now go ahead and click the ‘Manually enter an API key’ button.
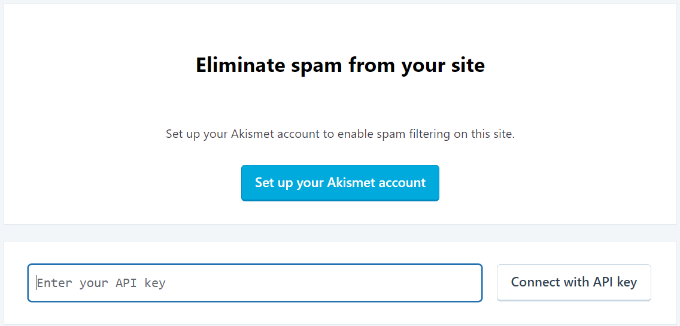
When you click the button, a new field will appear where you’ll need to enter the API key. You can find the API Key in your email inbox.
After entering the key, simply click the ‘Connect with API key’ button.
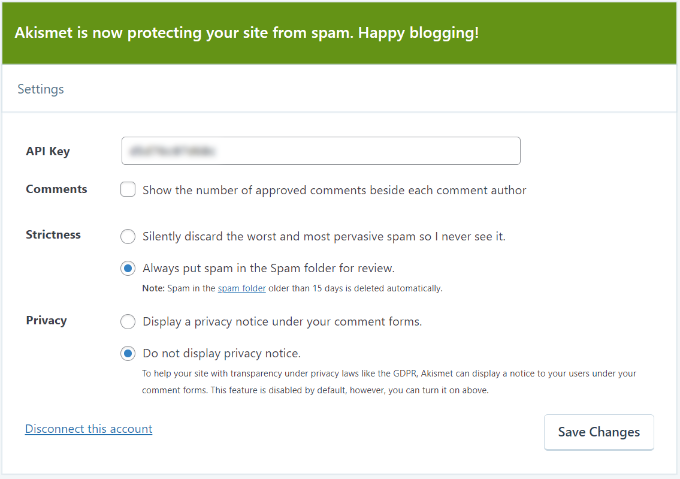
Once the API key is connected, Akismet will start protecting your website from spam comments.
You can also tweak the settings in Akismet. For instance, the plugin lets you display the number of approved comments beside each comment author, review spam comments or automatically discard them, and show a privacy notice under comment forms.
When you’ve made the changes, go ahead and click the ‘Save Changes’ button.
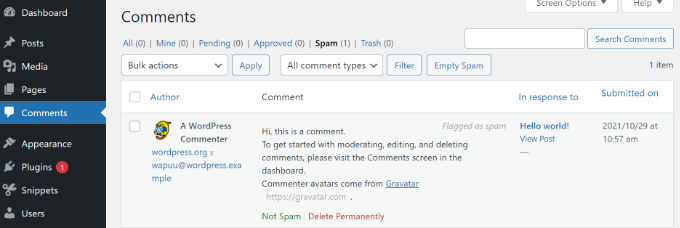
Next, you can review spam comments by navigating to Comments from your WordPress dashboard and then selecting the ‘Spam’ tab.
If you feel that a legitimate comment has been marked as spam, then you can simply click the ‘Not Spam’ button under the comment.
You can also permanently delete comments or click the ‘Empty Spam’ button to clear the spam folder.
Do you want to know how to start affiliate marketing as a beginner?
Affiliate marketing is one of the most popular ways to make money online. It allows you to add a steady income stream to your blog’s monetization strategy.
In this affiliate marketing guide for beginners, we will explain how affiliate marketing works, and how to get started right away.
What is Affiliate Marketing?
Affiliate marketing is when you earn a commission when a person makes a purchase after clicking your unique referral link.
Unlike other ad types which pay based on clicks or views, affiliate marketing works on a CPA (cost-per-acquisition), or CPL (cost-per-lead) basis. In other words, you only earn a commission when someone takes an action such as buying a product or signing up for a free trial.
Because there is less risk for the advertiser, affiliate programs pay out much higher commissions to publishers compared to Google AdSense or other types of ads.
Affiliate marketing requires a more hands-on approach. You have to find a product or service that you believe will be helpful to your users. After that, you have to strategically add it to your blog posts and other areas of your site so your users can purchase the product using your referral link.
To give you a better idea, here are some popular affiliate marketing blog examples.
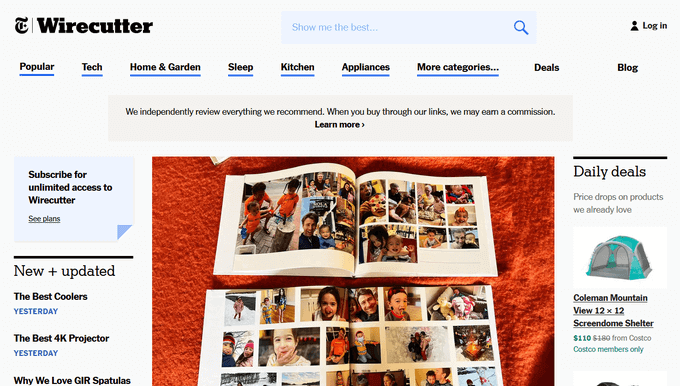
Wirecutter
Wirecutter is a well-known product recommendation website from the New York Times. It publishes product reviews and ‘best of’ lists for all types of affiliate products including kitchen tools, home decor, pet supplies, software, and more.
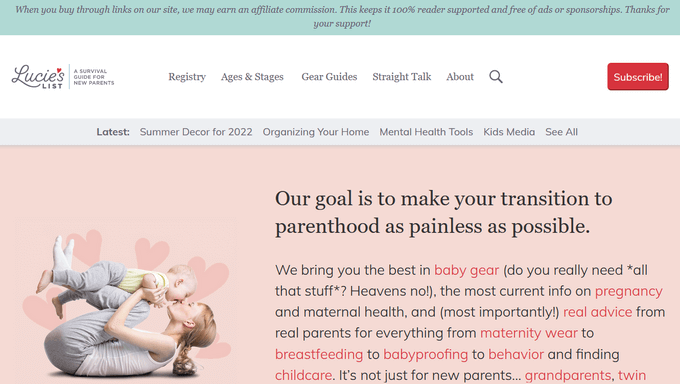
Lucie’s List
Lucie’s List is an affiliate marketing blog for new and expectant parents. Throughout the blog, you can find buying guides with affiliate links for strollers, car seats, bottles, high chairs, and other baby products.
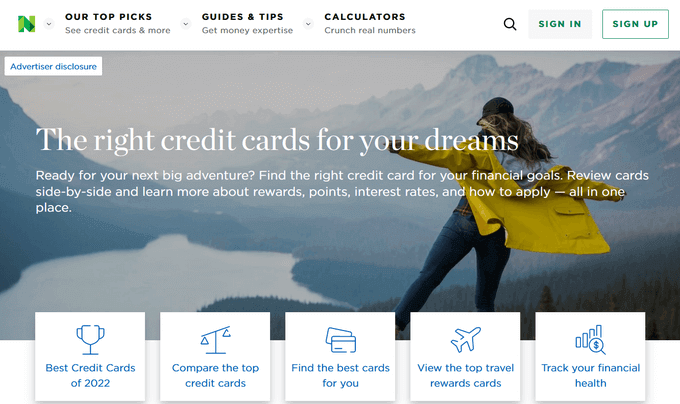
NerdWallet
NerdWallet is another popular website that earns money by promoting financial products to its audience. It publishes reviews on the best credit cards, mortgages, and banking services.
How Does Affiliate Marketing / Tracking Work?
First, you have to find a company or product that you want to promote. You need to select a product or service that you believe will be relevant to your blog’s topic and useful for your audience. The product or company you choose is often called a ‘Merchant’.
Next, you have to partner up with the company by joining their partner program. This makes you their ‘Affiliate’. Some companies also use the terms associates or partners.
Once you have joined their partner program (also called an Affiliate Program), you will get a unique affiliate ID. You will need to use this affiliate ID in all affiliate links that you add to your website to promote the product.
You can promote the product by adding in-depth product reviews, recommending it in your articles, displaying banner ads, sending an email newsletter, and more. All traffic you send to the merchant website with your unique ID will be tracked.
Once a user makes a purchase, you will earn a commission. Your payment is issued once your earnings reach a particular threshold, typically 45-60 days.
How to Get Started with Affiliate Marketing
First, you need to make sure that you are using the right blogging platform, and that you are allowed to run affiliate marketing campaigns on your website.
For example, if you are using WordPress.com, then there are some restrictions regarding the products and services you can link to. For more details see our comparison of WordPress.com vs WordPress.org.
On the other hand, if you are on a self-hosted WordPress.org website, then you can add any affiliate link you want and efficiently manage your affiliate campaigns.
If you haven’t created a website already, then you can get started right away. Simply follow the instructions in our step-by-step guide on how to start a blog, and you’ll be up and running in less than 30 minutes.
Next, you need to let your users know how you make money from your website by adding a disclosure page. See WPBeginner’s disclosure page and feel free to use it as a template.
You will also need to add a privacy policy and terms of service page to your blog.
These are among the must-have pages for every WordPress blog. They not only save you from legal issues in the future, but they also help you build trust with your audience.
Finding Affiliate Products and Services to Promote
There are many ways to find products and companies that you can partner up with as an affiliate. Here are some of the easiest ways to find the products you can promote.
1. Become an affiliate for products you already use
First, you need to look at the products and services that you already use and find useful. This makes it easy for you to convince your users about the product since you already know the pros and cons.
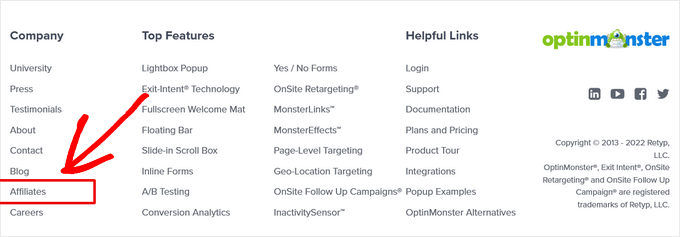
Next, you need to go to the product’s website and search for terms like ‘Affiliate program’, ‘Partners’, or ‘Affiliates’. Many companies are actively looking for affiliate marketers to promote their products, so they often add a link to their affiliate page in their website’s footer.
2. Look for products other blogs are recommending
Another way to find products is by looking at other blogs similar to yours. You will be able to find many similar blogs that are using affiliate marketing to make money.
But how do you know that they are promoting affiliate products?
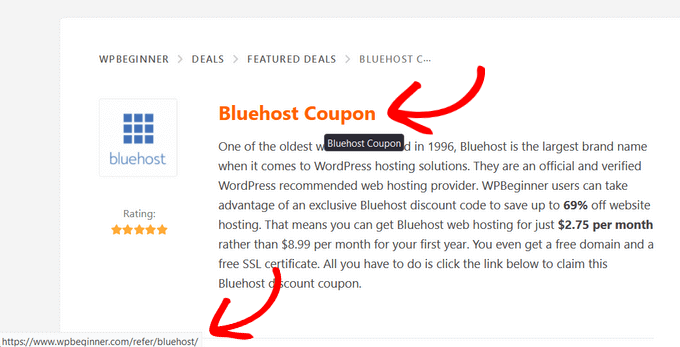
First, look for the obvious and easily noticeable banner ads on their website. Take your mouse to the banner ad, and you will see a link in your browser’s status bar.
This link will usually have an affiliate ID. Affiliate ID helps merchants track which affiliate partner is sending them traffic and sales.
Sometimes these links may look like internal links, but when you click on them they will take you to a product website with the affiliate marketer’s ID in the link. You will also find similar affiliate links throughout their content.
3. Join bigger affiliate networks
Another way to find products to promote is by joining affiliate networks. These websites act as a middleman between affiliate marketers and merchants.
You will notice that many products and companies that you want to partner with already use an affiliate network. This helps you quickly find a lot of products that you can start promoting on your website.
In the next section we’ll share more about affiliate networks and our top recommendations.
4. Reach out to companies
If you really want to promote a product but can’t find any information about their affiliate program, then you can simply ask them via email.
Some companies may not be actively promoting their affiliate program. If they have an affiliate program, then they can invite you to join.
What are Affiliate Networks? Why You Should Join Them?
Affiliate networks act as a middleman between you (the affiliate marketer) and merchants (companies that want to sell their products).
For merchants, they provide their platform as a service to list their products, track affiliate traffic, manage affiliates, and send payments.
For affiliate marketers, they offer an easy-to-use platform to search for products, sign up as an affiliate, and track your campaign performance and earnings.
Following are some of the most popular affiliate networks that you can join.
ShareaSale – One of the largest affiliate networks with many high-paying affiliate products for almost every category imaginable. For example, the popular WordPress hosting company WP Engine uses ShareASale to manage its affiliates.
CJ Affiliate (Formerly, Commission Junction) – Another top affiliate network with a huge number of merchants and products neatly organized in categories and easily searchable. Companies like GoDaddy, Expedia, and many others use CJ.
ClickBank – This is a large online marketplace for selling digital products in various categories from different vendors. It is easy to use and has tons of learning resources for new affiliate marketers.
Amazon Associates – Amazon is the world’s largest eCommerce store with millions of products. You can sign up for their affiliate program and start earning by sending people to a website they already use for their online shopping. See this guide on how to build an Amazon affiliate store in WordPress.
Which affiliate networks should you join?
You should join affiliate networks that have the products you want to promote. You can join multiple affiliate networks for different products. We use all the above networks and a few others.
Make sure that you always check the network program policies. You also need to review the program policies of individual products and merchants. This will give you a clear idea about your earnings, payments, additional incentives, and more.
Affiliate Marketing Tips to Increase Earnings
Now that we have covered the basics, let’s dive into some more tips on how to actually make money from affiliate marketing.
1. Choose good products and companies to promote
As an affiliate marketer, you don’t have control over the future of products that you are recommending. That’s why you need to make sure that you are recommending the best products from reputable companies.
The best way to do this is by recommending the products and services that you have actually used. If you want to recommend a product that looks useful, then feel free to contact them to learn more.
If you ask nicely, most companies will gladly offer you a free account or copy to test their product or service.
2. Keep your audience in mind
Keep your website’s audience and their interests in mind when choosing the product. For example, if you run a fashion blog, then you would want to promote fashion accessories, clothing, and similar products that your audience would want to buy.
You also need to make sure that you are not just recommending products because they are offering higher commissions. If a user buys a product based on your recommendation, and it doesn’t turn out useful, then they will never trust your recommendations again.
3. Offer highly useful and valuable content
You can add affiliate links and banners anywhere on your WordPress site. However, simply adding links will not result in convincing your users to actually buy those products.
You need to convince your users by offering useful and valuable information about the product. Many affiliate marketers do that by writing in-depth product reviews, video reviews, product comparisons with pros and cons, and more.
4. Start an email newsletter
Promoting affiliate products in your email newsletter is another powerful way to boost your affiliate income.
That’s because email marketing is direct and ongoing. Once people sign up for your newsletter, they’ll regularly receive awesome deals and product recommendations directly in their inbox.
To convince people to subscribe to your newsletter, you can use a tool like OptinMonster.
OptinMonster is the best email capture tool on the market. Using the drag and drop builder and 400+ built-in templates, you can quickly create eye-catching newsletter optin forms.
Aside from promoting affiliate products on your website, you can also diversify your income with dropshipping.
Dropshipping is where you accept customer orders without keeping any products in stock. When a customer purchases a product from your site, you place the order with the original vendor and they’ll ship the product directly to the customer.
Affiliate Marketing Plugins and Tools for WordPress
As your blog grows, you will be recommending a lot of different products. This will make it difficult for you to manage all the affiliate links, banners, and ads spread all over your website.
Luckily, there are excellent affiliate marketing tools and plugins for WordPress that you can use to help with management.
Manually adding links to your content becomes quite difficult as your site grows. You will have to copy the URL with your affiliate ID every time you mention the product and paste it into WordPress.
It also lets you change lengthy affiliate links into cloaked pretty links which are more user-friendly.
ThirstyAffiliates also has the option to automatically replace keywords with affiliate links, which can significantly help you boost your affiliate revenue.
AdSanity is the best WordPress ad management plugin and a must-have for every affiliate marketer’s toolbox. It allows you to create banner ads from your WordPress site and manage them from a single dashboard.
MonsterInsights is the best Google Analytics plugin for WordPress. It allows you to see where your users are coming from and what they do when they are on your website.
You can see all of this important data in a single, easy-to-read report right from your WordPress dashboard.
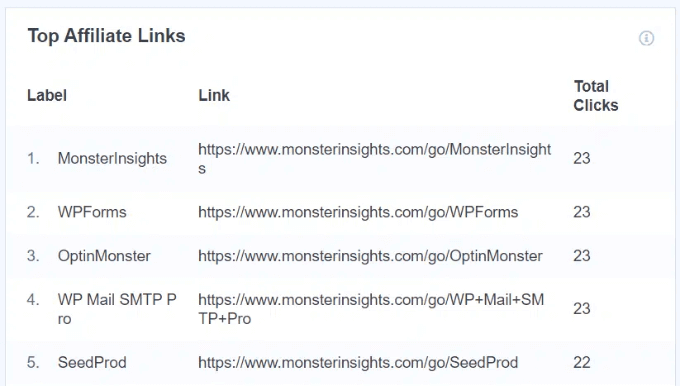
MonsterInsights can also detect if you’re using ThirstyAffiliates to manage your affiliate links. That means it can automatically track all your affiliate links, no matter what link prefix you’re using.
Other powerful MonsterInsights features include eCommerce tracking, file download tracking, forms tracking, and much more.
We hope this ultimate affiliate marketing guide for beginners helped you learn how to become an affiliate marketer. You may also want to see our ultimate WordPress SEO guide to bring more visitors to your website.
If you liked this article, then please subscribe to our YouTube Channel for WordPress video tutorials. You can also find us on Twitter and Facebook.
Are you wondering what you can do with sticky posts in WordPress?
Sticky posts are one of the least known features in WordPress, but they can really beneficial for your site. Using them can help keep important content visible to your audience, which can increase conversions and engagement.
In this article, we will show you 6 cool things you can do with sticky posts in WordPress.
What are Sticky Posts and Why Should You Use Them?
A sticky post is any content that sticks to the top of your site’s blog page. You can also show them on the homepage, category, archive, and other pages.
You might choose to sticky your WordPress website‘s pillar articles, top products, announcements, or discount offers so that you get more eyes on them.
Sticky posts are powerful because as you create more content over time, your older articles get buried underneath the new blog posts. As a result, users may not be aware of your top articles and will have difficulty finding these posts on your site.
However, many website owners don’t know how to make the most of the sticky posts feature in WordPress. Here are some cool things you can do with sticky posts.
You can click the links below to jump ahead to any section you’re interested in:
1. Display Sticky Posts as Recent Articles on Sidebar
WordPress shows your sticky posts at the top of the blog post page on your website. However, you can also display them in your website sidebar as the most recent articles.
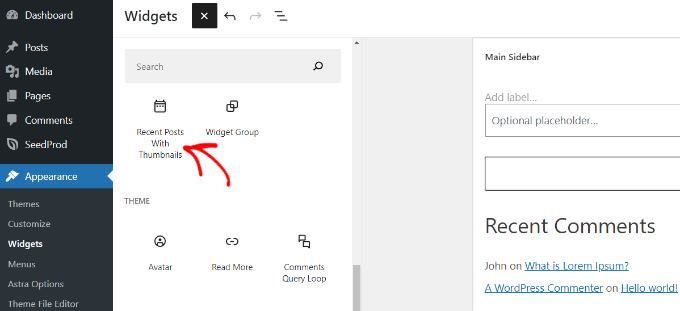
Upon activation, you can head to Appearance » Widgets from your WordPress admin panel. Next, you can click the ‘+’ sign and add the ‘Recent Posts With Thumbnails’ widget block.
In the widget block settings, you can enter a title such as ‘recent posts’ and choose the number of posts to display.
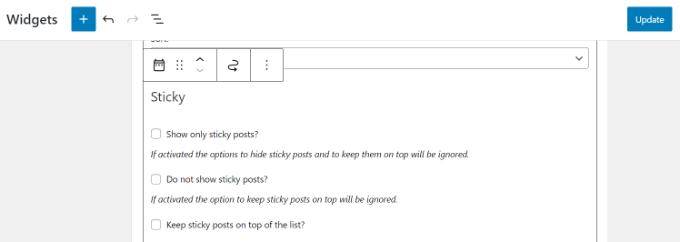
Next, scroll down to the ‘Sticky’ section in the widget settings. Here, you can enable the option to show only sticky posts as recent posts and keep them on top of the list.
When you’re done, simply click the ‘Update’ button.
Now visit your website to see posts you’ve marked as ‘sticky’ showing as recent articles in your sidebar.
2. Sticky Posts for Categories
By default, sticky posts only appear on your WordPress blog‘s front page. But what if you want to display featured content on your category archive pages?
First, you’ll need to install and activate the Sticky Posts – Switch plugin. For more details, please see our guide on how to install a WordPress plugin.
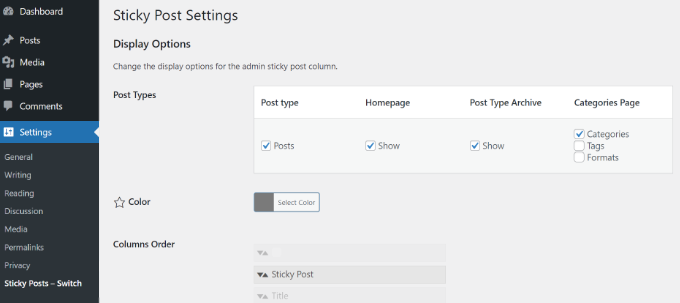
Upon activation, you can go to Settings » Sticky Posts – Switch from the WordPress admin menu. Simply check the ‘Categories’ box under the ‘Categories Page’ heading to show sticky posts.
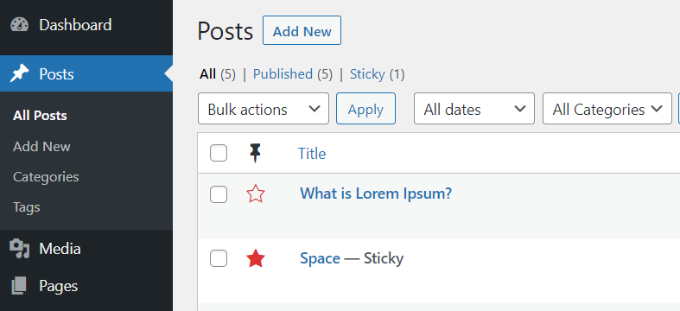
The plugin also adds a star icon on the Posts page in your WordPress dashboard.
This way, you can quickly make a post sticky by simply clicking the icon. You don’t have to open the content editor or view the quick edit settings.
Typically, sticky posts are used for featured posts to display your most prominent content.
After a while, your old featured posts disappear under the archives. You can bring back your old featured content to life by showing them on a custom archives page or anywhere else on your site.
If you’re an advanced user, you can also paste this code into your theme’s functions.php file. However, we do not recommend directly editing the theme files because the slightest mistake can break your site.
function wpb_latest_sticky() { /* Get all sticky posts */ $sticky = get_option( 'sticky_posts' ); /* Sort the stickies with the newest ones at the top */ rsort( $sticky ); /* Get the 5 newest stickies (change 5 for a different number) */ $sticky = array_slice( $sticky, 0, 5 ); /* Query sticky posts */ $the_query = new WP_Query( array( 'post__in' => $sticky, 'ignore_sticky_posts' => 1 ) ); // The Loop if ( $the_query->have_posts() ) { $return .= '<ul>'; while ( $the_query->have_posts() ) { $the_query->the_post(); $return .= '<li><a href="' .get_permalink(). '" title="' . get_the_title() . '">' . get_the_title() . '</a><br />' . get_the_excerpt(). '</li>'; } $return .= '</ul>'; } else { // no posts found } /* Restore original Post Data */ wp_reset_postdata(); return $return; } add_shortcode('latest_stickies', 'wpb_latest_sticky');
Did you know that you can make custom post types sticky in WordPress?
Typically, the sticky post feature is only available for default WordPress posts, but this does not mean that you cannot add this feature for other post types.
Upon activation, simply go to Settings » Sticky Posts – Switch from your WordPress dashboard. Under the ‘Post type’ column, you will see a list of all custom post types you have created on your site.
Next, you can click the checkbox for the custom post type you want to make sticky. In this example, we mark our ‘Book Reviews’ post type to be sticky.
When using sticky posts, you will notice that WordPress displays your articles at the top of all your WordPress posts by default.
To exclude sticky posts from the WordPress loop and appear at the top, all you have to do is enter the following custom code on your WordPress website.
<?php // The loop arguments $args = array( 'posts_per_page' => 10, 'post__not_in' => get_option( 'sticky_posts' ) // do not display the sticky posts at all. ); // The loop $the_query = new WP_Query($args); if ($the_query->have_posts()) { while ($the_query->have_posts()) { $the_query->the_post(); } }
Next, do you want to add custom styling to your sticky posts?
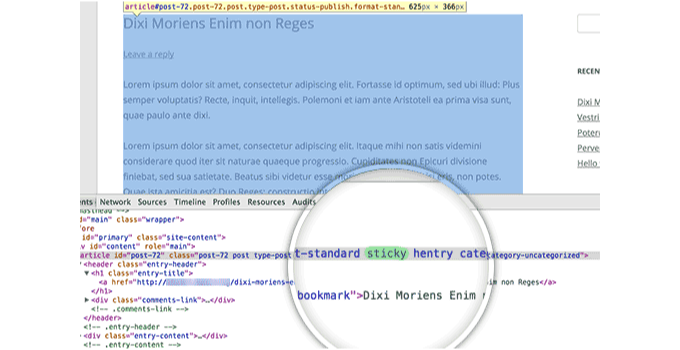
Many WordPress themes use post_class() functions to automatically add post classes for each post. If your theme is already using post_class() function, then you will see a ‘sticky class’ added to your sticky posts.
Now, you can use the.sticky CSS class in your WordPress theme. Here is some basic CSS to get you started:
We hope this article helped you learn some cool things to do with sticky posts on your WordPress site. You may also want to check out our guide on how to start an online store and the ultimate WordPress SEO guide for beginners.
If you liked this article, then please subscribe to our YouTube Channel for WordPress video tutorials. You can also find us on Twitter and Facebook.
Are you looking for ways to get more Likes on your Facebook page?
Facebook Likes add social proof for your online business, which attracts more users and helps you expand your social reach. You can gain more of a Facebook audience even when users aren’t actively using the social network.
In this article, we will show you some simple and quick ways to get more likes on Facebook.
Why Should You Get More Likes on Facebook?
Facebook is the top social media website in the world with more than 2.9 billion active users. For marketers, this brings tons of opportunities to leverage Facebook’s massive reach for growing their websites and businesses.
Facebook likes are visible to users and their friends, helping you increase your reach and find new audiences for your WordPress website.
Likes also add social proof for your new visitors, helping you win their trust, and get more users engaged with your content on Facebook.
That being said, let’s take a look at some of the quick ways to start getting more likes on Facebook. You can click the links below to jump ahead to any section:
Facebook Page Plugin is an easy way to get more likes on your business page. It allows you to promote your Facebook page on your WordPress website. Users can like and share your page.
Normally, you would add the page plugin to your blog’s sidebar. However, this makes it less noticeable and may not get you as many likes as you want.
This is where OptinMonster comes in. It is the number one lead generation software on the market and helps you convert website visitors into subscribers and followers.
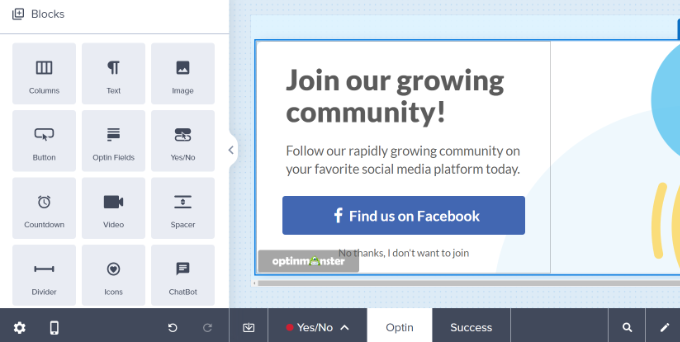
OptinMonster comes with beautiful WordPress popups that you can trigger when users are about to leave your site, scroll down, or view specific pages. These optins include exit-intent popups, slide-in boxes, after-post banners, and more.
Using the drag-and-drop campaign builder and pre-built templates, you can create a lightbox popup to promote your Facebook page and get more likes. It offers multiple blocks to customize your popup and see a real-time preview of what it will look like.
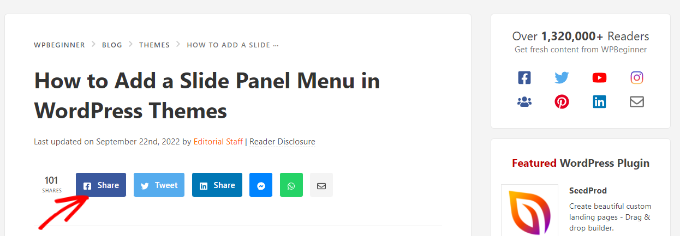
Facebook like and share buttons allow your users to like and share your individual blog posts without leaving your website.
This is easier and more convenient for your users. If you are using it with share counts, then it also adds social proof to your blog posts.
There are a ton of social media plugins for WordPress that can help you add share and like buttons to your site.
However, social sharing plugins can affect WordPress speed and performance by loading too many external scripts.
Now, many of our users ask us what we use to display the social sharing buttons on WPBeginner articles. We actually use a custom code solution explicitly written for our websites. If you are looking for something similar, then we recommend the Shared Counts plugin. It is extremely simple to use and incredibly fast.
Another way to get more Facebook likes is by displaying your social media posts in a custom social feed.
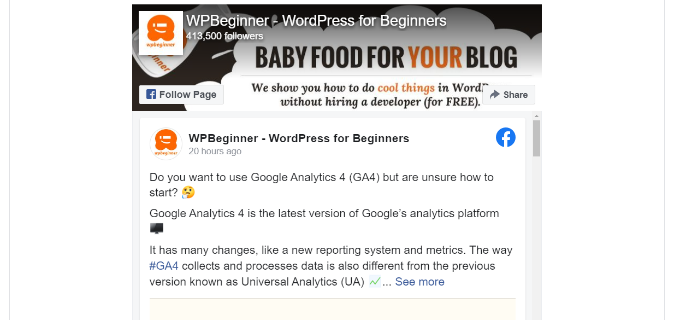
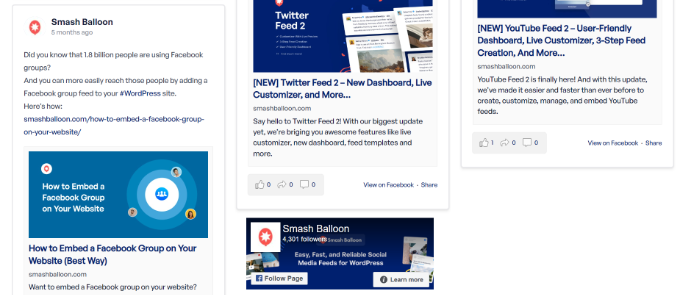
A custom Facebook feed allows you to display posts from your business page or group onto your WordPress website.
Since it is difficult for users to view all the posts on your Facebook page, a custom feed helps solve this issue. You can show what’s happening on your page, add all your Facebook posts in one place, boost engagement, and allow users to easily like and share your content.
With the help of the Smash Balloon Custom Facebook Feed plugin, you can easily create a Facebook feed. It offers powerful features and lets you customize the feed using its visual editor.
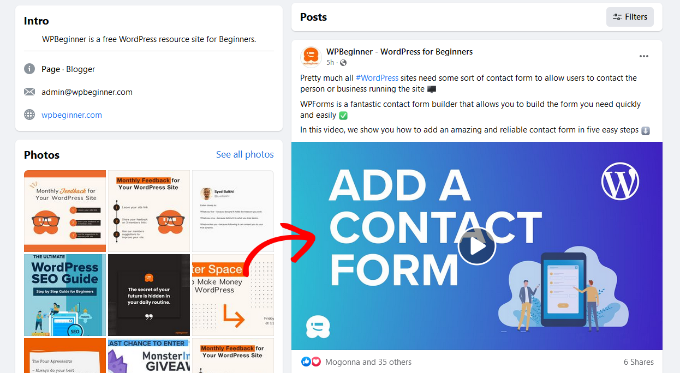
You need to ensure that your Facebook page is active, and the easiest way to do this is by regularly sharing content on your page. You can automatically post to Facebook from WordPress and don’t need to manually share your articles.
Usually, users share a post and wait for the likes to follow. If your page is new, then chances are that very few people would see the post, and even fewer would click the Like button.
Facebook’s algorithm shows users the content they and their friends like. This means that if you get enough likes for your posts from the start, then Facebook will start showing your content to your followers more often.
Here are a few tips that will help you get the ball rolling:
Ask your friends to like and share posts from your page
Share your page posts on your own personal profile
Share the post in Facebook groups or events where it is relevant and useful
5. Run Contests and Giveaways to Get More Likes
One of the simplest and quickest ways to earn more likes on your Facebook page is to run contests and giveaways. You can offer valuable and attractive giveaways that are relevant to your users. In return, they’ll like your Facebook page and boost engagement.
The prizes in your giveaway don’t need to be very expensive. You can select something your users may need and post it on your Facebook page. The more giveaways you offer, the more likes you get on your Facebook page.
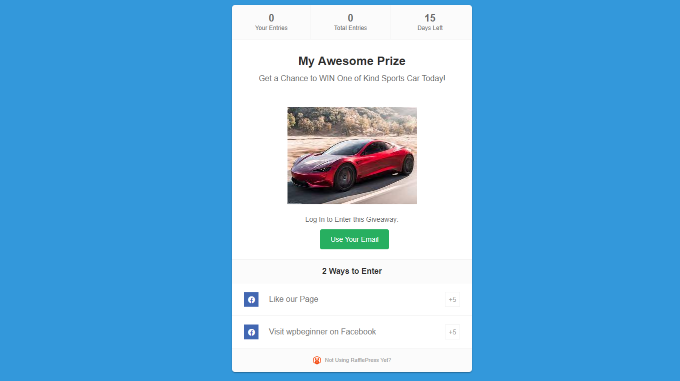
You don’t even need third-party apps to run these contests. You can announce them on your WordPress blog or a Facebook post, allowing users to enter by liking the post, leaving a comment, or uploading a photo.
However, a proper WordPress giveaway plugin like RafflePress can significantly improve your chances of running a successful giveaway by introducing various viral sharing elements and giving you an easy way to manage your giveaway.
To gain more likes on your Facebook page, you need to keep your users engaged by actively posting new updates. Now, this would take a lot of your time if you started doing that manually.
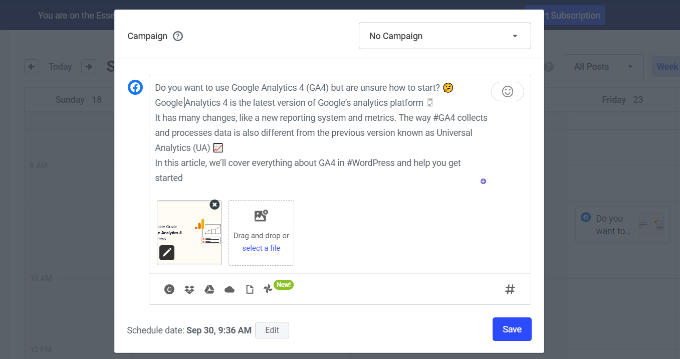
Scheduling status updates work alongside your automatic sharing of new WordPress blog posts. Make sure that you schedule both updates to appear at different times for maximum reach.
7. Reply to Comments on Facebook Posts
Comments bring life to any social platform, including Facebook. They are the easiest way to engage your users and build a thriving community around your website and brand.
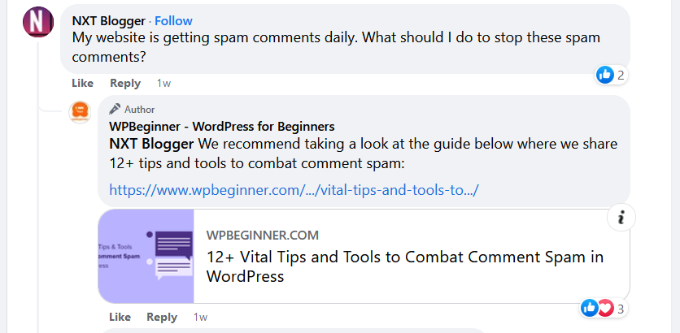
When users leave a comment on your page, Facebook starts showing them your posts more often. To boost this effect, you can encourage users to leave more comments by simply answering their comments on your Facebook page.
8. Retarget Website Visitors on Facebook
Have you ever visited a website and started seeing its ads in your Facebook feed? These are called remarketing or retargeting.
Basically, you install a cookie on your website, which helps Facebook identify that user. After that, you purchase Facebook ads and select your website visitors as the target audience.
Contrary to popular belief, Facebook ads don’t cost that much money, and you can control how much money you want to spend. For more details, see our step-by-step guide on how to install Facebook retargeting pixel in WordPress.
9. Make Your Posts Standout with Open Graph
Open Graph is metadata that you can add to your content and control how it appears when shared on social media websites like Twitter and Facebook.
Usually, Facebook can automatically fetch the correct title and description for your content. However, if you don’t explicitly tell it which image to use, then it will randomly pick any image from your article which may not look good.
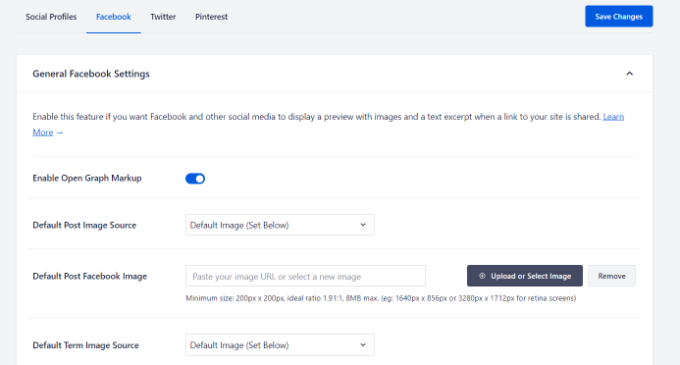
The easiest way to use Open Graph metadata on your website is by using the All in One SEO (AIOSEO) plugin. You can enable open graph markup with a click of a button and then upload your Facebook post image.
Images work like a charm when it comes to getting your users to click on something. It will make your post more attractive and help you get more likes, shares, and comments.
Now you may be wondering, how do I track if all my efforts to get Facebook likes are paying off? The obvious answer is by looking at your Page’s Facebook Insights report.
However, it doesn’t tell you how much traffic you are getting from Facebook to your website and how those users are converting. A better way of tracking traffic from social media is using Google Analytics.
You get insights about your campaign’s performance and whether it’s generating likes and engagement on your site. Plus, you get to see the social channels people use to arrive on your site.
The easiest way to configure Google Analytics in WordPress is using MonsterInsights. It is the best Analytics plugin and configures advanced tracking out of the box without editing code. For more details, please see our guide on how to install Google Analytics in WordPress.
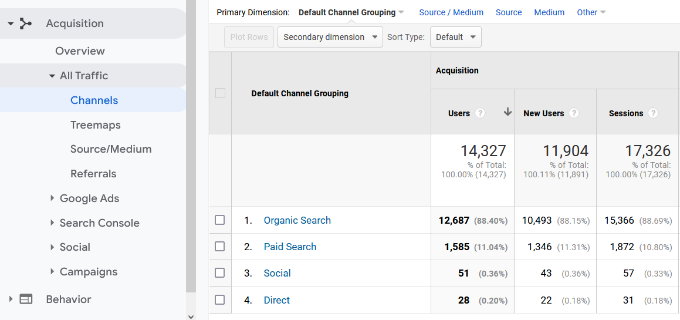
Once you have set it up, you can view your Facebook traffic in Universal Analytics under the Acquisition » Channels » Social report. Simply click on the ‘Social’ channel to see how many visitors are coming from Facebook.
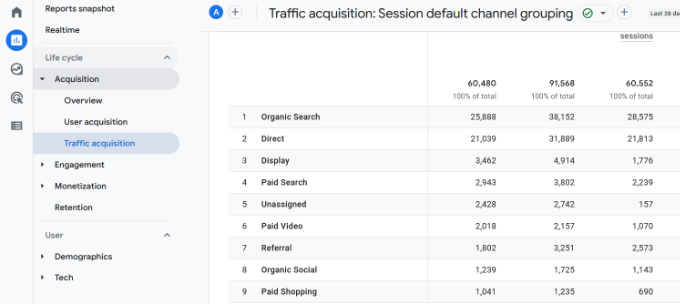
On the other hand, if you’re using Google Analytics 4, then you can view your Facebook traffic by going to Reports » Acquisition » Traffic acquisition.
Do note that now is the best time to switch to Google Analytics 4. That’s because Universal Analytics will stop working from July 1, 2023.
We hope this article helped you find ways to get more likes on Facebook. You may also want to see our guide on WordPress SEO and the best must-have WordPress plugins.
If you liked this article, then please subscribe to our YouTube Channel for WordPress video tutorials. You can also find us on Twitter and Facebook.
Are you looking for a way to prevent image theft in WordPress?
Image theft is a common problem that photographers deal with on a regular basis. It’s very easy for anyone to copy images and text on the internet. That’s why it’s important to protect your original work.
In this article, we will share 4 ways to prevent image theft in WordPress websites.
About Image Theft and Copyright
Copyright laws are universal and applicable around the world. The original creator automatically becomes the copyright owner of their creative work.
Even if they don’t mention it on their WordPress website, one should still assume that the content they are viewing is protected by copyright. This includes images, text, videos, logos, or any other form of content that you see on the web.
The problem is that images and text can be easily copied. Many people think that no one would notice if they stole an image and used it on their own website.
It is not only illegal but also unethical to steal other people’s work. There are many places where you can easily find royalty free and public domain images.
While it is flattering to see other people use your work in their own projects, sometimes it can be very frustrating to see a blatant disregard for your rights.
There is no way to completely stop people from stealing your images, but there are plenty of ways to discourage and prevent image theft on a WordPress website.
Here are the 4 most common ways to protect your images in WordPress.
1. Disable Right Click
Stealing images from your website is easy because a user can simply right-click and select ‘save image as’ to download them. You can disable right-click on your website and make it more difficult for an average user to steal your image.
Here are two plugins that you can use to disable right-click on images in WordPress.
Envira Gallery is the best WordPress gallery plugin in the market. Apart from helping you create beautiful image galleries, Envira comes with tons of other features as well. One of these features is image protection.
Simply go to Envira Gallery » Addons from your WordPress admin panel. Next, navigate to the ‘Protection’ addon and then install and activate it.
When creating your gallery, click on the ‘Misc’ tab and scroll down to the Image Protection Settings. You will find the option to Enable Image Protection. Go ahead and check this option and save your gallery.
There is also an option to enable a popup alert that will appear when a user attempts to copy the image.
You can now add this image gallery anywhere on your WordPress site. It will automatically disable right-click on images.
WP Content Copy Protection is a free WordPress and it allows you to disable right-click on your WordPress site.
By default, the plugin will disable right-click on your entire website. However, you can disable protection on selected pages, posts, and categories.
You can also control protection settings for registered users and admin users. There is also an option to show a message when a user tries to right-click an image.
2. Use Watermark on Your WordPress Images
Watermarks seem to be working great for many stock photography websites. The obvious downside is that your photographs or images might not look the best.
However, you can add watermarks tastefully. The goal is to keep the aesthetic appeal of your images while still discouraging people from stealing them.
Method 1: Using Envira Gallery
Envira Gallery comes with a Watermarking addon. You will need at least a Plus license of Envira Gallery to use this addon.
Simply install and activate the Envira Gallery plugin. Upon activation, you need to visit Envira Gallery » Addons and then navigate to the Watermarking addon. Next, install and activate it.
When creating a gallery or editing an existing gallery, you will notice the new ‘Watermarking’ tab in gallery settings.
You can click the checkbox for the ‘Enabled Watermarking’ option and more options will appear. Next, upload a watermark for your images, select its position, margin, and choose whether to apply the watermark to existing images.
Method 2: Using Easy Watermark Plugin
The other option is to use the Easy Watermark plugin. Simply install and activate the Easy Watermark plugin. If you need help, then please see our guide on how to install a WordPress plugin.
Upon activation, you can go to Tools &rquo; Easy Watermark page to configure the plugin settings.
Next, go ahead and click the ‘Add New Watermark’ button and then enter the title for your watermark. After that, you can click the ‘Text’ tab and the text under the ‘Watermark’ field.
There are also options to change the text font, size, color, angle, and opacity. Besides that, you can also edit the text’s alignment and set up applying rules.
If you click the ‘Image’ tab, then you can upload an image for your watermark. When you’re done, simply click the ‘Save’ button and your watermark will appear on your images.
Another common way to steal images from websites is by loading them from the original source. The image will load from your servers and will be displayed on third-party websites without your permission.
This also increases your server load and bandwidth usage.
Here is how you can disable the hotlinking of images from your WordPress site.
Simply add this code to the .htaccess file in your WordPress site’s root directory.
#disable hotlinking of images with forbidden or custom image option RewriteEngine on RewriteCond %{HTTP_REFERER} !^$ RewriteCond %{HTTP_REFERER} !^http(s)?://(www.)?wpbeginner.com [NC] RewriteCond %{HTTP_REFERER} !^http(s)?://(www.)?google.com [NC] RewriteRule .(jpg|jpeg|png|gif)$ – [NC,F,L]
Don’t forget to replace wpbeginner.com with your own domain name.
This code blocks hotlinking while still allowing images to be viewed in search results and on your website.
Adding a copyright notice to your website can also discourage people from stealing images. You can simply add a copyright notice to your theme’s footer file in plain text or HTML like this:
The downside of this is that you will have to edit this code each year. A better approach is to add a dynamic copyright notice in WordPress. Simply add this code to your theme’s functions.php file or a site-specific plugin.
This code finds the date of the first post you published on your blog and the last date you published anything. After that, it outputs a dynamic copyright notice.
You will need to add the shortcode [copyright] to any post, page, or text widget on your site to display a copyright notice. You can also use this code in your theme’s footer.
<?php echo wpb_copyright(); ?>
Now, if you’re not sure whether your pictures are stolen, then here’s how you can find out.
How to Check if a Photo is Stolen
The easiest way to see if a picture is stolen is by using Google Images. There are many other premium tools that you can use, but Google is free to use and quickly shows if someone else is using your images.
After that, you can upload your image or paste the image URL in Google Images.
Google will now show details about the image, possible related searches, and some visually similar images.
However, if you scroll down, you’ll see the ‘Pages that include matching images’ section. This is where you can see any website that might be using your photo without your consent.
Once you’ve figured out who has stolen your images, you can reach out to them and request them to give you proper mention for your work. You can also contact Google directly and submit a takedown notice.
We hope this article helped you protect your images and prevent image theft in WordPress. You may also want to see our guide on how to fix most common image issues in WordPress.
If you liked this article, then please subscribe to our YouTube Channel for WordPress video tutorials. You can also find us on Twitter and Facebook.