Do you want to add ebook downloads to your WordPress site?
WordPress makes it easy for you to upload your ebook files in PDF format and make them available for download. You can also sell ebooks or use them to get more email subscribers.
In this article, we will show you how to add ebook downloads in WordPress as well as how to make the most out of your ebooks.
We’ll cover a few different methods, so simply click the links below to jump to the section you need:
Method 1. Direct Ebook Downloads in WordPress Posts
With this method, you can offer your ebook as a free download using the WordPress File block. This block can even display your ebook’s content directly in the WordPress post or page.
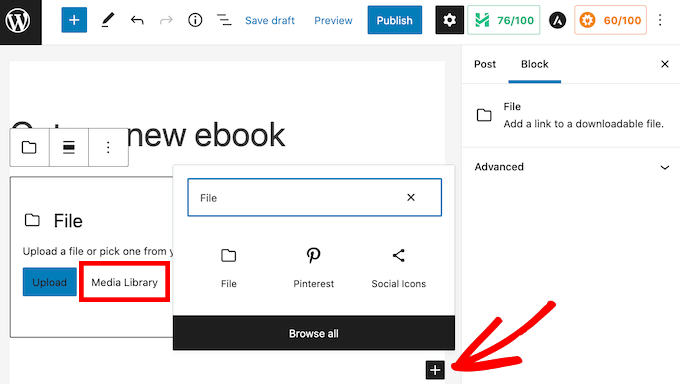
First you need to edit the post or page where you want to add your ebook download. You can then find the spot where you want to display your ebook, and click on the + icon to add a new block.
In the popup that appears, type File to find the right block.
Once you click on the File block, it will add the block to your page.
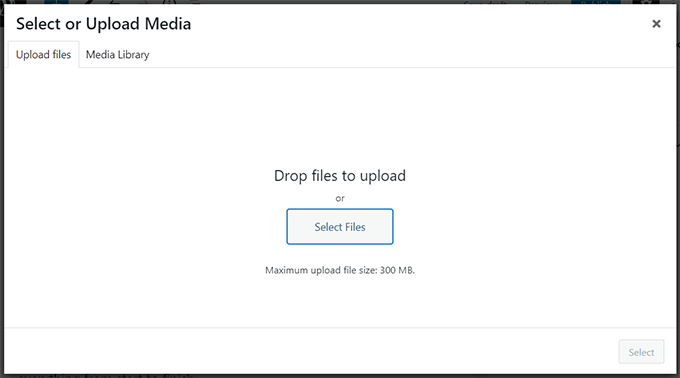
In the File block, click on the Media Library button, and a popup will appear.
You can now select your ebook file, or drag and drop the file to upload it.
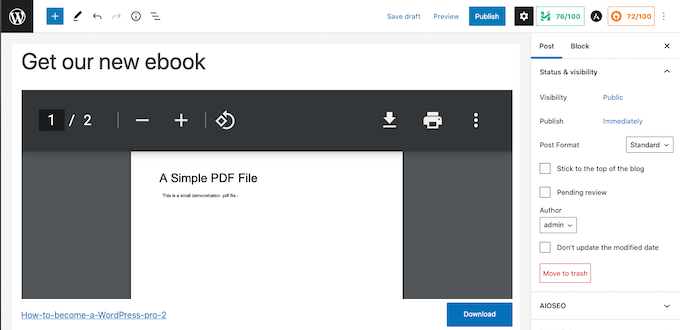
By default, the File block displays your ebook’s contents in a small PDF viewer.
It also has controls that visitors can use to scroll through your ebook, download the file, or even print your ebook.
Sometimes, you may not want to display a preview. For example, your ebook may span lots of pages or have images that you want visitors to see fullscreen.
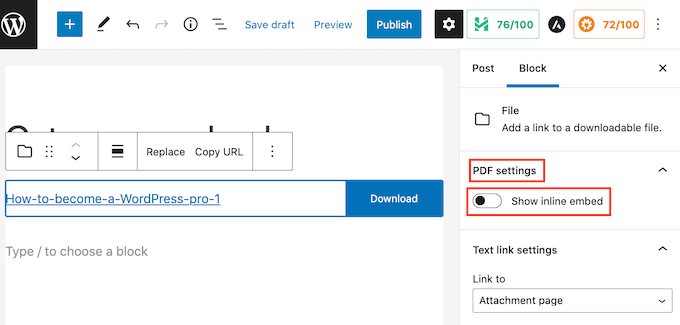
If you don’t want to include a preview, then you can find the PDF settings in the right sidebar of the content editor. You can then click to expand this section, and turn off the ‘Show inline embed’ slider.
WordPress will now remove the preview, and display only a Download button and a link.
Visitors can download this file to their local computer by clicking on the blue Download button, or open this ebook in a new tab, by clicking on the link.
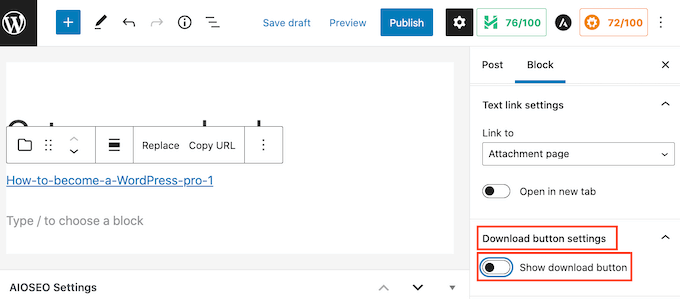
If you prefer, you can remove the Download button. To remove it, first click on the ‘Download button settings’ section in the WordPress sidebar.
You can then click on the ‘Show download button’ slider to turn this setting off.
Without the download button, visitors can still download the file manually, but they would have to launch your ebook in a new tab first to find the download option.
As you’re making changes to your File block, you can see how it will appear to visitors by clicking on the Preview button at the top of the screen.
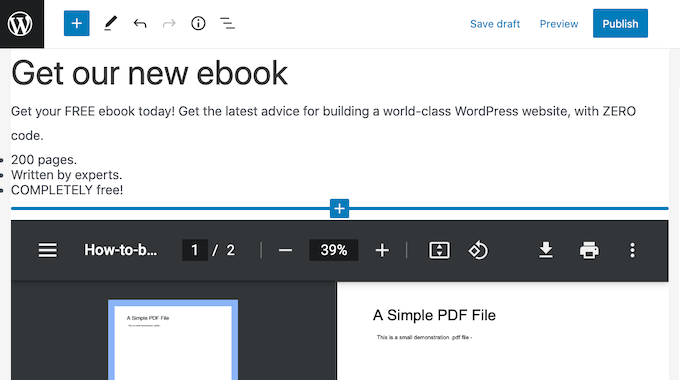
Once you’re happy with your File block, you may want to add more blocks. For example, you might write some supporting text or add a call-to-action button to encourage visitors to download your ebook.
When you’re ready, don’t forget to make your changes live by clicking on the Update or Publish button at the top of the screen.
That’s it! You have now successfully added your ebook download into a WordPress post. You can now visit your website to see it in action.
Note: Want your visitors to be able to search for your ebook’s contents on your website? WordPress doesn’t do this by default, so we wrote a guide on how to add PDF indexing and search in WordPress.
Method 2. Use Ebook Downloads to Get More Subscribers
Uploading your ebook using the File block is an easy way to offer great content for free.
However, if you’re using your ebook to grow your email list or capture leads, then you’ll want to make sure your visitors can’t access the ebook until they share their email address.
Using this plugin, you can create high-converting opt in forms without hiring a developer. We use it on WPBeginner and have increased our conversions by over 600% with this plugin alone.
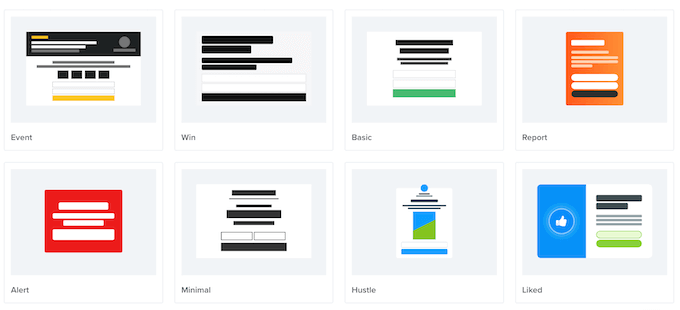
OptinMonster also comes with lots of ready-made templates that you can use to create high-converting popups.
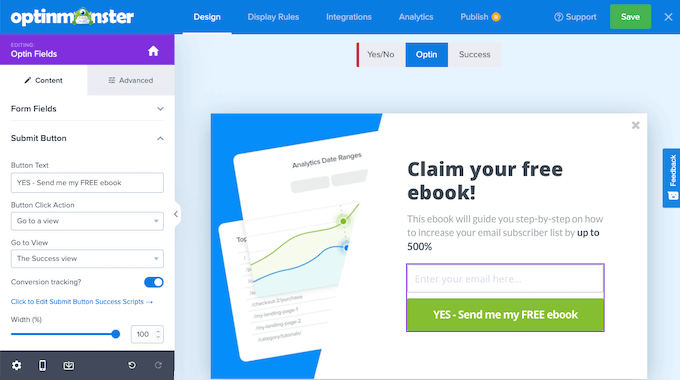
You can use these popups to ask visitors to perform an action before sending them to the ebook download. This marketing technique is sometimes referred to as offering lead magnets.
Basically, you offer free bonus content to your visitors in return for a small action like signing up to your mailing list.
It’s a win win for both parties. You get a new lead or subscriber, and your users get a free ebook.
First, you’ll need to install and activate the Easy Digital Downloads plugin. You can follow our tutorial on how to install a WordPress plugin.
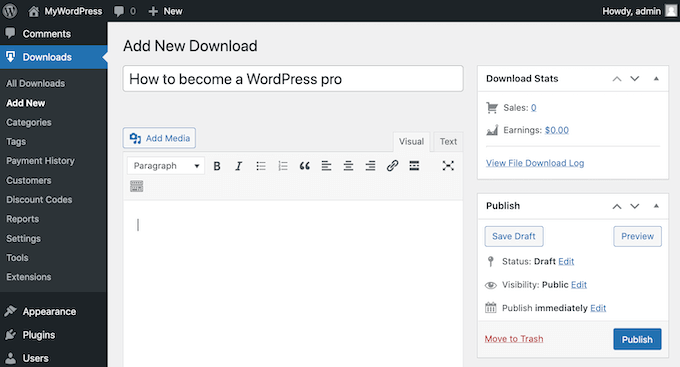
Upon activation, the first task is adding your ebook as a new product. To get started, head over to Downloads » Add New.
On this page, type a name for your ebook into the ‘Enter download name here’ field. This will usually be the book’s title, but it can be anything that you want.
Next, type a description for your ebook into the main section of the post editor. This could be a sales pitch that you’ve written to promote your book, or you might use the book’s blurb or summary.
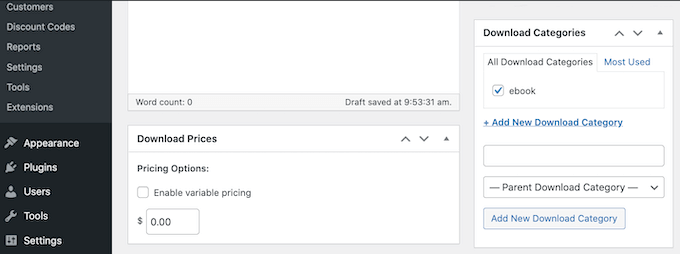
To help visitors discover your ebook, you may want to create some categories and tags. You can add this information in the Download Categories and Download Tags sections.
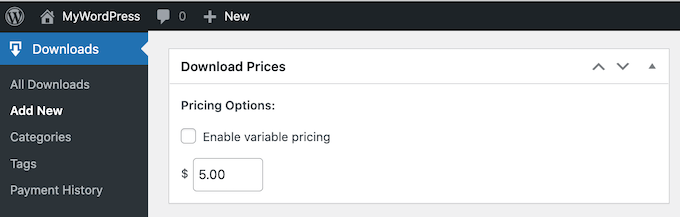
After that, scroll down to the Download Prices section.
Here you can set a price for your ebook.
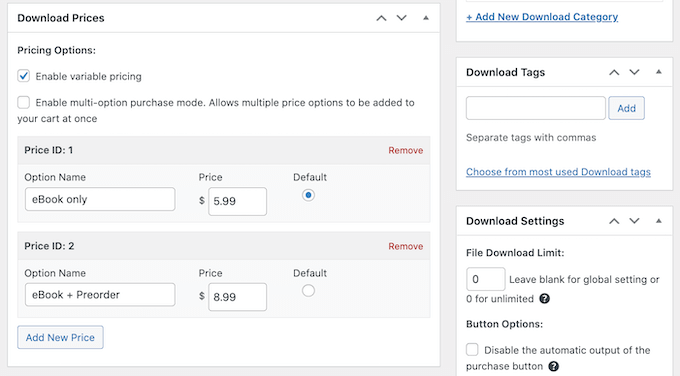
Easy Digital Downloads also supports variable pricing. You might use variable pricing to sell other products alongside your ebook. For example, you could give customers the option to save money by preordering your next ebook at the same time.
If you want to offer variable pricing, then select the ‘Enable variable pricing’ checkbox. This adds a new section where you can set your different prices.
Next, you need to upload your downloadable file. This is the ebook that your customers will purchase.
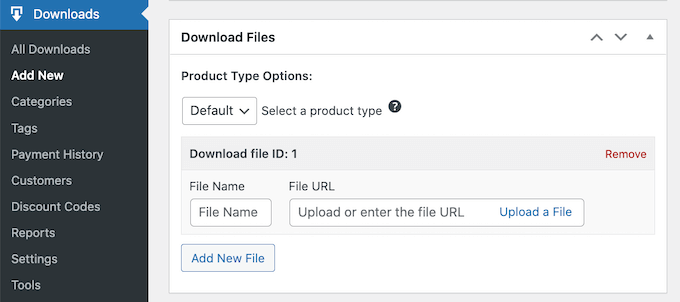
To do this, scroll to the Download Files section.
In the File Name field, type a name for your downloadable file. You can then click on Upload a file.
This will launch the WordPress media library where you can upload or select a book.
The final step is adding an eye-catching product image. This can help catch the visitor’s attention, and encourage them to buy your ebook.
For ebooks, you’ll typically want to use the book’s front cover as your product image. You can easily create a professional-looking cover using web design software such as Canva.
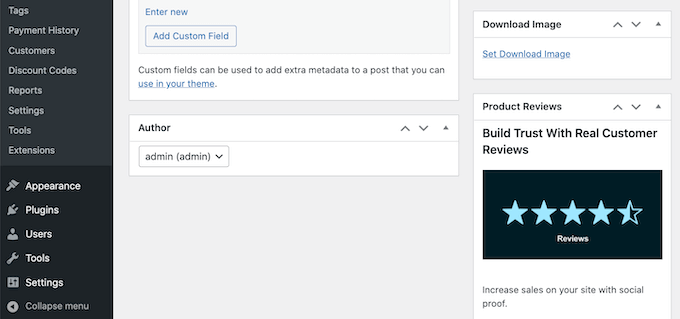
To add a product image, scroll to the Download Image section.
You can then click on the ‘Set Download Image’ link. This launches the WordPress media library.
After choosing an image, there are some more settings that you may want to explore. However, this is all you need to do in order to create a downloadable ebook.
To see how your ebook will appear on your website, you can click on the Preview button. When you’re ready to publish your product, simply click on the Publish button.
By default, Easy Digital Downloads publishes your ebook as a new page. Your goal is to drive traffic to this webpage.
This might mean adding this product page to your website’s menu. You might also link to it from different areas of your website, such as a blog post or announcement bar.
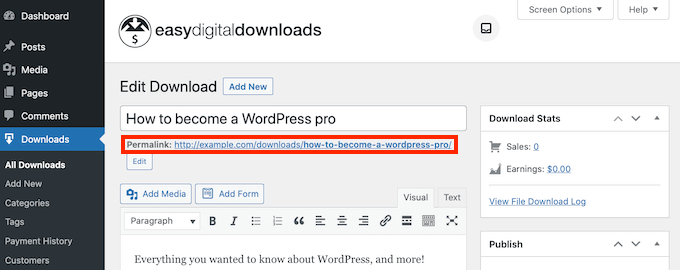
To do this, you’ll need to know the product page’s URL. You’ll find this information just beneath the product’s title.
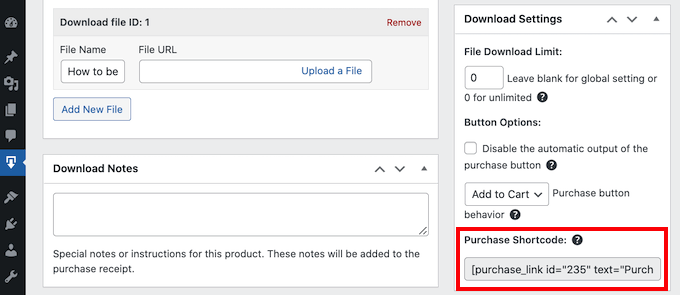
Another option is adding the product’s Purchase Shortcode to a page, post, or widget.
This code creates a Purchase button.
Whenever a visitor clicks on this button, it’ll add the ebook to their shopping cart.
The Purchase button will then change to a Checkout button.
Clicking on this button will take the shopper to the Easy Digital Download checkout page. This makes the Purchase Shortcode a great way to encourage sales from any area of your website.
To add a Purchase button to any page, post, or widget, scroll to the ebook’s Download Settings section. You can then copy the Purchase Shortcode.
Do you want to know how to create categories and subcategories in WordPress?
In WordPress, your posts can be organized into different categories and tags. You can even create subcategories for further organization. Using categories and subcategories can help your readers find the content they’re most interested in and improve your website’s SEO rankings.
In this article, we’ll show you how to add categories and subcategories in WordPress, step by step.
Understanding Parent and Child Categories in WordPress
Categories are a powerful tool. They’re not just a way to sort your content. They also help you develop a proper site structure that is meaningful and semantic. This is great for your WordPress SEO.
Note: If you’re not clear about the difference between categories and tags, take a look at our guide on categories vs tags. This explains why categories and tags are different, and how to use them correctly.
Now you might be wondering, why and when would someone need to use child categories (subcategories) on their WordPress website?
Let’s say you’re creating a travel blog for different destinations around the world. You might want users to be able to find articles by both country and city.
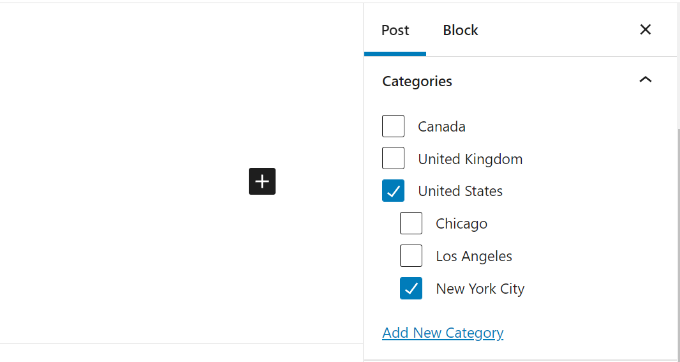
For example, you might have an article about the best waterparks in the United States. It would make sense to use ‘United States’ as the category for that post.
However, you might also have articles about the best places to eat in New York City, Los Angeles, Chicago, and more. This is where you can use child or subcategories. Then ‘United States’ can become a parent category and the cities can become child categories.
A post filed under a child category doesn’t need to also be filed under the parent category. In our example, we could have left ‘United States’ unchecked and just put the post in the ‘New York City’ category.
If you file a post under the child category but not under the parent category, then your post will appear only on the archive pages of the child category.
Having said that, let’s take a look at how to add both regular categories and child categories in WordPress.
Adding a Category in WordPress
You can easily add a new category in WordPress when writing a post.
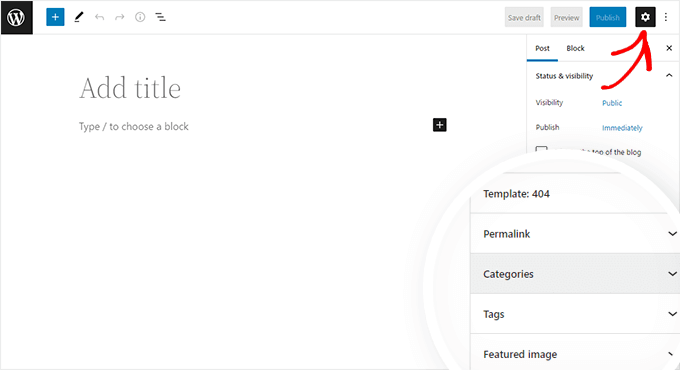
First, if the sidebar isn’t showing when you’re editing a post, you’ll need to click on the gear icon on the top right.
Then, in the Post panel on the right-hand side, open up the Categories tab.
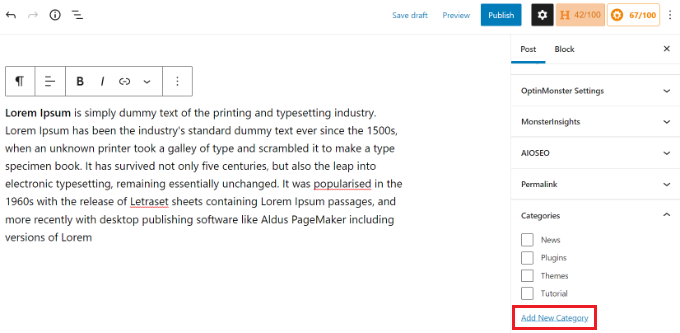
You’ll see different categories that you’ve already created.
However, to create a new category, you can simply click the ‘Add New Category’ link.
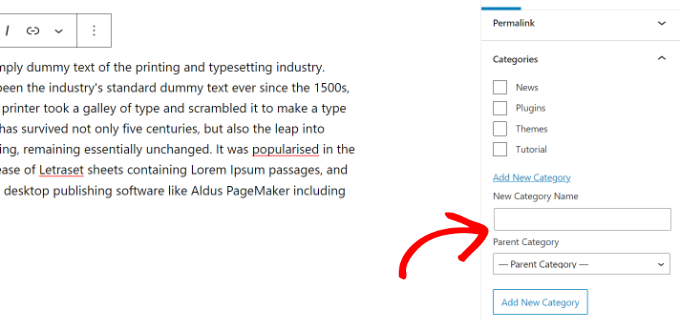
Once you click the link, two new boxes will appear where you can add your category.
For a regular category, you don’t need to select anything from the Parent Category dropdown.
Once you’ve typed in the name for your category, simply click the ‘Add New Category’ button.
The box for that category will then be automatically checked for your current post. You can uncheck it if you want.
You can also add a new category without editing a post.
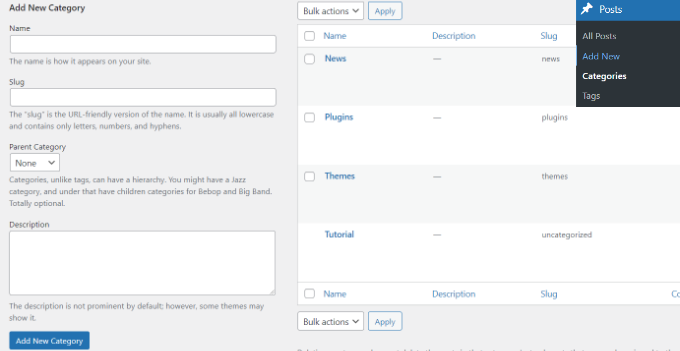
Simply go to Posts » Categories and add your new category. This is handy if you want to create all your categories before adding content.
This method also lets you edit the slug (URL) for your categories. You can delete and rename categories and give them a description. See how to add SEO keywords and descriptions in WordPress.
Adding a Child Category (Sub Category) in WordPress
You can add and edit child categories in exactly the same way you added your parent categories.
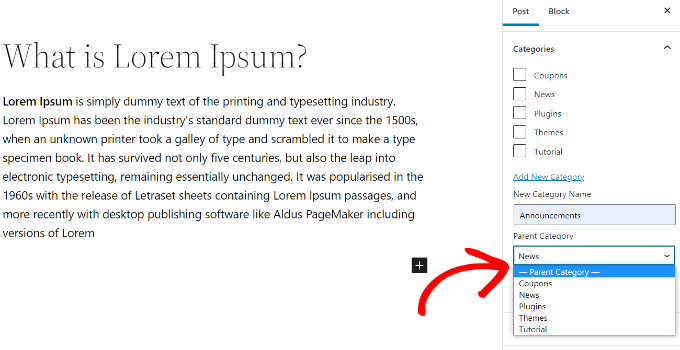
When you’re editing a post, open the settings panel and scroll down to the Categories tab.
Next, click the ‘Add New Category’ option and type in the name for your child category. Then select the category that you want to use as the parent from the dropdown list.
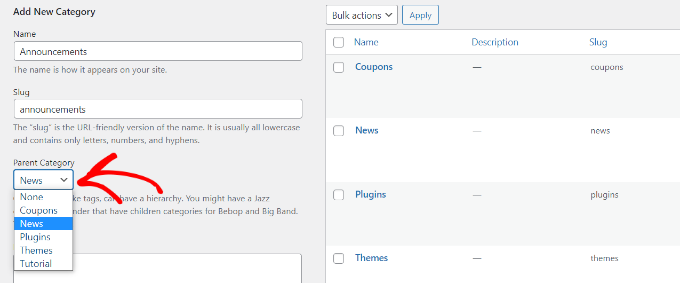
Similarly, you can also go to Posts » Categories to add child categories.
Just type in the name for your child category and select the parent category from the dropdown menu.
Your child categories can also have their own child categories if you want.
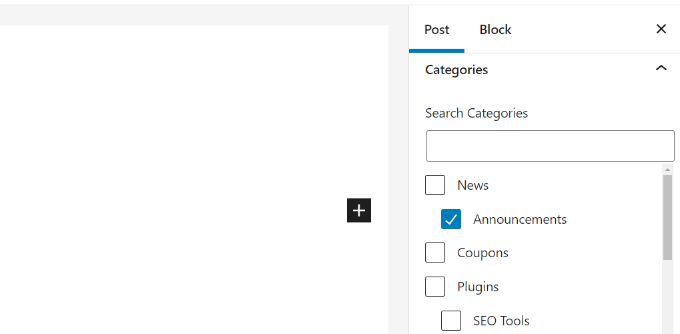
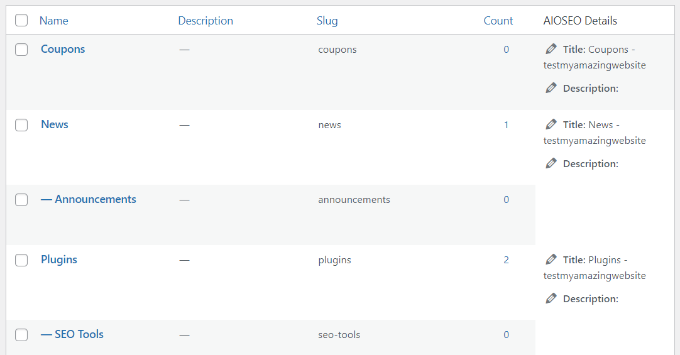
For instance, we might decide to develop a category structure that is used to group multiple types of content together, like this:
Here, News is a category, with the Announcements as child categories.
Categories on the same level within a parent category are sometimes called ‘sibling’ categories. For instance, the Announcements and SEO Tools are sibling categories here.
Categories can only have one parent. You can’t add one sub-category under two different parent categories.
This is meaningful and helps search engines and visitors understand what your page is about. You also get a chance to add keywords to your URL. Keywords help people find content on search engines.
WordPress also allows you to easily change the /category/ prefix of your category URLs. You can even remove it completely if you want.
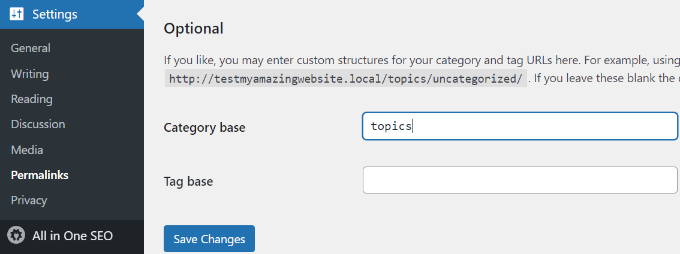
Simply go to the Settings » Permalinks page from the WordPress admin panel and scroll down to the ‘Category base’ section.
Here you can enter the prefix you would like to use and click on the ‘Save Changes’ button to store your changes.
The ‘category’ prefix in your category URLs doesn’t add any benefit to your SEO.
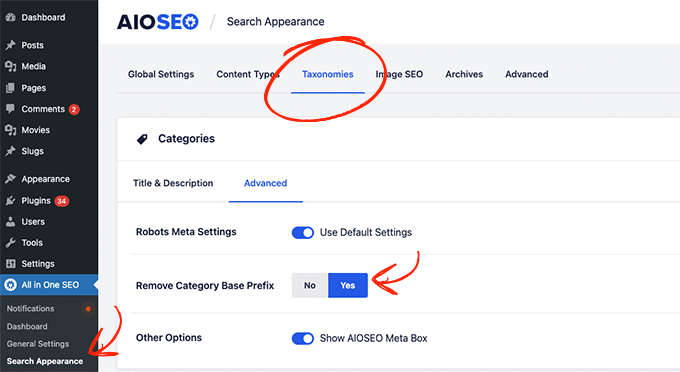
This is why some website owners prefer to remove the remove the word ‘category’ from their WordPress category archive pages’ URLs. You can easily do this by using the All in One SEO plugin, so your category URLs look like this:
http://example.com/united-states/new-york-city/
Simply go to the Search Appearance menu for AIOSEO and then select the Taxonomies tab. Under the Advanced settings for Categories, you will see the option to remove category base prefix.
Alternatively, you can also use the FV Top Level Categories plugin. Simply install the plugin and it will remove the word ‘category’ from your category archive pages’ URLs.
Important: If you decide to change the category base on an existing WordPress site, then you’ll need to set up redirects to avoid 404 errors for search engine visitors. For more detailed instructions, please follow our guide on how to change the category base prefix in WordPress.
How to Display Categories and Child Categories in WordPress Sidebar
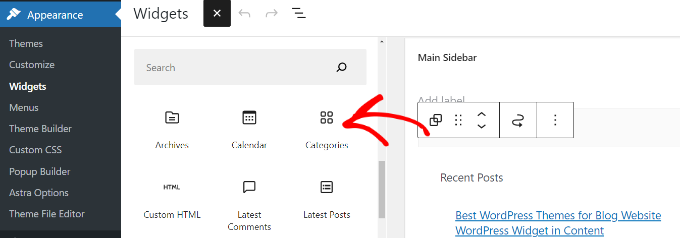
You can add a widget block to your WordPress sidebar or footer to show a list of categories. In your WordPress dashboard, go to Appearance » Widgets.
If you haven’t changed your widgets from the ones that WordPress puts there by default, you should see the Categories widget block already in place. If not, then you can click the ‘+’ button and add a ‘Category’ block to your widget area.
By default, the widget will show all your categories in a flat list, in alphabetical order.
Here’s a preview of how they looked on our test website:
Tip: Categories will only display on the list if you’ve assigned at least 1 published post to them.
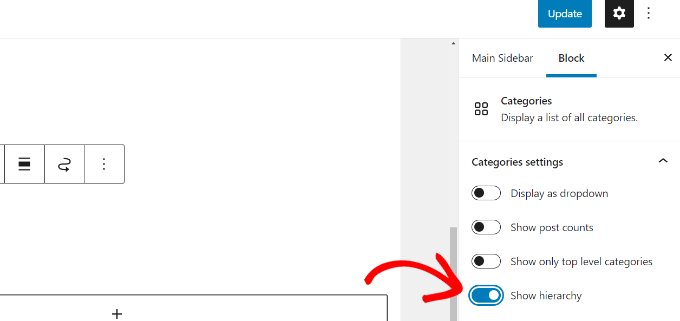
You can change it to show the child categories (subcategories) beneath their parent categories if you want. Simply enable the ‘Show hierarchy’ option in the widget settings like this. Don’t forget to click the ‘Update’ button.
On your site, you should now see your parent categories with the child categories nested beneath them.
Aside from the default category widget block, you can also create custom category menu links using the WordPress navigation menu. After that, you can add that menu to your header menu, sidebar, footer, or other menu locations.
Do you want to add a privacy policy to your WordPress site?
A privacy policy page is a document required by law that discloses the information you collect about visitors on your website. It is recommended to add a privacy policy page to your website whether you are a blogger, freelancer, or business owner.
Now, the problem is most beginners don’t know how to create a legitimate privacy policy and then display it on their website.
In this article, we will show you how to easily add a privacy policy in WordPress.
What Is a Privacy Policy and Do You Need It on Your Website?
All websites collect information about their visitors in different ways.
In many countries (including the United States), websites are required by law to disclose the information they collect about their visitors, and how this information is used.
Here are some of the ways in which a typical WordPress site collects user information:
Other social media platform widgets that track users
Advertising programs like Google Adsense which track users
All websites on the internet should have a privacy policy page. It protects your business from legal issues and also helps build consumer trust.
You also need to add a privacy policy page to comply with the General Data Protection Regulation (GDPR).
For those who don’t know, GDPR is a European Union (EU) law that gives its citizens control over their personal data. This law applies to every business (including WordPress blogs) around the world, even if you are not from the EU countries.
For more details, you may read our ultimate guide on GDPR and understand its impact on your WordPress site.
What Should You Include in a Privacy Policy?
The basic requirements for a privacy policy are quite simple. You need to list all the ways you collect or intend to collect user information on your website.
A simple privacy policy page should contain the following information:
Information you collect about users visiting your website.
Methods used to collect information, e.g. cookies and web beacons, sign up, registration, comment forms, etc.
Mention all third-party advertisers collecting user information on your website like Google Adsense.
Include links to the privacy policy of each advertising program you participate in.
How users can block cookies and opt-out of third party advertisements.
Your contact information so that users can reach out if they have questions.
There are many websites on the internet that allow you to automatically generate text for your privacy policy or terms of service pages.
WordPress itself comes with a basic privacy policy generator that you can use.
You can also take a look at WPBeginner’s privacy policy page as a starting point. Simply replace all references to WPBeginner and our parent company with the name of your website or business.
Adding a Privacy Policy Page in WordPress
WordPress makes it easy to generate a privacy policy page for your website. It also gives you a generic privacy policy template to use with instructions on how to add content to it.
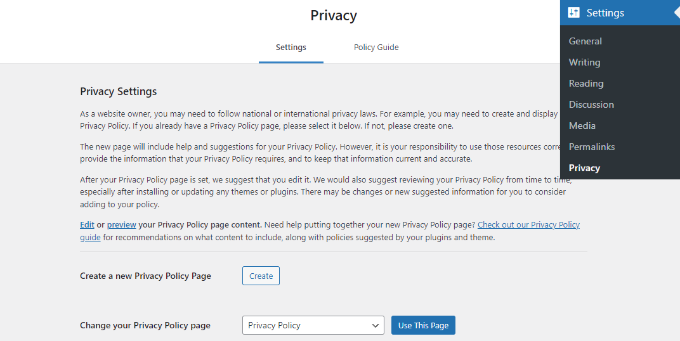
First, you need to visit the Settings » Privacy page. You’ll notice that WordPress has already created a Privacy Policy page draft for you.
You can click on the ‘Use this Page’ button to save this page as your privacy policy.
You can also click on the ‘Create’ button to generate a new Privacy Policy page. WordPress will automatically create a new page and open it for you to make changes.
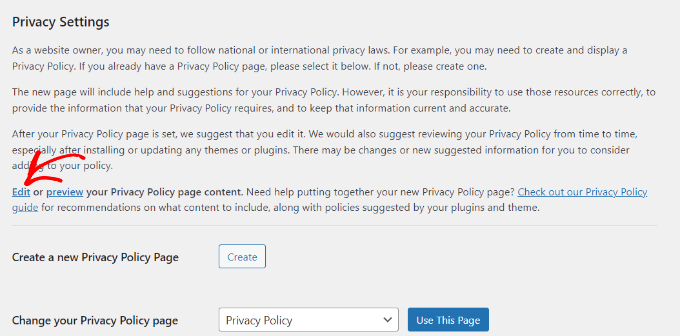
If you are using the default draft, then you need to click on the Edit link to make changes and publish it.
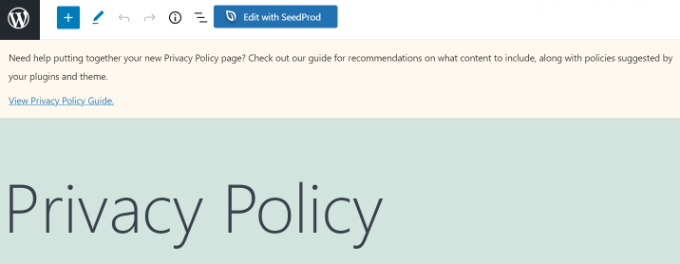
Once you open the privacy policy page for editing, you will see a notification on top with a link to the default WordPress privacy policy page guide.
The content of the privacy policy also contains instructions on how to edit and change each section.
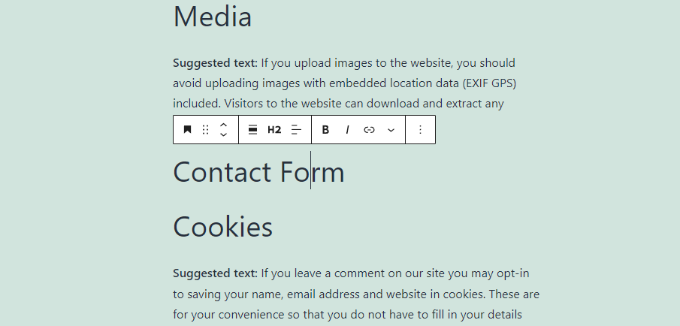
You will notice that it has sections for different ways a WordPress website may collect personal information. For example, it lists comments, login cookies, embeds, and more.
It will also have sections with no information below them, including contact form and analytics.
As for contact forms, you can mention the information you collect and what it is used for.
After thoroughly reviewing the privacy policy page, you can click on the Publish button to save your changes.
Adding a Link to Privacy Policy Page in WordPress
Most websites display a link to their privacy policy page in the footer area of their website. This way the link appears on every page but does not take space in your main navigation menu.
There are multiple ways to do this. Let’s start with the easiest one.
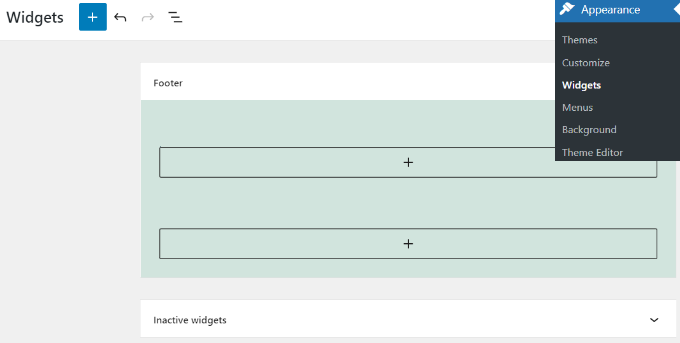
Many WordPress themes come with widget-ready areas in the footer also called the Footer sidebar. You can go to the Appearance » Widgets page to confirm if your theme has a footer widget area.
If your theme has one, then you can use the navigation menu widget to display a list of links to your informational pages including the privacy policy.
First, you will need to create a new custom navigation menu.
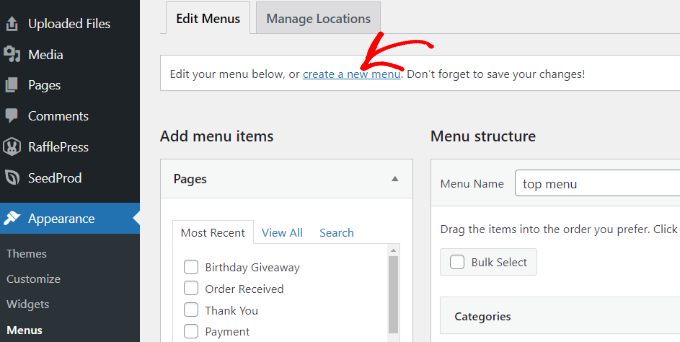
Simply visit the Appearance » Menus page to create a new custom menu. You will need to click on the ‘Create a new menu’ link on the top.
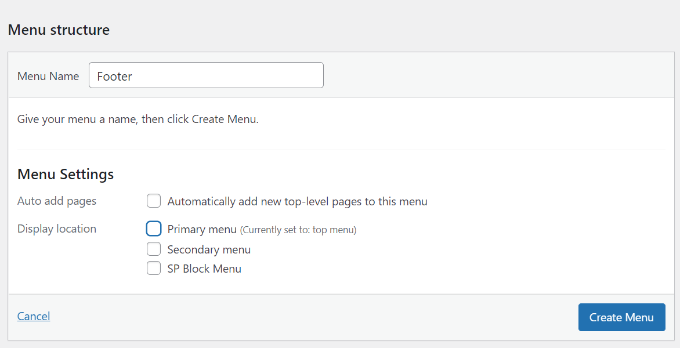
After that, you can enter a name for your menu and then click the ‘Create Menu’ button.
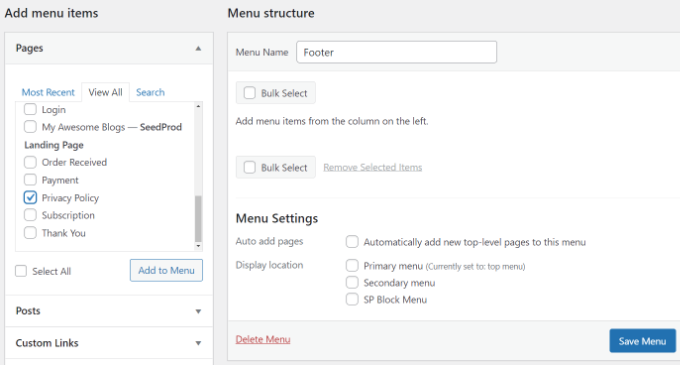
Next, you need to select pages from the left column to add to your menu.
After selecting them, simply click on the ‘Add to Menu’ button.
You should notice your selected pages appear under your newly created menu. You can now arrange menu items by clicking and dragging them up or down.
Once you are done, don’t forget to click on the ‘Save Menu’ button to store your changes.
For more help with creating menus, you can see our beginner’s guide on how to create navigational menus in WordPress.
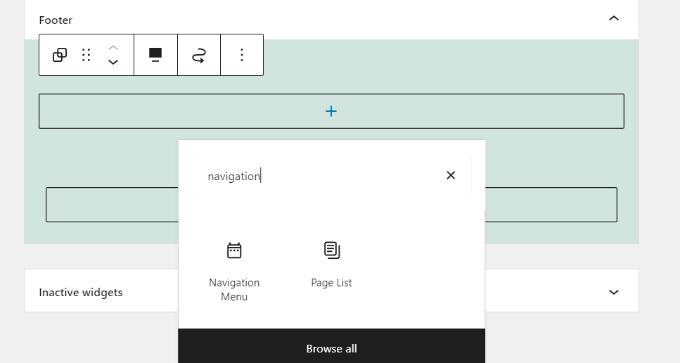
Now go to the Appearance » Widgets page and then click the ‘+’ button to add a ‘Navigation Menu’ widget block.
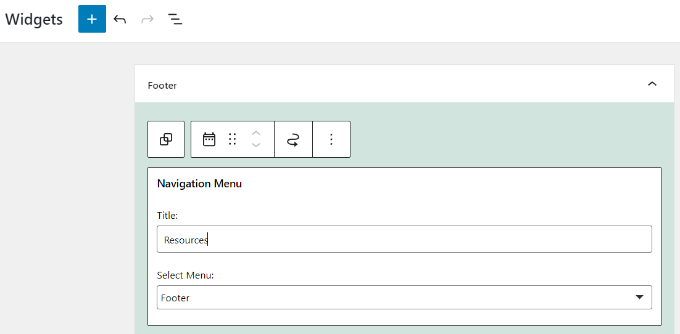
Next, you can optionally enter a title for your widget.
Then select your menu from the dropdown menu.
Once you’ve made the changes, don’t forget to click the Update button on your widgets page.
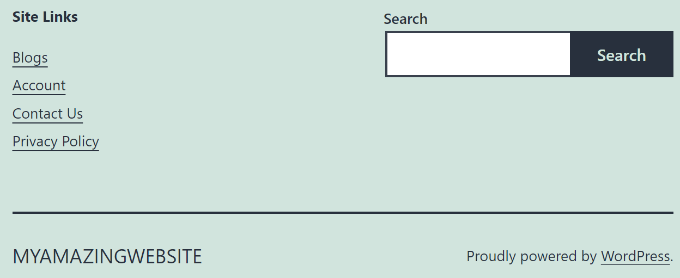
You can now visit your website to see the privacy policy links in the footer area of your website.
Manually Add a Link to Privacy Policy Page in WordPress
If your theme does not come with a footer widget area or a footer navigation menu, then you can manually add link to your privacy policy page using HTML code.
You’ll need to edit the footer.php file for your theme. If you haven’t done this before, then take a look at our guide on how to copy/paste code in WordPress.
In your footer.php file, add the following HTML to an appropriate location just before the </body> tag.
Don’t forget to replace the href value with the URL of your privacy policy page. You can now save your changes and preview your site to see the link in action.
That’s all! You have successfully added a privacy policy page to your WordPress site.
We hope this article helped you learn how to add a privacy policy in WordPress. You may also want to see our step-by-step WordPress SEO guide for beginners.
If you liked this article, then please subscribe to our YouTube Channel for WordPress video tutorials. You can also find us on Twitter and Facebook.
Creating a New Post in WordPress Using The Default Editor
In December 2018, WordPress introduced a new modern block-based editor also known as Gutenberg. It is clean and simple, but don’t let the looks deceive you.
Behind its clean interface, there are tons of powerful features neatly tucked away. We’ll explain all of them and help you unlock its true potential.
Adding Title and Content Blocks
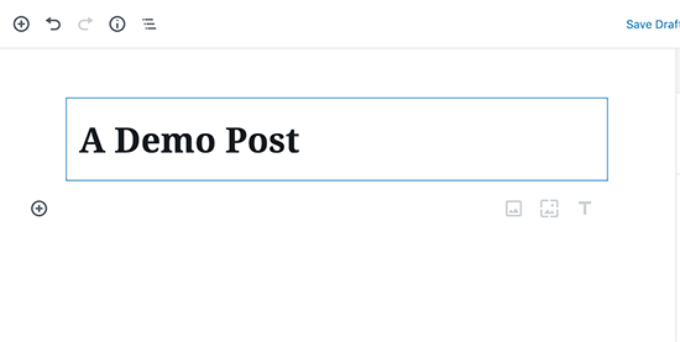
The WordPress block editor comes with a clean writing interface. At the top, you will enter your post’s title.
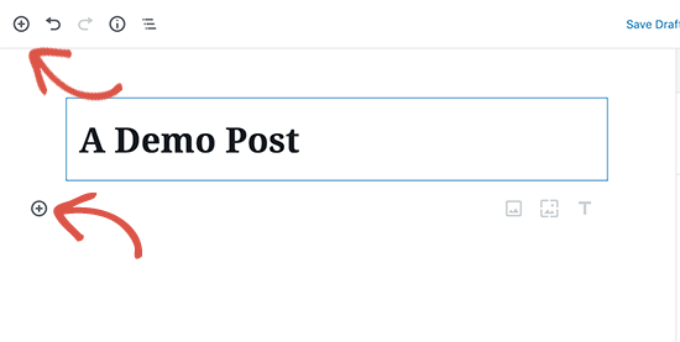
To add content, you need to add a block. There are multiple add block buttons on the screen that you can click to select and add a block.
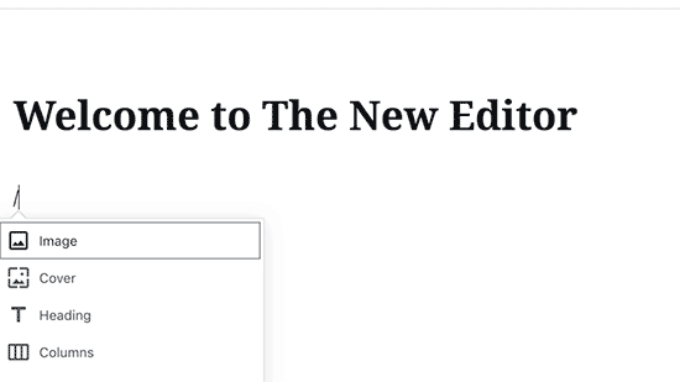
If you don’t want to use a mouse to click on the button, then you can use a keyboard shortcut by typing / to search and add a block.
All content elements are wrapped in a block. WordPress comes with blocks for all the common content items including paragraphs, columns, images, galleries, embeds, shortcodes, widgets, and more.
Some WordPress plugins may also add their own blocks to add other features like contact forms, SEO, etc (more on this later in the article).
Adding Images, Videos, & Other Media
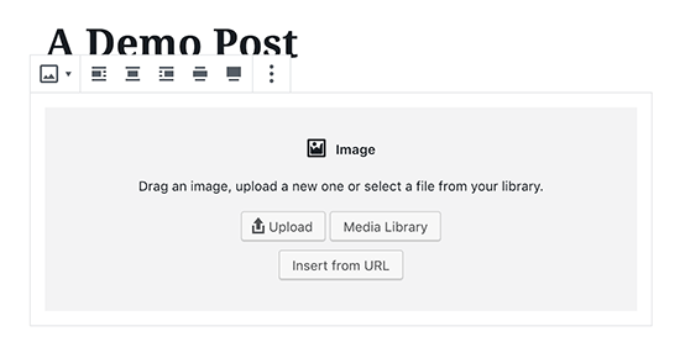
You can add images by simply adding the image block and then upload or select the image you want to add.
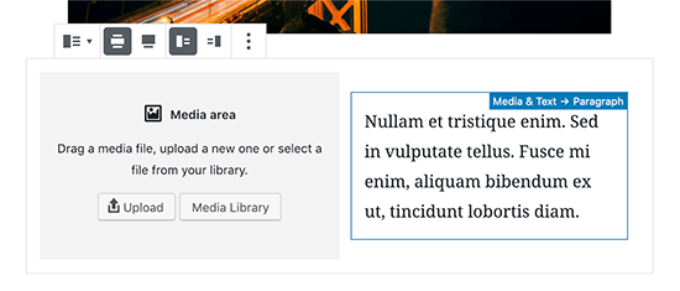
If you want to text and image next to each other, then you can use the ‘Media & Text’ block. This block helps you wrap text around the image in WordPress.
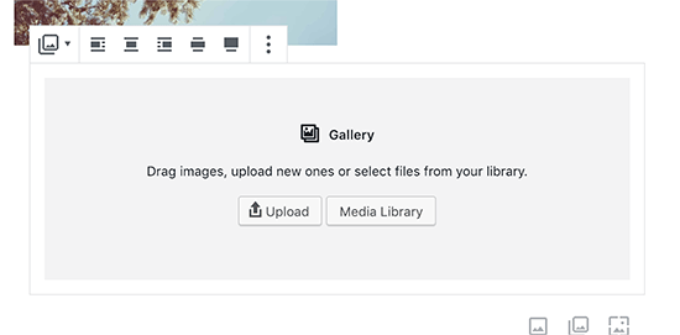
WordPress editor also comes with a Gallery block that you can use to display images in rows and columns with a grid layout.
Simply add the Gallery block and then upload or select the images from your WordPress media library.
While the gallery block is powerful, you may need other advanced gallery features like albums, image sorting, etc. In that case, we recommend using one of these WordPress gallery plugins.
Want to embed a video in your content? No problem.
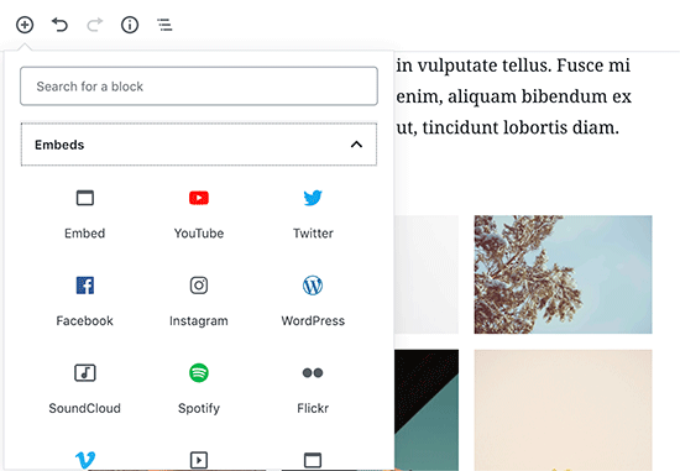
The default WordPress editor comes with embed blocks for all popular providers.
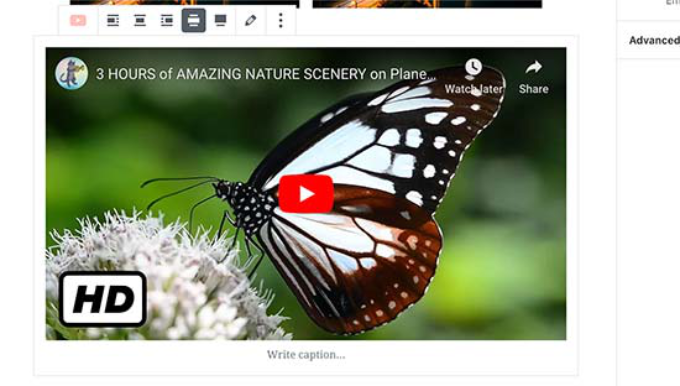
You can also just copy and paste the video URL to a paragraph block, and WordPress will automatically convert it into a video embed block.
While you use the video block to upload videos directly to your website, we recommend against that because it will slow down your website and can even crash your WordPress hosting server.
Instead, we recommend uploading your videos on a service like YouTube or Vimeo, and then embed it in your WordPress posts.
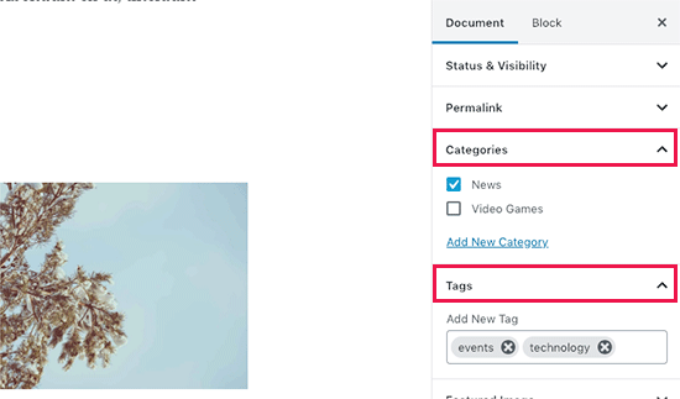
WordPress allows you to sort your posts into categories and tags. These taxonomies help you organize your content into sections and topics.
They also help with SEO and make it easier for your users to find the content they are looking for.
The categories and tags meta boxes are located in the right-hand column, under the Document settings.
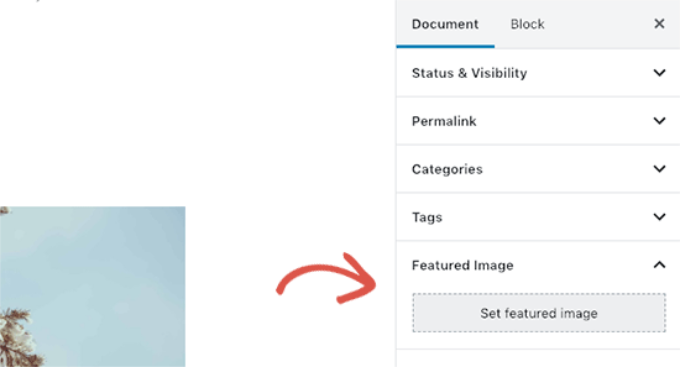
Adding Featured Image
A featured image (also known as post thumbnail) is the main article image that represents the content. They’re prominently displayed on your website on single posts, blog archive pages, as well as on the homepage of news, magazine, and blog websites.
Almost all WordPress themes support the featured image functionality. You will find the option to add a featured image to your post in the right column under the Document settings.
Simply click on the ‘Set featured image’ button and then select or upload the image you want to be used as the featured image.
It’s important that you don’t confuse featured images with cover images which is a new feature. See our article on cover image vs featured image for more details.
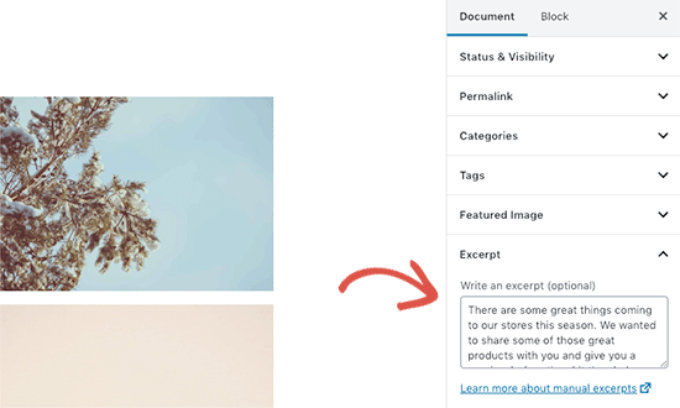
Adding Excerpts (Article Summary)
Excerpts are the summary of a blog post or article. Most WordPress themes can automatically generate the excerpt from the first few lines of your post.
However, this automatic excerpt may not always be meaningful or catchy. In that case, you may want to manually add an excerpt.
You can do so by adding it in the excerpt box located under the document settings column on the right.
Changing Post URL Slug or Permalink
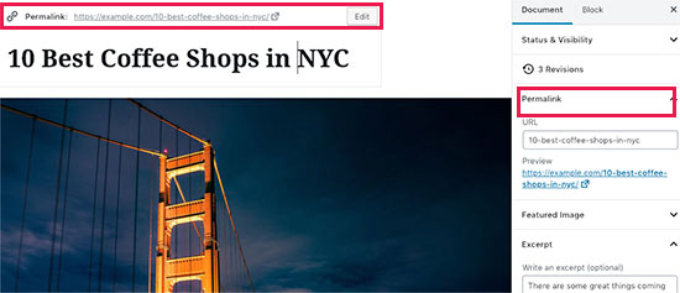
By default, WordPress uses SEO-friendly URLs for your blog posts. It automatically uses your post’s title as the permalink.
However, some users may want to change it to be more SEO and user-friendly. There are two ways to do that.
You can click on the post title, and you’ll notice the option to change the permalink above the title field. Alternatively, you can change it from the Permalink tab under the document settings column.
Changing Author
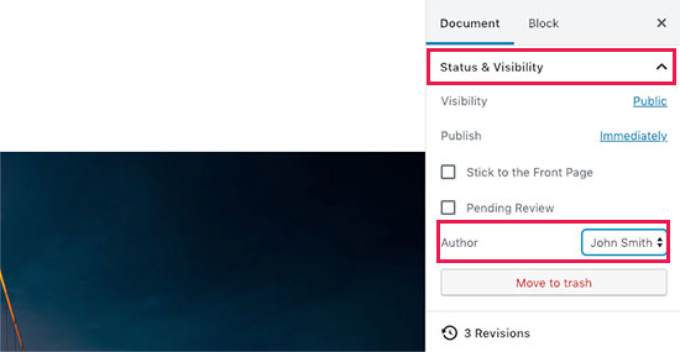
If you run a multi-author WordPress site, then you can also change a post’s author and assign it to a different author on your website.
You will find the option to change author under the ‘Status and Visibility’ tab in the right column.
Turn Comments On / Off
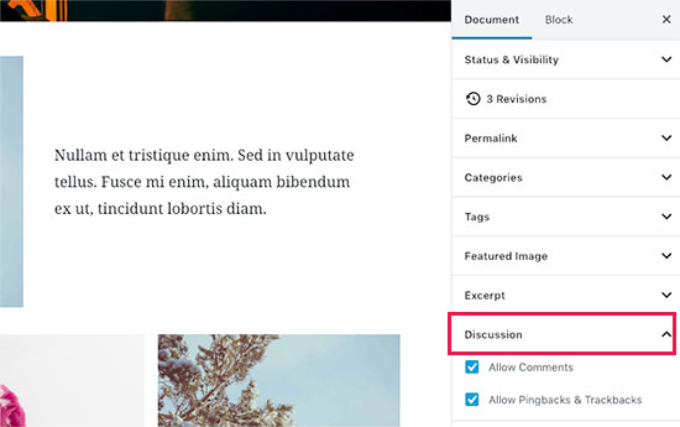
WordPress comes with a built-in commenting system that allows users to leave comments on your post. You can turn off comments for individual posts from the Discussion tab under the Document tab.
You’ll also see the option to allow pingbacks and trackbacks. These allow you and other blogs to notify each other when they link to an article.
However, it is mostly used for spam, so we recommend completely disabling pingbacks and trackbacks.
Options Added by WordPress Plugins
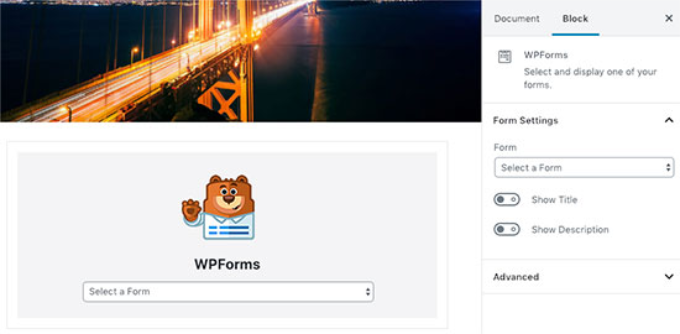
Most popular WordPress plugins will also add their own options to the post edit screen. Some will be available as blocks while others will be available as meta boxes.
The default WordPress edit screen is divided into two columns. The left column is where you write content, and the right column has all post settings including publishing options.
Let’s take a look at publishing options in the right column.
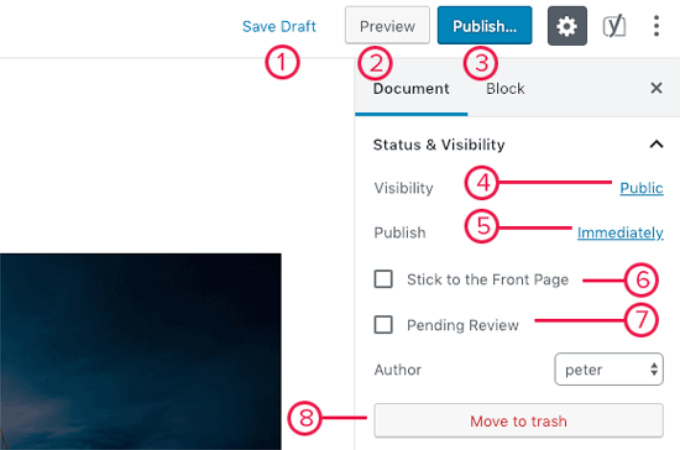
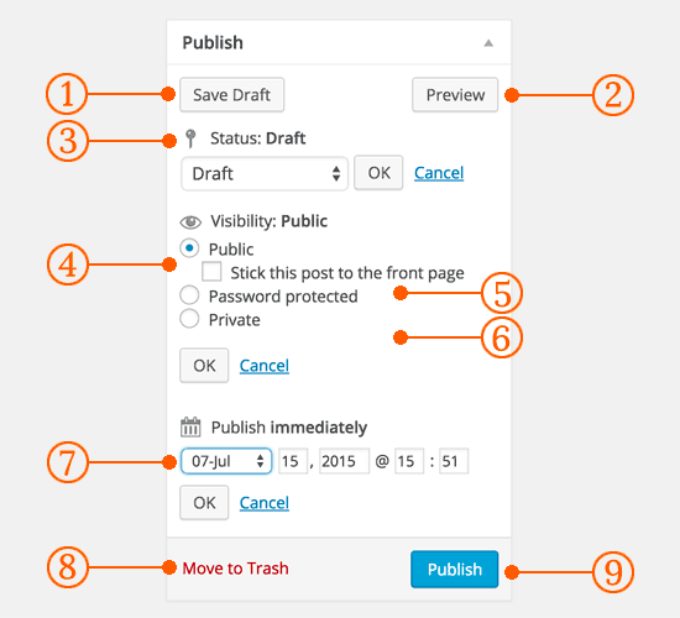
1. Save draft link allows you to quickly save changes you made to a WordPress post. The editor will also automatically save your changes as you write.
2. The preview button will open a live preview of your post or page in a new browser tab.
3. Once you are done editing your post, you can click on the Publish button to make your post go live.
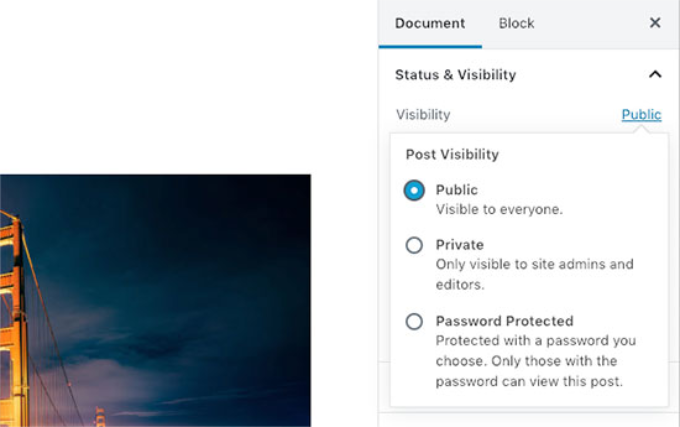
4. WordPress gives you a few options to control the visibility of your post. The default option is ‘Public’ but clicking on it will show you options to make a post private or password protected.
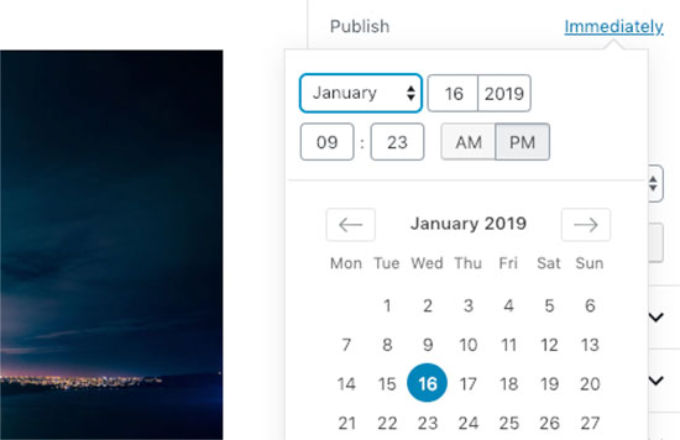
5. WordPress also allows you to control when a post is published. The default option is to publish immediately, but you can also schedule your posts to publish later or even select a past date.
6. Checking the box next to ‘Stick to front page’ will make a post sticky or featured. This makes the specific post appear on top of other posts.
7. Pending review option will add a custom status next to your post as ‘Pending review’. This feature is particularly helpful on multi-author blogs where contributors can just save posts and not publish them.
8. If you want to delete a post, then you can click on the ‘Move to trash’ button. WordPress will send the post to the trash. Deleted posts will remain in the trash folder for up to 30 days. After that, they will be deleted permanently.
Edit Screen Options
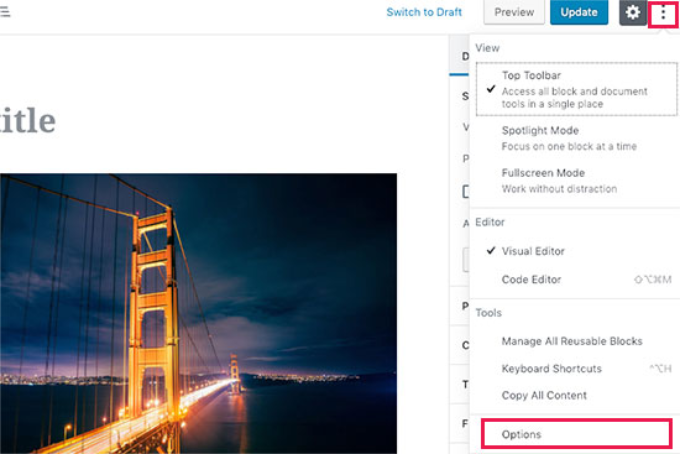
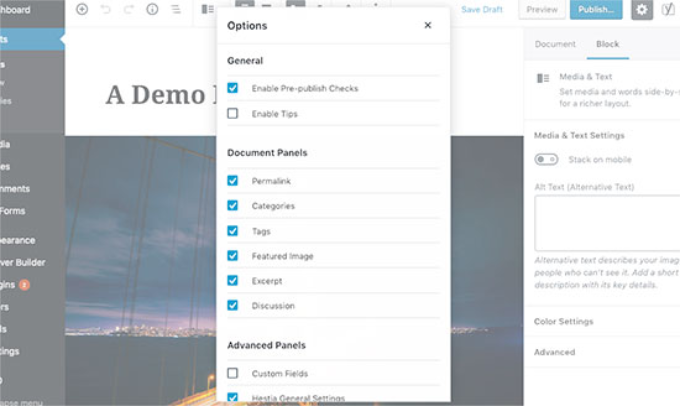
WordPress allows you to show and hide panels from the edit screen. You can do so by clicking on the three-dot menu at the top-right corner of the screen and then clicking on the ‘Options’ button.
This will bring up a popup where you can check or uncheck the panels.
Other Post Edit Screen Options
There are many other options on the post edit screen. Most of them are related to the appearance of the post edit screen and the editor itself.
Let’s explore them.
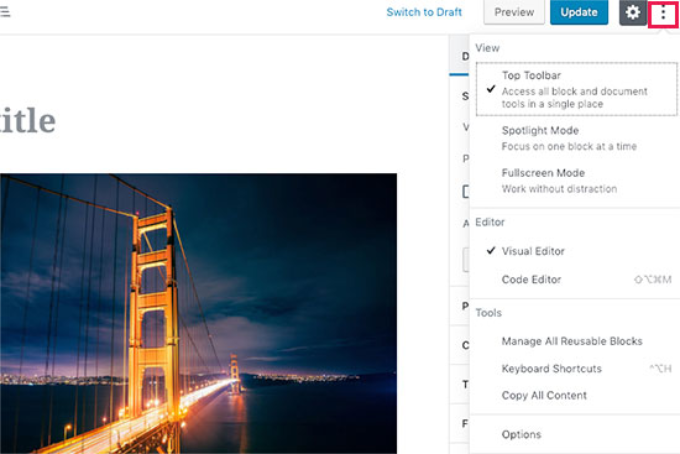
When you click on the three-dot menu icon at the top right corner of the screen, you will see options to move block toolbar to the top, spotlight mode, fullscreen mode, switch between visual editor or code editor, manage reusable blocks, and keyboard shortcuts.
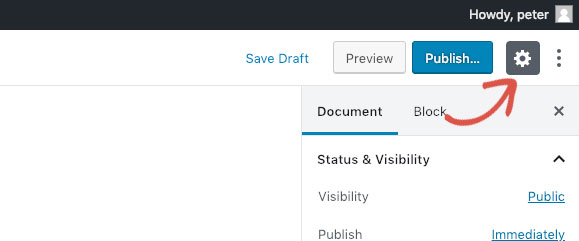
Next to it, you will see a button with the gear icon. Clicking on it will show/hide the right document and block settings column.
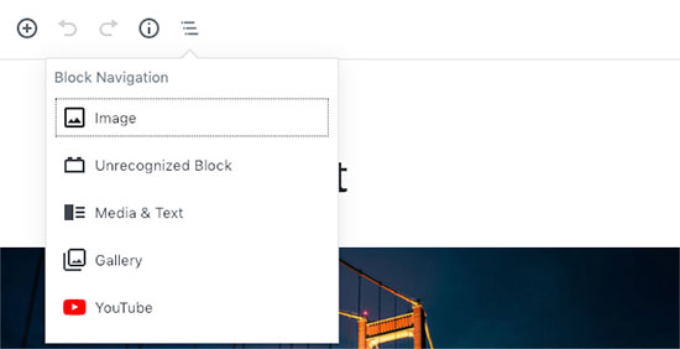
On the top-left corner of the screen, there are a few more buttons. First, from the right, you will see the block navigation button which allows you to quickly jump to a block in your post.
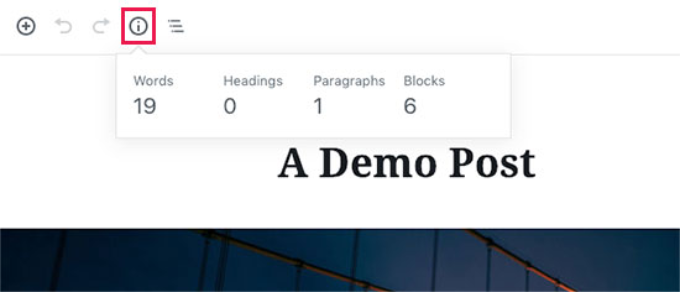
Next, you will see the information icon. Clicking on it will show you post stats like the number of words, paragraphs, headings, and blocks.
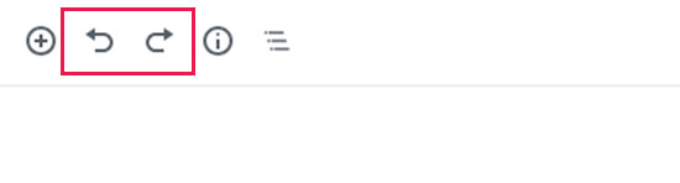
After that, you have Undo and Redo buttons which allow you to undo changes you made to your posts before saving or publishing them.
Finally, you have the add block button which allows you to insert blocks to the post editor.
The default WordPress editor is quite powerful.
We encourage you to explore it on your own when writing blog posts and pay attention to the individual block settings. Each block has different settings, and you’ll discover a lot of neat tricks there.
Creating a New Post in WordPress Using The Classic Editor
The classic editor will be supported until the end of 2021, and we strongly recommend all users to create a plan for switching to the new WordPress editor.
Title and Content Boxes
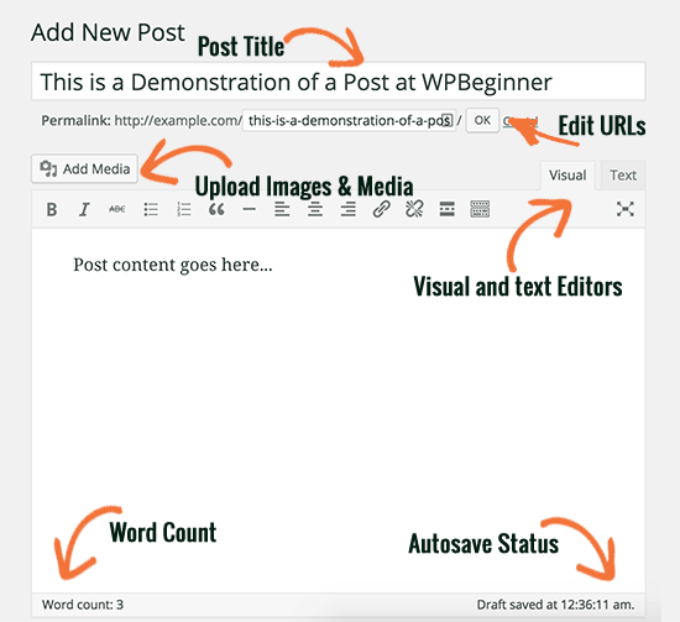
In the classic editor, title and content boxes are the most noticeable areas on the Add New Post screen (see the screenshot below).
Yours might look slightly different depending on whether you are using the visual or the text editor.
You can switch between visual and a text editor while writing a post, but we do not recommend switching as this could mess up your post’s formatting.
Visual Editor is a beginner-friendly text editor with formatting buttons and a nice visual layout for the content area. On the other hand, the text editor is a plain text editor where you can actually see the HTML or write your own.
The first text area on the top is where you add the post title. If you are using SEO Friendly URL structure, then WordPress will auto-generate the post URL based on your title. You can edit the URL by clicking on the edit button.
The content area is where you will write your post. You can use the formatting options from the toolbar or use one of the many keyboard shortcuts available which will speed up your writing process.
In the footer area of the content editor, WordPress will show you the word count for your post. This is especially useful if you’re writing a guest post or an article that needs to meet a certain number of words.
As you write, WordPress will automatically save a draft of your post. This autosave is stored in your WordPress database temporarily.
As soon as you save your draft or write more content, WordPress cleans up your autosave temporary draft and replaces it with a new one. This process ensures that you do not lose your content due to an internet connection or hardware failure. See our guide on how to undo changes in WordPress with post revisions.
The post editor shows your current draft and autosave status in the footer next to the word count.
Add Images and Media
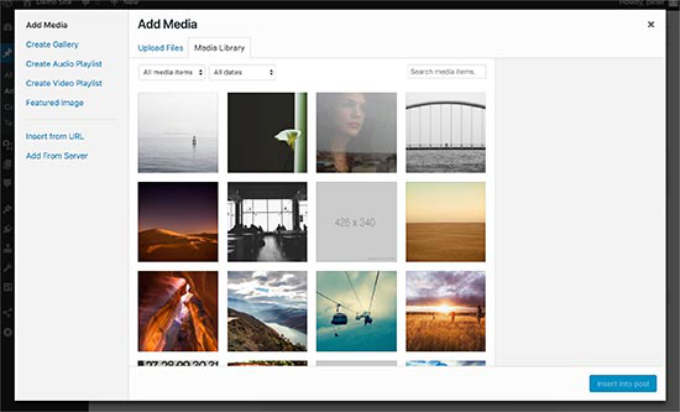
Between the title and content fields, there is a large Add Media button. You will need to click on it when you want to upload an image or any other media to your WordPress post. This will launch the media uploader in a popup window.
Simply click on the select files button to upload images or any other media to your WordPress site. You can also create image galleries from uploaded files.
The WordPress post edit screen is divided into two columns. The column on your left contains the post title and content editor. On your right-hand side, you have different meta boxes to configure post settings.
The top meta box in this column is labeled Publish. This is where all the publishing options for your posts are managed.
1. Save Draft button stores a draft of the post or page that you are working on. WordPress also auto-saves your posts as you write them.
2. Preview button shows a live preview of your post. You can use it to see how your post will look after publishing.
3. Status allows you to set a status for your post. WordPress automatically handles post status for drafts and published posts. Unless you are using a plugin to add custom statuses, you don’t need to worry about this option.
4. Click on the Edit link next to visibility to expand it. The first option under visibility will allow you to make your post sticky on front-page. Sticky posts in WordPress are like featured content that are displayed on top of all other posts.
6. The third option under visibility is labeled private. This allows you to privately publish a post on your WordPress site. The private posts will be visible to users who have the editing privileges on your site.
7. Click on the edit link next to Publish, and WordPress will display the time and date options. You can use this option to schedule posts or create back dated post in WordPress.
8. Move to trash allows you to delete a WordPress post. Deleted posts live under trash, and you can restore them if you need to for up to 30 days.
9. Finally, the publish button makes your WordPress post public. Remember if you scheduled a post, then it will appear on your site on the scheduled date and time.
Adding Categories and Tags
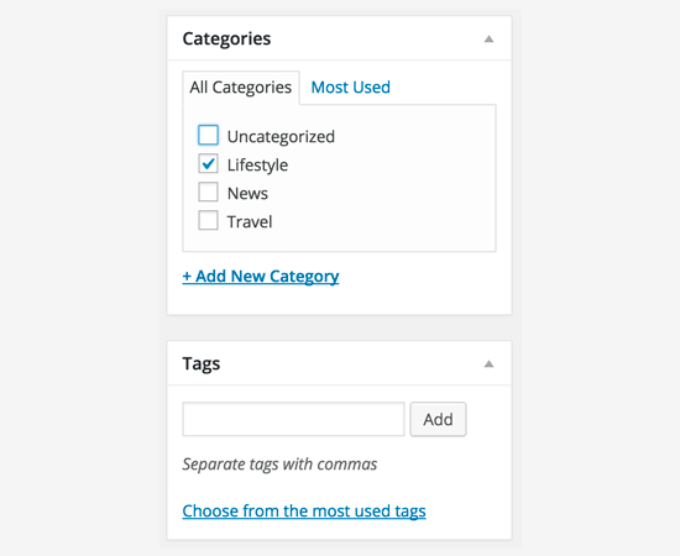
You can sort your posts into categories and tags. The categories and tags meta boxes usually appear in the right-hand column below publish meta box.
Categories and tags help you organize your content in a meaningful and browsable format.
Not only does it help users easily find your content, but it also boosts your site’s SEO. See our guide on the difference between categories and tags and how to use them to sort your content.
Featured Image (Post Thumbnails)
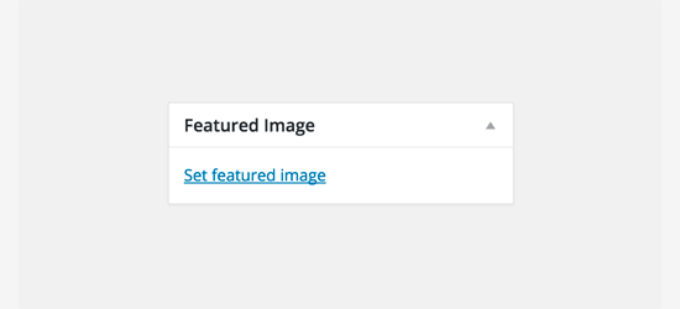
Most WordPress themes support featured images or post thumbnails for articles. Usually, it is the last box in the right column on your post edit screen.
Simply click on the set featured image link, and it will bring up the media uploader popup. You can select an image from your previous uploads or upload a new image from your computer.
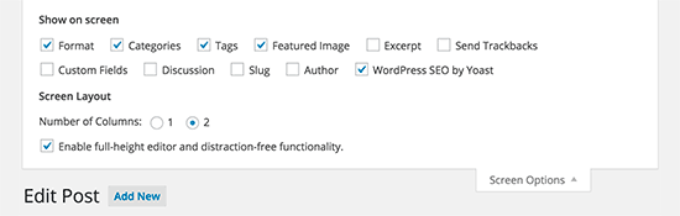
Some of the options on the post edit screen are hidden by default to present a cleaner and simpler editing experience. These options are not commonly used by beginners. However, you may need them later.
Simply click on the Screen Options button on the top right corner of the page. This will show a menu with checkboxes next to option names.
As you can see some of the options will already be checked. For the others, you can display them by clicking on the checkbox next to an option name, and it will appear on your post edit page.
Let’s take a look at some of these options and what they do.
Excerpts
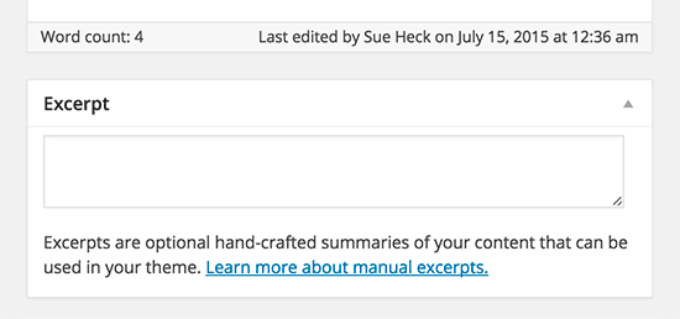
Checking this box adds a meta box below your content editor. You can use this box to add a short summary or excerpt for your post.
Ideally, you should display a summary or excerpt for your posts on your site’s front page and archives. Full content should only be displayed on the post’s single page.
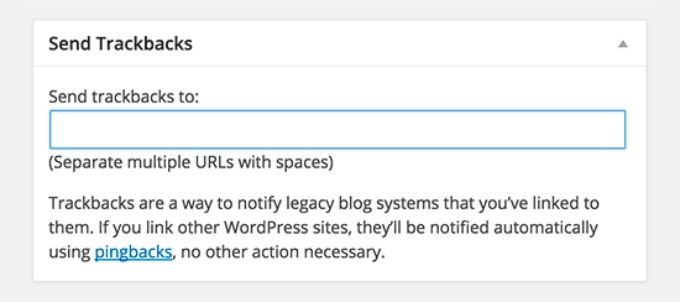
Send Trackbacks option allows you to notify other blog owners that you have linked to their content.
If the other blog owner is running WordPress, then you don’t need to send them trackbacks. Your WordPress site will automatically send them a ping when you publish the post.
Trackback feature is misused by spammers so much that many site owners simply disable them. We have an article on dealing with trackback spam in WordPress.
Custom Fields
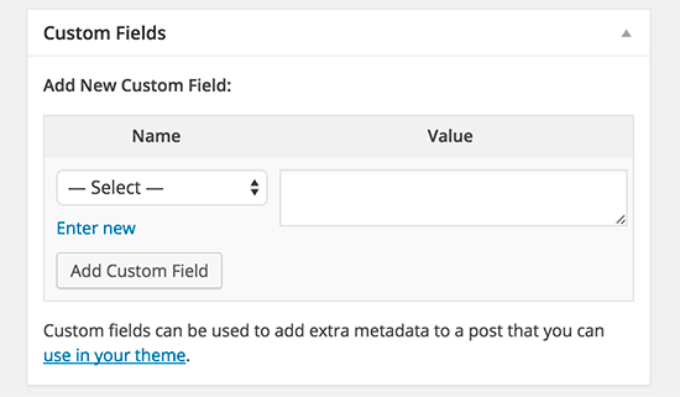
This option will display a user interface for custom fields below your post editor. You can use it to manually enter custom information in your posts. See our WordPress custom fields 101 guide for beginners to learn more.
Discussion
While comments are a great way to engage your audience, sometimes you may not want to have comments on a specific post or a page.
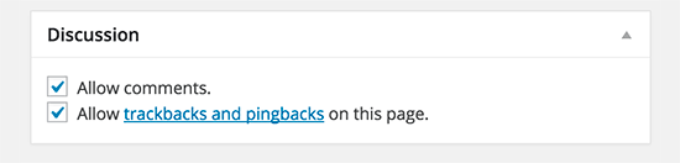
The discussion option displays a meta box below the post editor to turn on/off comments and pingbacks for your post.
Since pages are supposed to be like static pages, most users want to turn off comments on them. You can do so by editing each page, or you can see this tutorial to turn off/disable comments on WordPress pages.
Once your WordPress site gets some reputation, you will start getting an increase of comment spam. Instead of turning off comments, you may want to try these tips and tools to combat comment spam in WordPress.
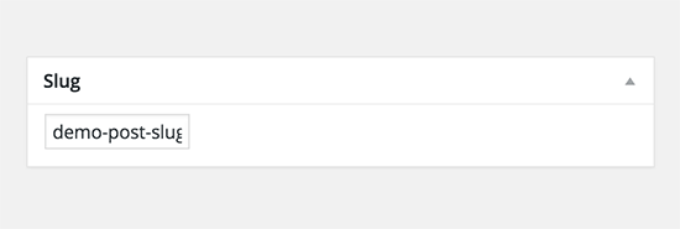
Slug
A slug is a cleaner title that can be used in URLs.
http://example.com/2015/07/this-is-post-slug
WordPress automatically generates a post slug and displays it as the post URL just below the post title. You can edit the URL slug by clicking on the edit link below the post title.
You can also enable the slug option from the Screen Options and edit your post slug there.
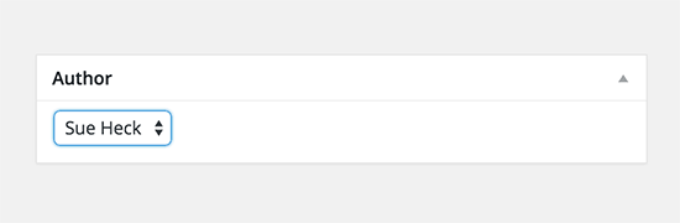
Author
WordPress will automatically assign you as the post author when you create a post.
However, sometimes you may want to show another user on your WordPress site as the author. Enabling the author checkbox allows you to do that from the post edit screen.
Bonus Tips for Creating Better Blog Posts
The reason why WordPress is the most popular blogging platform is because it comes with a great set of tools right out of the box to help you create new content.
However, there are many other tools and tips that you can use to improve your blog content.
The first tip we offer to everyone who’s just starting a blog is consistency. Make sure that you regularly publish blog posts. You can plan an editorial calendar and then stick to it.
We recommend starting with 1 – 2 posts a week and then gradually increasing your pace.
Often new users struggle with finding post ideas for their blog. Here is a massive list of blog post ideas that you can use to get started.
You’ll also need to learn how to promote your posts and keep track of things. Our team has picked the best content marketing tools that will help you grow your blog.
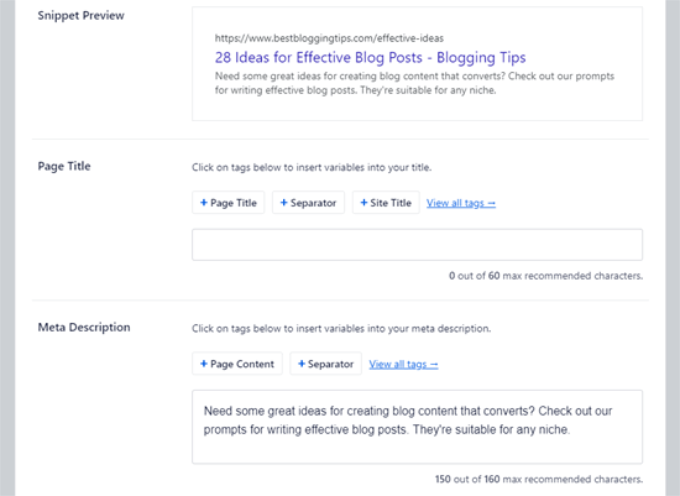
Lastly, you can optimize your website for search engines like Google. This is where AIOSEO comes in handy, as it helps with search engine optimization (SEO) without any technical knowledge. You can rank for different keywords and drive organic traffic to your blog.
Often users ask us what’s the difference between posts vs pages, and which one is better for SEO? The simple answer is that it depends. Posts are timely content organized in a reverse chronological order which is why they’re called blog posts.
Pages on the other hand are static content such as your about page, contact page, etc. The process of adding a new post or page in WordPress is exactly the same.
We hope this article helped you learn how to add a new post in WordPress like a pro. You may also want to see our essential WordPress SEO guide for and the best email marketing services for small businesses.
If you liked this article, then please subscribe to our YouTube Channel for WordPress video tutorials. You can also find us on Twitter and Facebook.
Do you want to add a background image to your WordPress site?
Background images can make your website look more engaging and vibrant.
In this article, we will show you how to easily add a background image to your WordPress site.
Why Add a WordPress Background Image?
Adding an image to your WordPress website can make it more attractive to visitors. You can quickly grab users’ attention and engage them with your content.
It also allows you to personalize your website design according to your brand. For example, you can upload subtle photos of your products or brand mascot in the background.
However, we do suggest selecting background images that are not distracting or make it hard to read the content on your WordPress blog. A background should enhance the user experience and help deliver your message to visitors.
It’s also important to choose a background image that’s mobile friendly and won’t impact your website speed. Otherwise, it will hurt your WordPress SEO.
That said, let’s look at different ways you can add a WordPress background image. We’ll cover multiple methods including the use of the WordPress theme customizer, full site editor, a plugin, theme builder, and more.
Simply click a link below to jump ahead to your preferred section:
Method 1. Add a Background Image Using Your WordPress Theme Customizer
Most popular WordPress themes come with custom background support. This feature allows you to easily set a background image, and we recommend this method if your theme supports it.
However, if your customizer menu option is missing, then your theme may have full site editing enabled. In the next section, we’ll cover how to use the full site editor to change your background image.
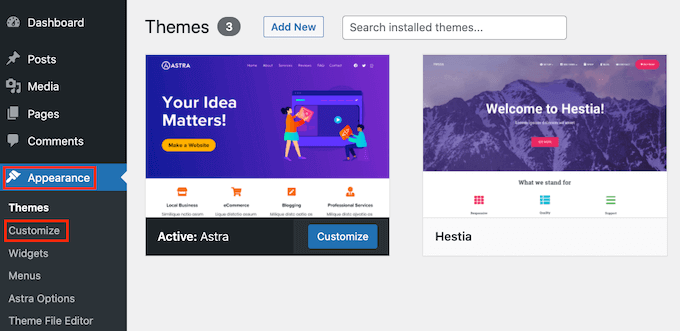
To use the Customizer, you need to visit the Appearance » Customize page in your WordPress admin. This will launch the WordPress theme customizer where you can change different theme settings while viewing a live preview of your website.
An important thing to remember is that the options you see will vary based on the WordPress theme you’re using. For this tutorial, we are using the Astra theme.
If you’re using a different theme, then you may need to look up that theme’s documentation or contact the theme developer to find out how to add a background image if you can’t find it in the customizer.
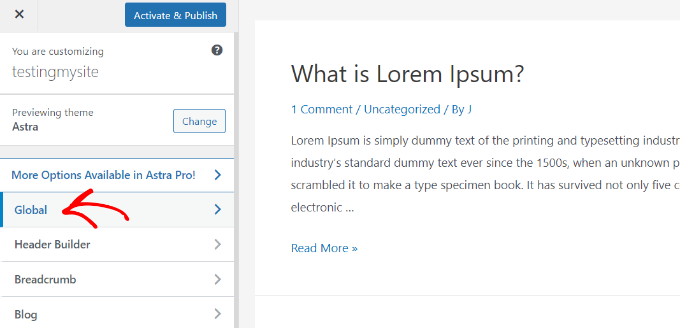
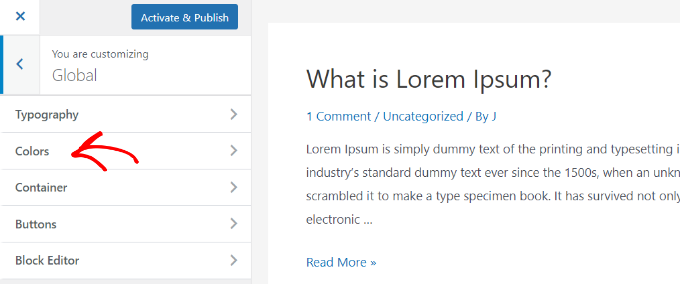
In the Astra theme’s customizer options, you need to click on ‘Global’ in the panel to the left.
After that, you’ll see different Global options to customize your Astra theme.
Go ahead and click into the ‘Colors’ section.
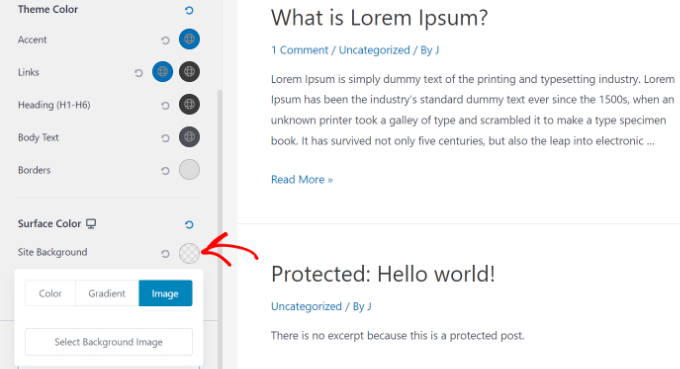
Here, you can change the theme colors, including the background color. You can also customize your links, body text, headings, borders, and more.
To add a background image, scroll down to the ‘Surface Color’ section. Then you can click on the ‘Site Background’ option and switch to the ‘Image’ tab.
After that, simply click the ‘Select Background Image’ button.
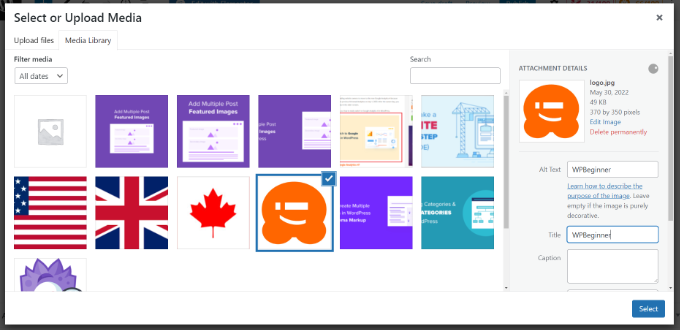
This will bring up the WordPress media library, where you can upload an image from your computer or select one you have previously uploaded.
After you have chosen the image for your background, you need to click on the ‘Select’ button.
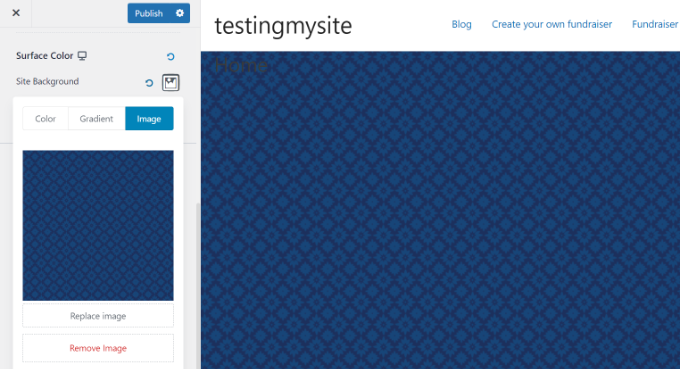
This will close the media popup, and you will see a preview of your selected background image in the theme customizer.
Don’t forget to click on the ‘Publish’ button at the top to store your settings.
That’s all. You have successfully added a background image to your WordPress site. Go ahead and visit your website to see it in action.
Method 2. Add a Custom Background Image Using Full Site Editor
If you’re using a block-based WordPress theme, then you can add a custom background image using the full site editor (FSE).
The full site editor allows you to edit your website design using blocks. It is just like editing a blog post or page using the WordPress block editor.
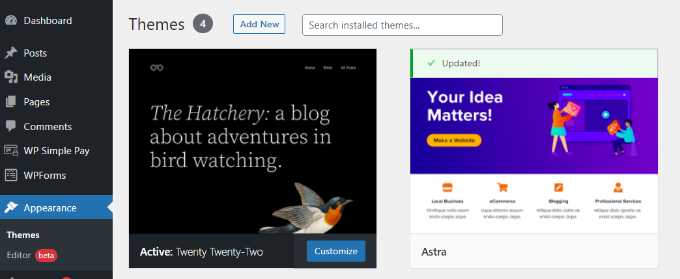
For this tutorial, we’ll use the default Twenty Twenty-Two theme. To launch the full site editor, simply go to Appearance » Editor from your WordPress dashboard.
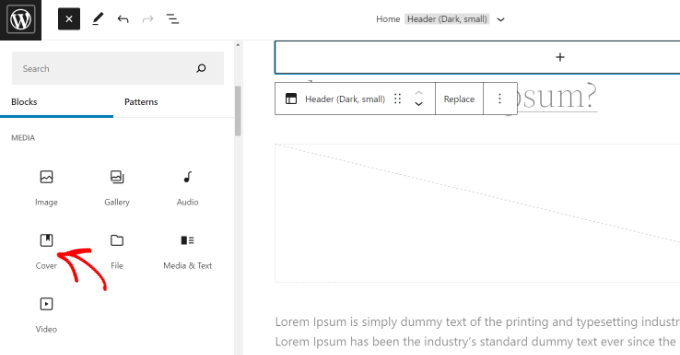
Once you’re in the full site editor, you’ll need to add a Cover block to your template to upload a background image.
Simply click the ‘+’ sign at the top and add a Cover block.
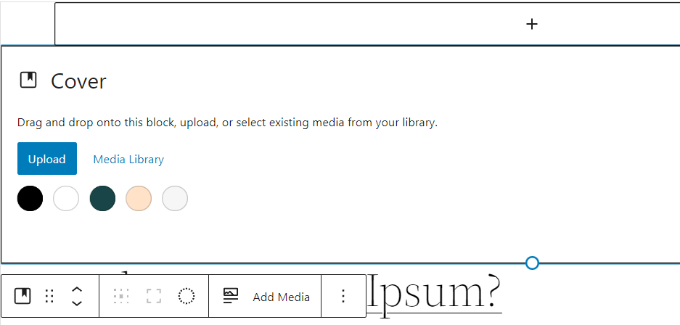
Go ahead and click ‘Upload’ or ‘Media Library’ button in the Cover block to add a background image to the block.
This will open the WordPress media uploader popup.
You can choose an image that you’d like to use as the website background.
When you have chosen the image, simply click on the ‘Select’ button.
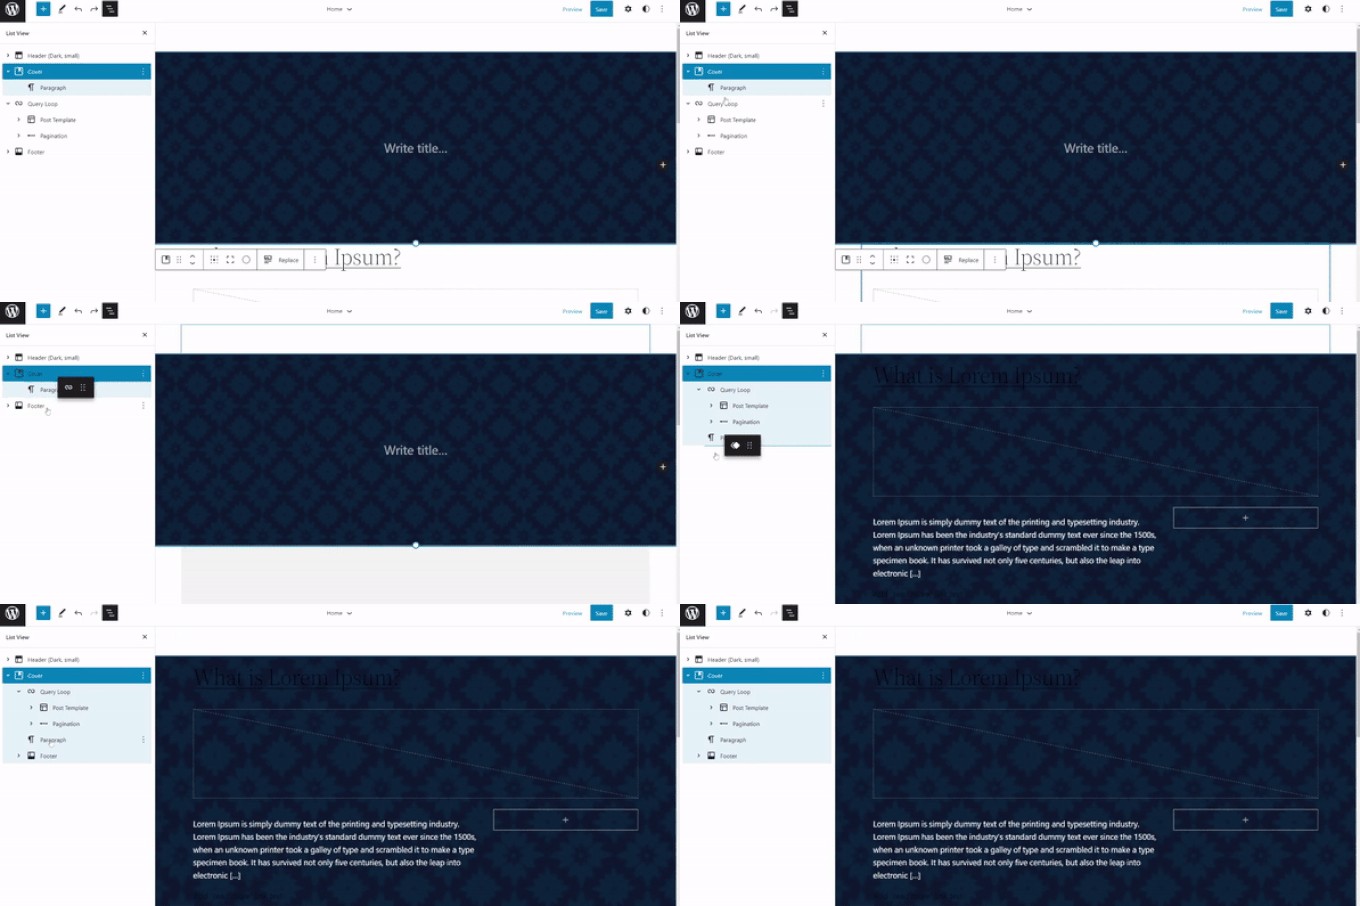
Once the image is added to the Cover block, the next step is to set it as the background of the page.
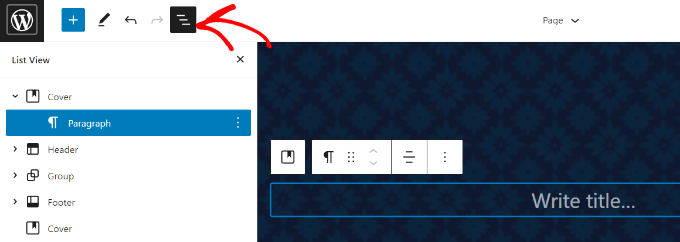
To do so, click on the List View icon at the top (icon with 3 dashes) to open an outline view of theme elements, such as the site header and footer.
After that, simply drag and drop all the template elements under the Cover block in the list view.
When they are all under there, the Cover block’s image will show up as the site’s background.
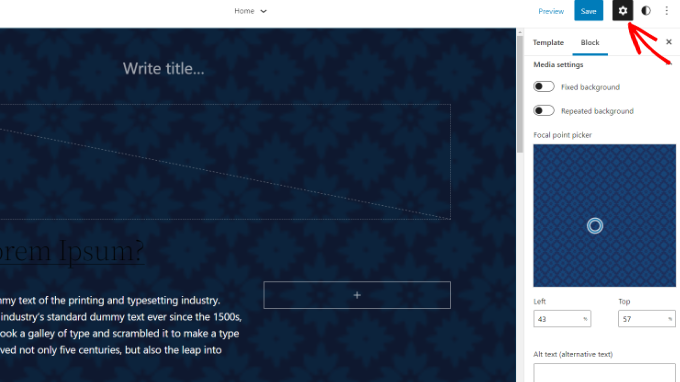
After that, you can adjust the background image by clicking into the Cover block and selecting the gear icon in the top right corner of the screen. This opens the Block settings panel.
You will find options to make the image a fixed background, repeated background, adjust its overlay, edit the color, and more.
When you’re done, don’t forget to click the ‘Save’ button.
That’s it! You’ve successfully added a background image using the full site editor.
Method 3. Add Background Image Using WordPress Theme Builder
Another way you can add custom background images to your website is by using a WordPress theme builder like SeedProd.
It is the best WordPress landing page plugin and website builder. You get drag and drop functionality to easily customize your website design without touching a single line of code.
For this tutorial, we’ll use the SeedProd Pro version because it includes the theme builder. There is also a SeedProd Lite version that you can try for free.
First, you’ll need to install and activate the SeedProd plugin. If you need help, then please see our guide on how to install a WordPress plugin.
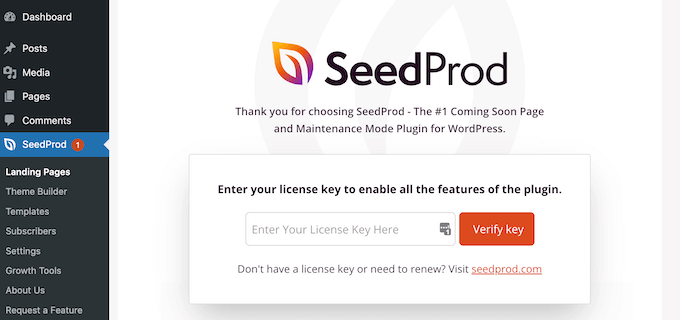
Once the plugin is active, you’ll see the SeedProd welcome screen in your WordPress dashboard. Next, simply enter your license key and click the ‘Verify Key’ button. You can find the license key in your SeedProd account area.
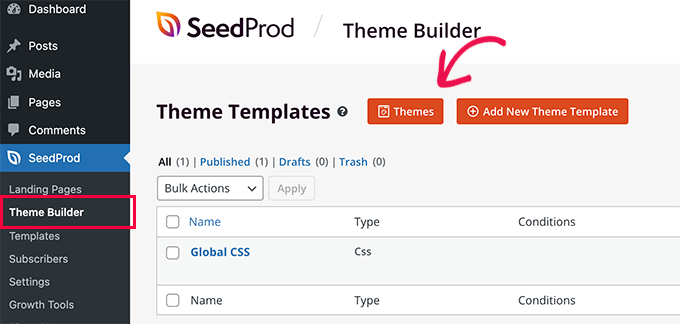
Next, you’ll need to head to SeedProd » Theme Builder in your WordPress admin panel.
Go ahead and click the ‘Themes’ button at the top.
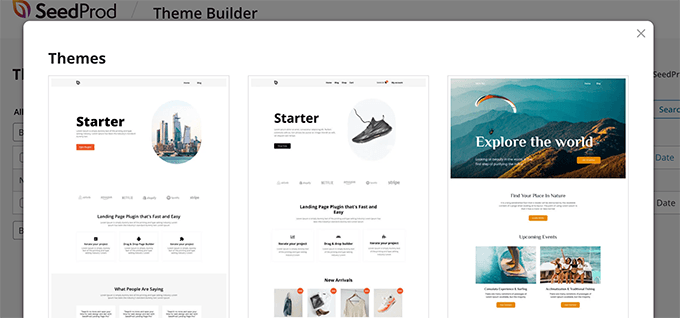
SeedProd will now offer multiple theme templates to choose from.
You can hover over any template that you’d like to use and click on it. Let’s use the ‘Starter’ theme template for this tutorial.
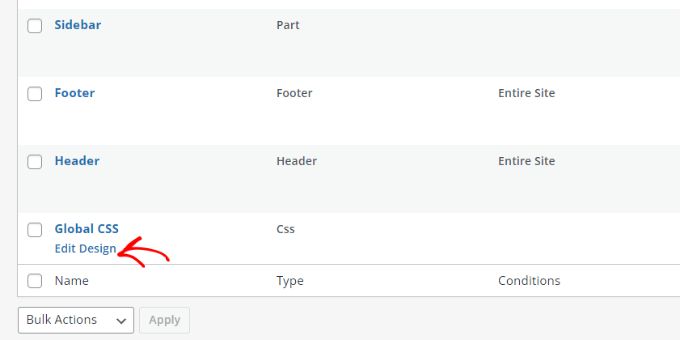
From here, SeedProd will generate different templates such as the homepage, single post, single page, sidebar, header, and more.
To add a background image that appears on the entire website and on all the theme templates, go ahead and click the ‘Edit Design’ option under Global CSS.
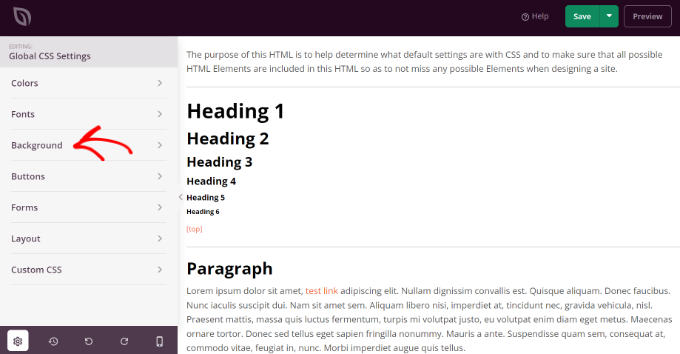
On the next screen, you’ll see global CSS settings you can change.
Simply click on the ‘Background’ option.
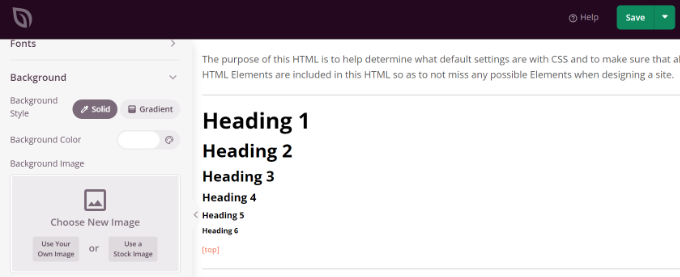
After that, you’ll see the Background Image options.
Go ahead and click the ‘Use Your Own Image’ button to upload your picture or click the ‘Use a Stock Image’ button to search for a stock image to use as your website background.
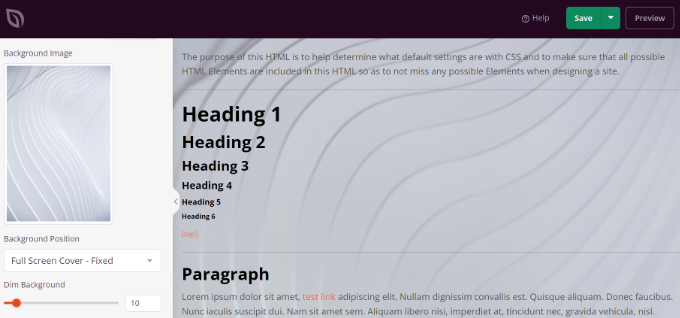
Once you’ve added a background image, the SeedProd builder will display a live preview.
The plugin also offers options to change the Background Position. You can choose whether you’d like to use the full screen cover, put it on repeat, and more.
Plus, you can edit how dark the background image should be by moving the ‘Dim Background’ slider. The higher the score, the darker the image will be.
When you’re done editing the background image, simply click the ‘Save’ button at the top and close the Global CSS Settings.
If you want to add a custom background image for different parts of your website, then you can edit those individual theme templates in SeedProd.
This plugin will let you set a different background for any post, page, category, and more. Plus, they will automatically be full-screen and adjust themselves for mobile devices.
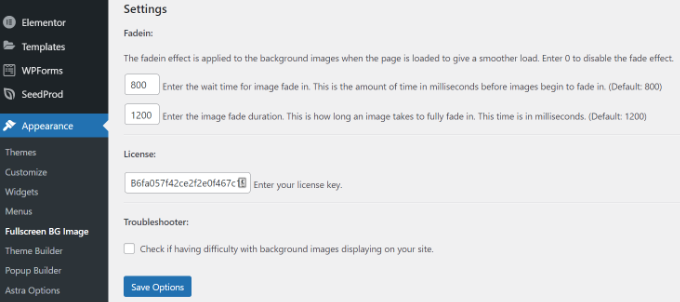
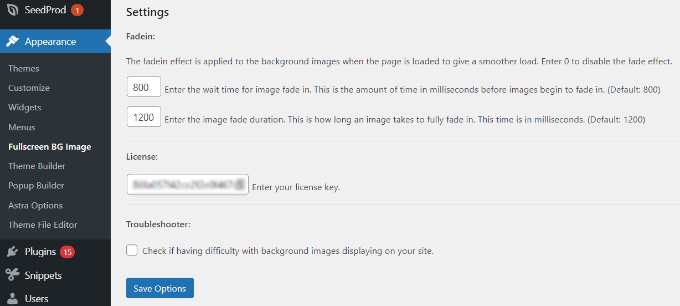
Upon activation, you need to visit Appearance » Fullscreen BG Image to configure the plugin settings.
You will be asked to add your license key. You can get this information from the email you received after buying the plugin or from your account on the plugin’s website.
Next, you need to click on the ‘Save Options’ button to activate your key. You are now ready to start adding background images to your WordPress site.
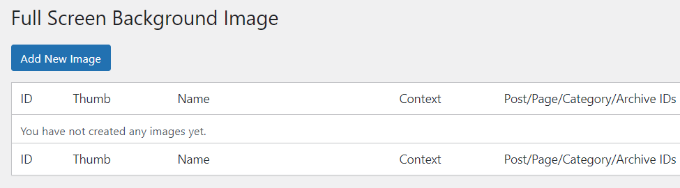
Go ahead and click on the ‘Add New Image’ button on the plugin’s settings page.
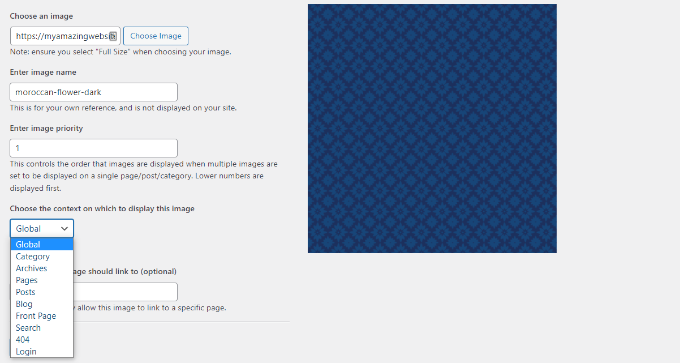
You should now see the background image upload screen.
Click on the ‘Choose Image’ button to upload or select an image. As soon as you select the image, you will be able to see a live preview of the image on your screen.
Next, you need to provide a name for this image. This name is just for you, so you can type anything here. Finally, you need to select where you want to use this as the background page.
Once you have chosen whether it will be the background for the whole site, for posts, categories, archives, or elsewhere, don’t forget to save your changes.
You can add as many images as you want to different areas of your site by visiting the Appearance » Fullscreen BG Image page and repeating this process.
If you set more than one image to be used globally or for posts, pages, and categories, then the plugin will automatically start displaying background images as a slideshow.
You can adjust the time it takes for an image to fade out and the time after which a new background image starts to fade in the plugin Settings.
The time you enter here is in milliseconds. 1 second is 1000 milliseconds. If you want a background image to fade out after 20 seconds, then you will need to enter 20000.
Don’t forget to click on the ‘Save Options’ button to store your changes.
Background Images for Posts, Pages, and Categories
Full Screen Background Pro also allows you to set background images for single posts, pages, categories, tags, and more.
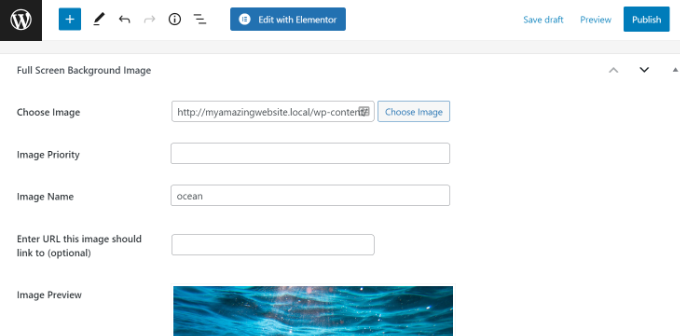
Just edit the post/page where you want to display a different background image. On the post edit screen, you will notice the new ‘Full Screen Background Image’ box below the post editor.
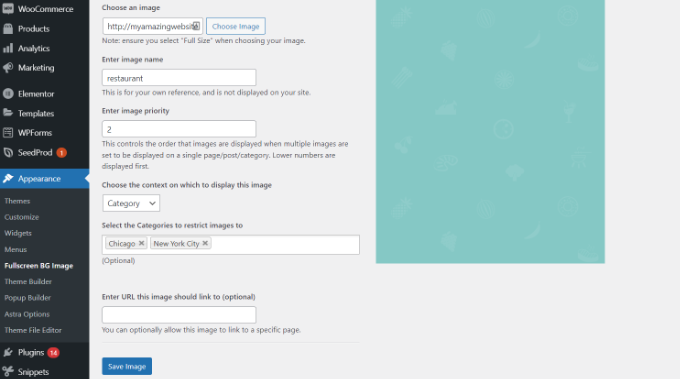
To use a background image for categories, posts, and pages, you need to visit the Appearance » Fullscreen BG Image page and then click on the ‘Add New Image’ button.
After uploading your image, you can select a category, posts, pages, archives, and other options from the ‘Choose the context on which to display this image’ dropdown menu.
Let’s say you want to show a background image for category pages. For this, simply select ‘Category’ from the dropdown menu.
The plugin also offers an option to restrict the background image to specific categories, posts, and pages.
For example, if you want to add a custom background image for specific categories, then simply enter the category names under the ‘Select the Categories to restrict images to’ field.
Don’t forget to save your image to store your settings.
You’ve now successfully added a background image for specific posts, pages, and categories.
Method 5. Add Background Images Using CSS Hero
CSS Hero is a WordPress plugin that allows you to make any changes to your theme without touching a single line of code.
You can add background images quickly in a few simple steps. First, you need to install and activate CSS Hero. For more details, please see our guide on how to install a WordPress plugin.
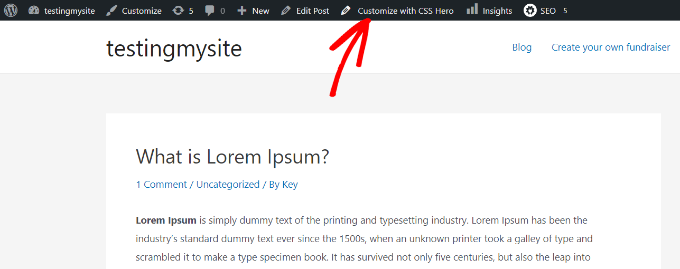
Once you’ve done that, it’s time to start customizing your website. Now open up your homepage in your browser. You’ll see the ‘Customize with CSS Hero’ link in your admin bar.
After you click that link, you’ll see the CSS Hero options open up. Hover your mouse over the area you want to add an image to.
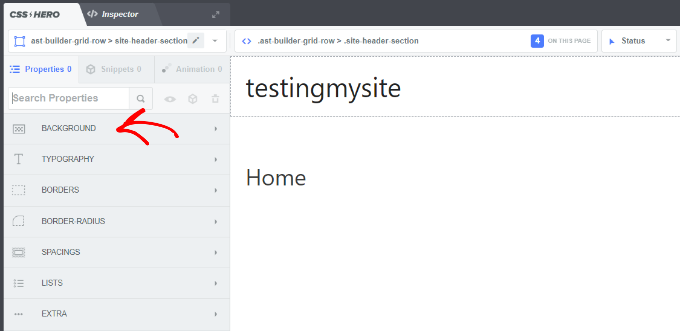
When you click the selected area, you can see the ‘Background’ option in the left sidebar.
Go ahead and click ‘Background’ to see the settings for adding an image.
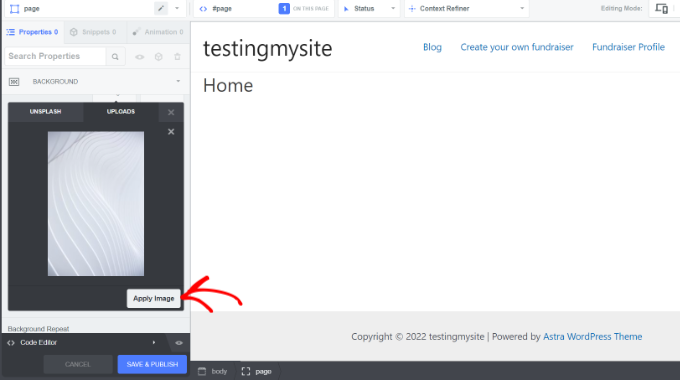
From there, you can click on ‘Image.’ Now, you can choose an image from Unsplash or upload your own to create your background.
When you click on the image you want, you’ll see the ‘Apply Image’ button. Then you can choose what size you want your image to be. You can choose the large version so it will stretch across the page.
Hit ‘Save and Publish’ at the bottom to save the background image for your site.
Method 6. Add Custom Background Images Anywhere in WordPress Using CSS Code
By default, WordPress adds several CSS classes to different HTML elements throughout your WordPress site. You can easily add custom background images to individual posts, categories, authors, and other pages using these WordPress generated CSS classes.
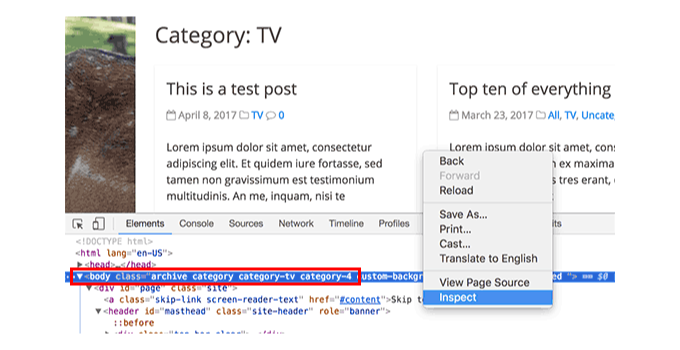
For example, If you have a category on your website called TV, then WordPress will automatically add these CSS classes to the body tag when someone views the TV category page.
Don’t forget to replace the background image URL and the category class with ones from your own site.
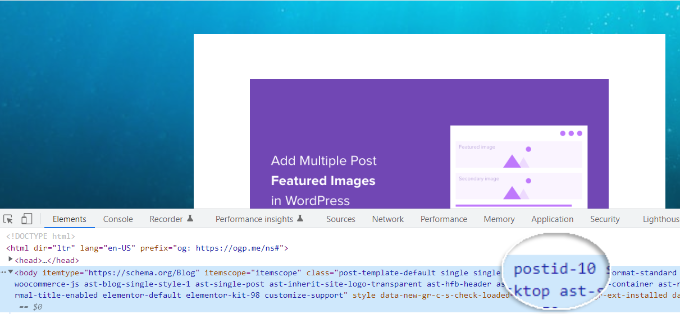
You can also add custom backgrounds to individual posts and pages. WordPress adds a CSS class with the post or page ID in the body tag. You can use the same CSS code, just replace .category-tv with the post-specific CSS class.