How to Add Your Website to Bing Webmaster Tools

Do you want to submit your WordPress site to Bing Webmaster Tools?

Bing is among the top search engines in the world. Submitting your site to its webmaster tool helps you monitor your site’s performance and keyword rankings and fix indexing issues.

In this article, we’ll show you how to add your websites to Bing Webmaster Tools.

How to add your website to Bing Webmaster Tools

What is Bing Webmaster Tools?

Bing Webmaster Tools is a free service by Microsoft that allows you to add your website to Bing search engine results.

This free tool helps your WordPress SEO by optimizing your site for Bing, so you can get more traffic.

The webmaster tools help you monitor and track your site’s performance in Bing. You can find out which keywords people use to find your site, so you can optimize those search terms in the content and get more traffic.

You can also see how Bing crawls and indexes your content. This helps to uncover and resolve indexing issues that might be preventing a blog post from appearing in Bing search results.

Aside from that, Bing Webmaster Tools shows your site’s backlinks and which websites you are linking to. It also helps remove content that you don’t want to display on Bing search results and scan for potential malware or spam issues that can threaten your WordPress website security.

That said, let’s see how you can add a website to Bing Webmaster Tools using the All in One SEO (AIOSEO) and WPCode plugin. We’ll also show how you can use the webmaster tool and import your site from Google Search Console.

You can use the links below to jump to the method you want to use.

Method 1: Add Website to Bing Webmaster Tools Using AIOSEO

The best way to add a website to Bing Webmaster Tools is using All in One SEO (AIOSEO).

It is the best SEO plugin for WordPress and helps you optimize your site search engines without technical knowledge or the need to hire an expert.

Note that we’ll use the AIOSEO Lite version for this tutorial because it is free and includes the ‘Webmaster Tools Verification’ feature. There is also an AIOSEO Pro version which includes more advanced features like link assistant, redirections, video sitemaps, and more.

Next, you’ll need to install and activate the AIOSEO plugin. If you need help, then please see our guide on how to install a WordPress plugin.

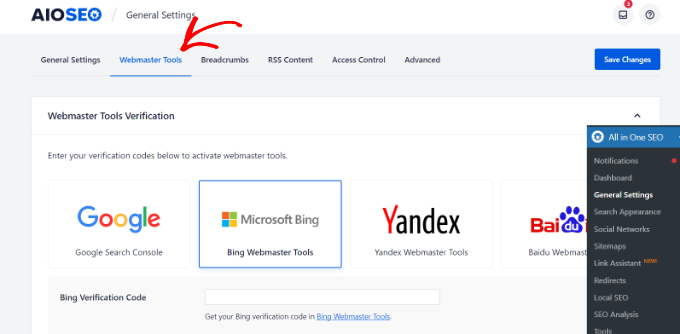
Upon activation, you can go to All in One SEO » General Settings from your WordPress dashboard. Next, head to the ‘Webmaster Tools’ tab and select the ‘Bing Webmaster Tools’ option.

Go to webmaster tools

Next, you’ll need to enter the Bing Verification Code. Let’s see how you can access the code in the webmaster tool.

How to Get Verification Code in Bing Webmaster Tools

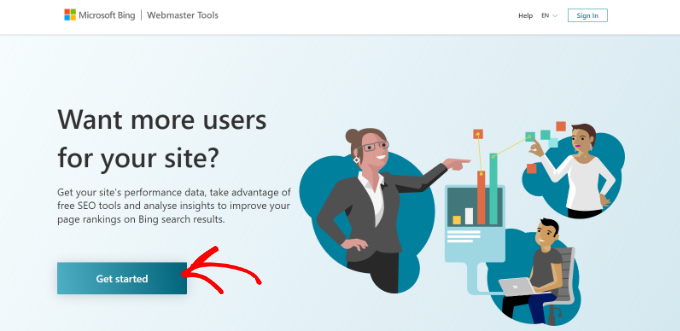
First, you’ll need to visit the Bing Webmaster Tools website and click the ‘Get started’ button.

We suggest opening the Bing Webmaster Tools website in a new browser window or tab because you’ll need to switch back to your WordPress admin dashboard to complete the verification process.

Sign in to your Bing account

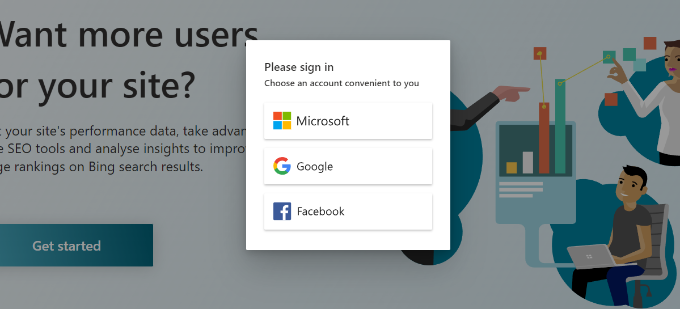
After that, you’ll need to sign in to your account.

You can use Microsoft, Google, or Facebook accounts to log in. Simply click on any options and choose your email address to sign in to the webmaster tool.

Choose an account to sign in

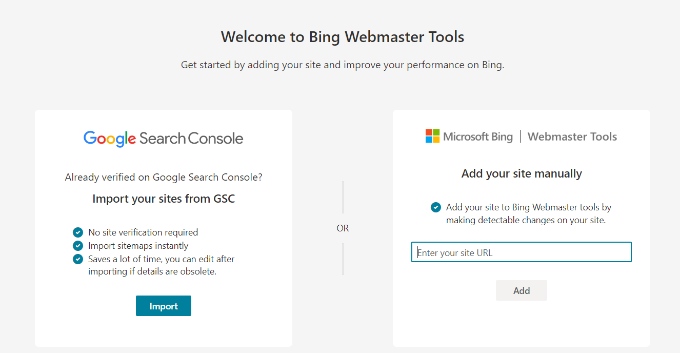
Next, Bing Webmaster Tools will show you 2 options to add your website.

You can import your sites from Google Search Console or manually add your website.

We’ll use the manual method to get the verification code.

Go ahead and enter your website address under the ‘Add your site manually’ section and then click the ‘Add’ button.

Manually add your website

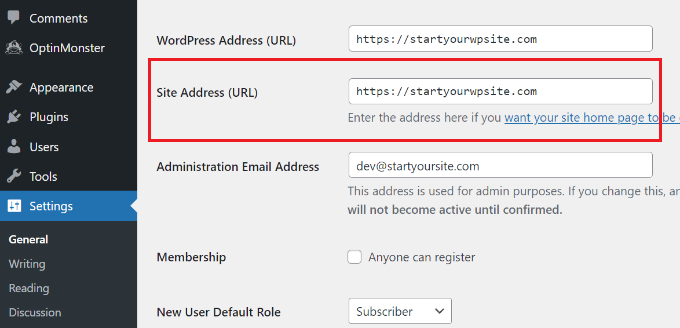
When adding your WordPress website, make sure to enter the URL used by WordPress. That’s because Bing will see HTTP and HTTPS as different sites. It will also consider your domain’s WWW and non-WWW versions as two separate websites.

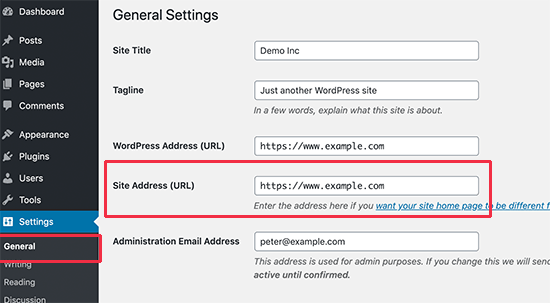
To check which URL is used by WordPress, simply login to your WordPress admin area and head to Settings » General. Then look for the link in the ‘Site Address (URL)’ field.

View your site address URL

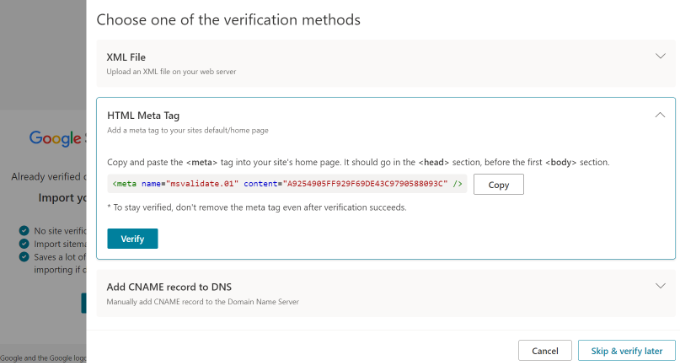
Once you add this website URL in Bing Webmaster Tools, a window will slide in from the right.

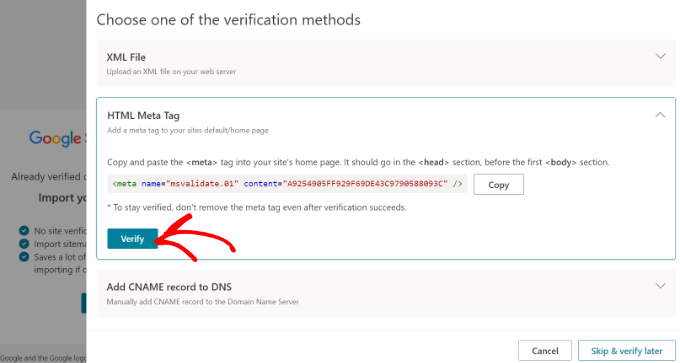
Here you will see different methods for verifying your website, including an XML file, HTML meta tag, and adding CNAME records to DNS.

For this tutorial, we’ll use the HTML Meta Tag method. When you click the ‘HTML Meta Tag’ option, Bing gives you a validation code you need to install on your website.

Go ahead and click the ‘Copy’ button to copy this line of code.

Different methods for verifying your site

Next, you’ll need to add the code to your WordPress website.

Add Verification Code & Verify Your Site in Bing Webmaster Tools

You can now head back to the WordPress admin browser window or tab.

After that, simply go to All in One SEO » General Settings from your WordPress dashboard.

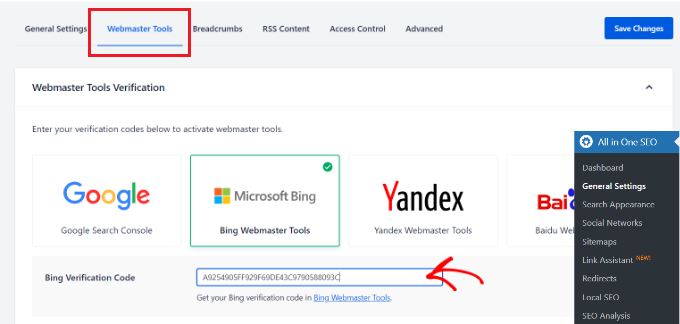
Now, head to the ‘Webmaster Tools’ tab and enter the HTML Meta Tag you copied earlier in the ‘Bing Verification Code’ field.

Enter Bing verification code in AIOSEO

When you do that, don’t forget to click the ‘Save Change’ button at the top.

After adding the HTML meta tag to your website, go back to the Bing Webmaster Tools tab or window and click the ‘Verify’ button.

Verify your site after entering meta tag

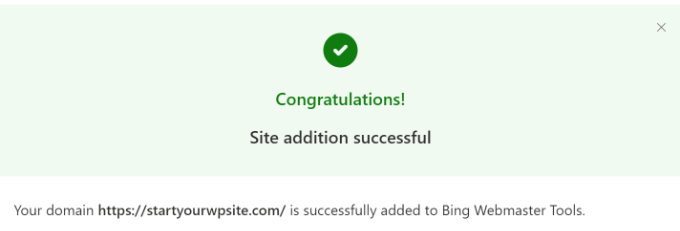
Next, you’ll see a message in Bing Webmaster Tools that your verification was successful.

You can then close the message and view your Bing Webmaster Tools dashboard.

View success message on verification

Method 2. Add Website to Bing Webmaster Tools Using WPCode

Another method of adding your website to Bing Webmaster Tools is using WPCode. It is the best WordPress code snippet plugin and helps you manage your website’s scripts. You can easily use WPCode to add the Bing Webmaster Tools HTML code to your website.

First, you’ll need to install and activate the free WPCode plugin. For more details, please see our guide on how to install a WordPress plugin.

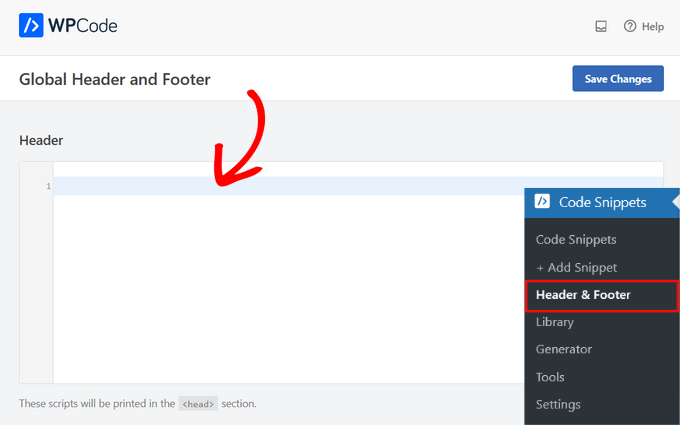
Upon activation, you can go to Code Snippets » Header & Footer from your WordPress admin panel. Here, you’ll need to add the HMTL code provided by Bing Webmaster Tools.

Paste code into the header box in WPCode

Access HTML Meta Tag & Verify Your Website

You can find the HTML code by going to the Bing Webmaster Tools website and logging into your account.

Once signed in, simply add your website URL under the ‘Add your site manually’ field and click the ‘Add’ button.

Manually add your website

On the next screen, Bing will show you multiple methods for verifying your website in the webmaster tool.

Go ahead and select the ‘HTML Meta Tag’ option and copy the code.

Different methods for verifying your site

After copying the code, you can head to your WordPress admin panel and go to the Code Snippets » Header & Footer page.

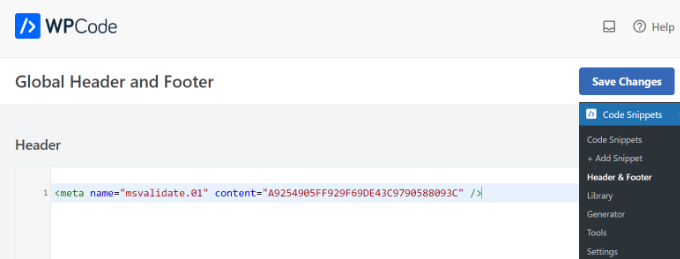
Next, you’ll need to paste the HTML meta tag into the ‘Header’ section.

Enter meta tag in header section

Don’t forget to click the ‘Save Changes’ button.

Now that you’ve added the HTML meta tag to your site, simply go back to the Bing Webmaster Tools tab or window and click the ‘Verify’ button.

Verify your site after entering meta tag

Bing Webmaster Tools will now show a message that your verification was successful.

Simply close the message to view the webmaster tool dashboard.

View success message on verification

Import Your Website from Google Search Console

You can also add your WordPress site to Bing Webmaster Tools by importing it from Google Search Console.

If you use this method, then you don’t have to worry about verifying your website by adding an HTML code. However, Bing will need access to your Google account, which could be a security risk if either your Webmaster Tools or Google account gets compromised.

To start, you can log in to Bing using your Microsoft, Bing, or Facebook account.

Next, go ahead and click the ‘Import’ button under the Import your site from the GSC section.

Manually add your website

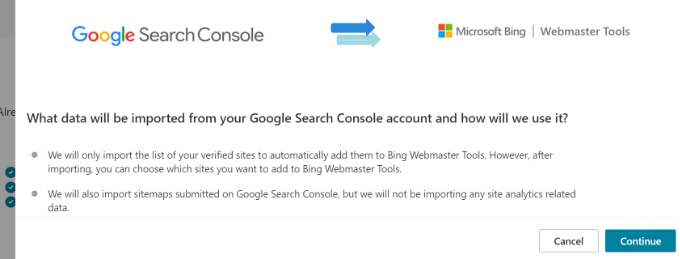
After that, you’ll see a message showing you what data will be imported from the Google Search Console account and how Bing will use it.

Simply click the ‘Continue’ button to move ahead.

Import site from search console

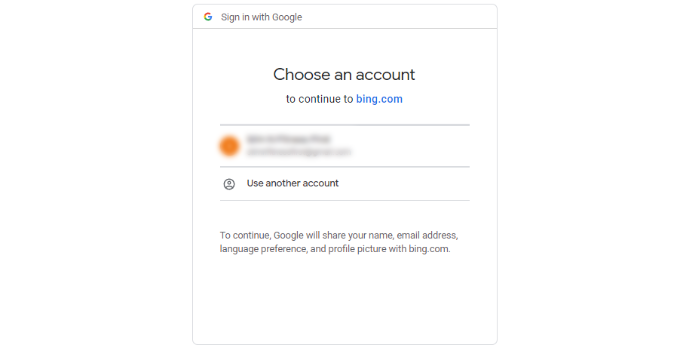
Next, you’ll need to select your Google account to sign in.

Go ahead and select the account that you use for logging into Google Search Console.

Sign in to your account

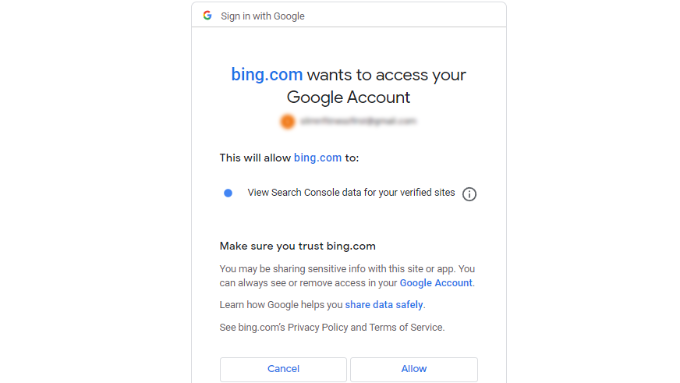
On the next screen, Bing will request access to your Google account.

Simply click the ‘Allow’ button to continue.

Allow access to your account

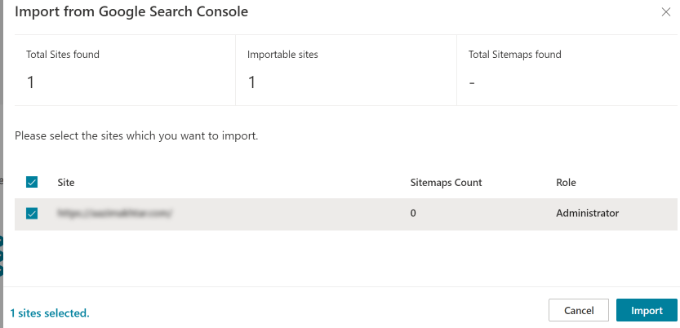
Next, you will see websites that are connected to Google Search Console.

Go ahead and select any websites you’d like to import into Bing Webmaster Tools and click the ‘Import’ button.

Select your site and import it

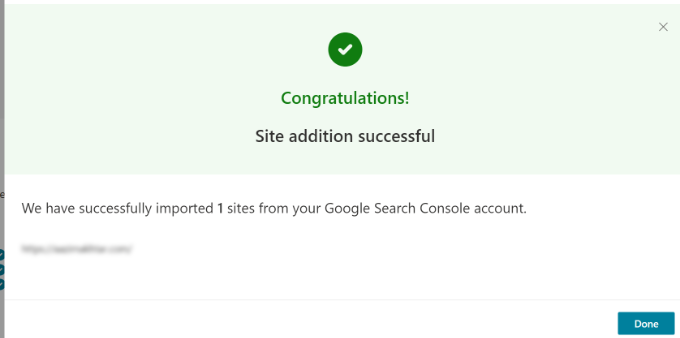
You’ll now see a message that your website has been successfully imported.

You can click the ‘Done’ button to close the window and view the Bing Webmaster Tools dashboard.

Successful import message

Bonus: How to Use Bing Webmaster Tools

In the Webmaster Tools dashboard, you have access to many different tools and options. Do note that Bing will take up to 48 hours to reflect data in its webmaster tools reports after setting it up on your WordPress site.

For example, you can view your site’s search performance by going to the Search Performance tab. You can then use this data to see which search terms people use to find your website and perform keyword research to develop new content ideas.

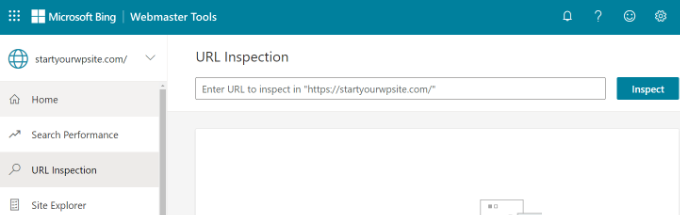
Similarly, the tool also lets you inspect a specific URL to see if there are any crawling issues. You can simply enter the post or page link in the URL Inspection tab and view the errors.

URL inspection tool in webmaster

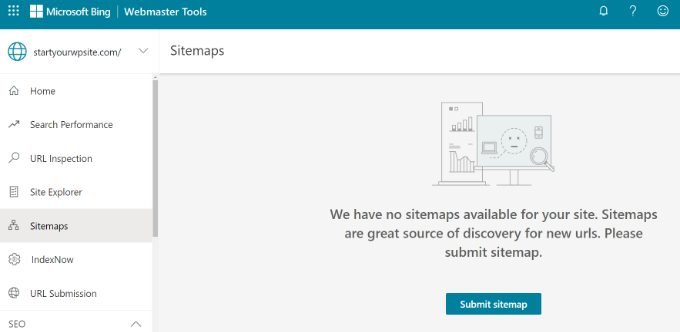
With Bing Webmaster Tools, you can submit your website sitemap in the Bing Webmaster Tools to help the search engine to discover new content quickly.

For more details, please see our guide on how to submit your site to search engines.

Submit sitemap in Bing

Plus, you can scan for any errors that could be preventing your content from appearing in Bing search results.

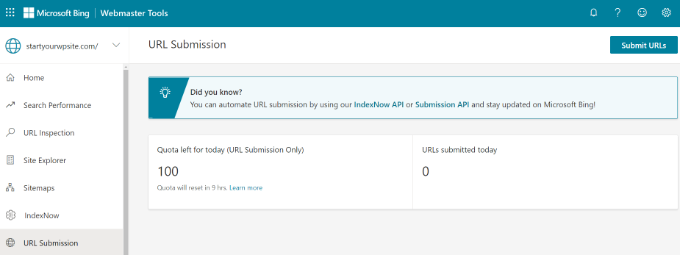
If a blog post or landing page isn’t appearing in the search results, then you can go to the ‘URL Submission’ tab and manually submit your content for indexing.

Submit URLs for indexing

We hope this article helped you learn how to add your website to Bing Webmaster Tools. You can also see our guide on WooCommerce SEO made easy, and our expert pick of the best WordPress SEO plugins and tools to grow your website.

If you liked this article, then please subscribe to our YouTube Channel for WordPress video tutorials. You can also find us on Twitter and Facebook.

How to Add Topics in WordPress Navigation Menus

Do you want to learn how to add topics in your WordPress navigation menu?

Often beginners users try to add topics in WordPress menu by creating a separate page for each topic. But that’s not the best way because adding these pages to a menu won’t display the relevant posts.

In this article, we will show you how to properly add topics in WordPress by using categories and tags in WordPress navigation menus.

How to Add Categories and Tags in WordPress Navigation Menus

Why Add Topics in WordPress Navigation Menus?

Let’s say you have a WordPress website that offers travel guides for different cities. You may want to add city names in your navigation menu, so that your visitors see relevant articles when they click the menu item.

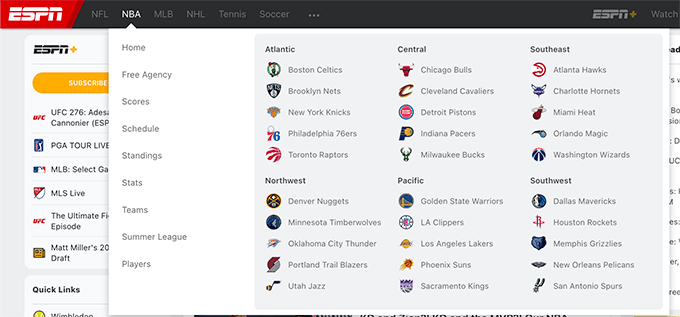
Alternatively, if you have a news website like The New York Times or ESPN, you would want to highlight the various topics in the navigation menu.

Example of Topics in Website Menu - ESPN

WordPress makes it quite easy to add topics if you organize your content using categories and tags.

Categories cover your website’s main topics like a table of contents, while tags cover more specific topics like an index. You can learn more by reading our guide on the difference between categories and tags.

Let’s take a look at how you can use categories and tags to organize your content, and then add those topics to your WordPress navigation menu for easy access.

Adding Categories and Tags to WordPress Posts

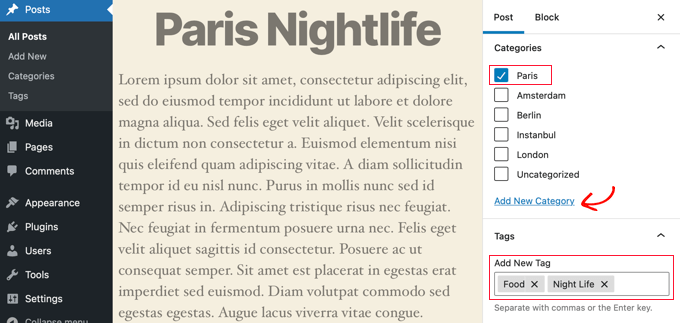
You can add or select categories while writing your blog posts. The categories box will appear on the right column of the WordPress content editor.

If you need to add a new category, then just click the ‘Add New Category’ link below the list of your existing categories.

For example, on a travel blog, you might create categories for each city you’ve written about, such as ‘Paris’, ‘Amsterdam’, ‘Berlin’, ‘Instanbul’, and ‘London’.

Adding Categories and Tags to a Post

You can also add tags from inside the content editor by simply typing into ‘Tags’ field on the right. When adding more than one tag, you need to separate them with commas.

If you want to choose a tag that you have previously created, then you need to type the first few characters and your matching tags will pop up. Then simply click the tag you want to use.

On a travel blog, you could add tags for the more specific topics covered in a certain post, for example, ‘Food’, ‘Night Life’, ‘Walking Tours’, and ‘Rail Travel’.

Once you have created a few posts and filed them under different categories and tags, you can now add them to your site’s navigation menu.

Adding Categories in WordPress Navigation Menus

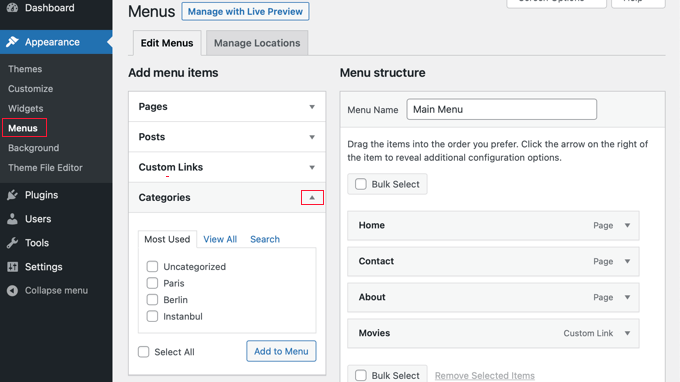
To add categories to your navigation menu, simply visit Appearance » Menus and click on the ‘Categories’ tab to expand it.

Visit Appearance » Menus and Expand the Categories Tab

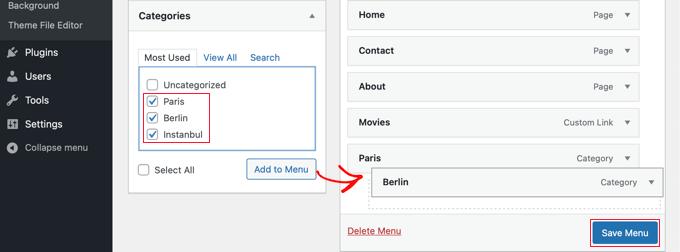
Next, select the categories you want to add to the menu and then click the ‘Add to Menu’ button. Your selected categories will now appear in the right hand column as menu items. You can move them up and down using drag and drop.

Select Categories and Click 'Add to Menu’

Once you are satisfied with the menu, click on the ‘Save Menu’ button to store your changes.

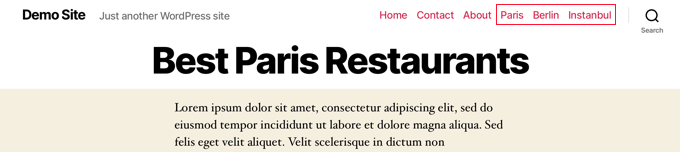
You can now visit your website to see your changes in action.

Preview of Categories Added to Navigation Menu

Adding Tags in WordPress Navigation Menus

To add tags to your navigation menu, you need to visit the Appearance » Menus page. Unlike categories, there isn’t an option to add tags by default.

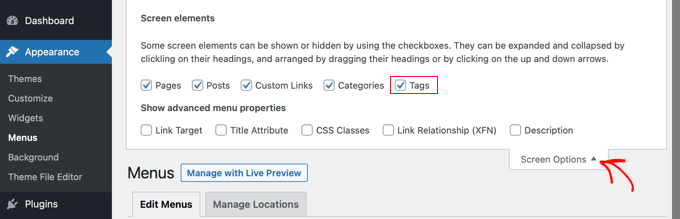
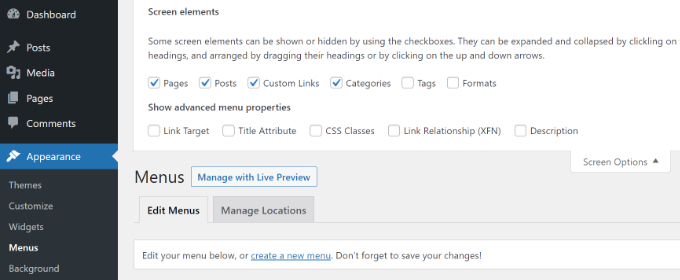
However, you can add a Tags tab by clicking on ‘Screen Options’ at the top of the screen, and then checking the ‘Tags’ box.

Screen Options on the Menus Page

A Tags tab will now be added to the left hand column. You can click the tab to expand it.

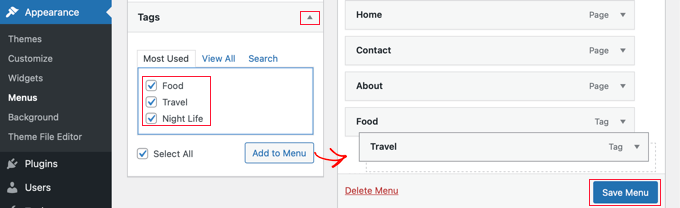
Now you can select the tags you wish to add to the menu. When you click the ‘Add to Menu’ button, your selected tags will appear in the right hand column as menu items and you can rearrange them using drag and drop.

Select Tags and Click 'Add to Menu'

Don’t forget to click the ‘Save Menu’ button to store your settings.

You can now visit your website to see that the tags have been added to your menu.

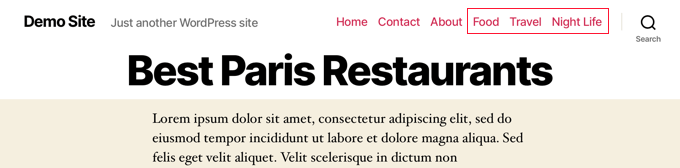
Preview of Tags Added to Navigation Menu

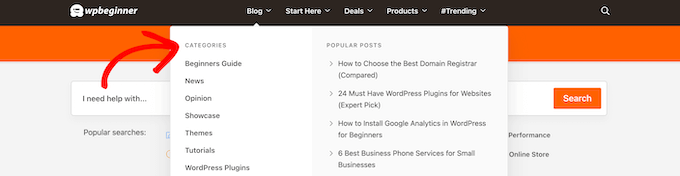
If you want to create an advanced topics drops menu with multiple columns like ESPN and WPBeginner, then that’s often referred to as mega menu.

You can follow our step-by-step tutorial on how to create a mega menu in WordPress for more details.

WPBeginner blog categories menu

We hope this tutorial helped you learn how to add categories and tags in WordPress navigation menus. You may also want to learn how to create a landing page with WordPress, or check out our list of must have plugins to grow your site.

If you liked this article, then please subscribe to our YouTube Channel for WordPress video tutorials. You can also find us on Twitter and Facebook.

How to Add Titles in WordPress Menu Without Linking to a Page

Do you want to know if there is a way to add titles in the WordPress menu without adding a link?

By default, the WordPress menu requires each menu item to be linked to a page or custom link. However, when creating a dropdown menu, you may want to add a title for sub-menus without linking it to a specific page.

In this article, we will show you how to add titles in WordPress menu without linking to a page.

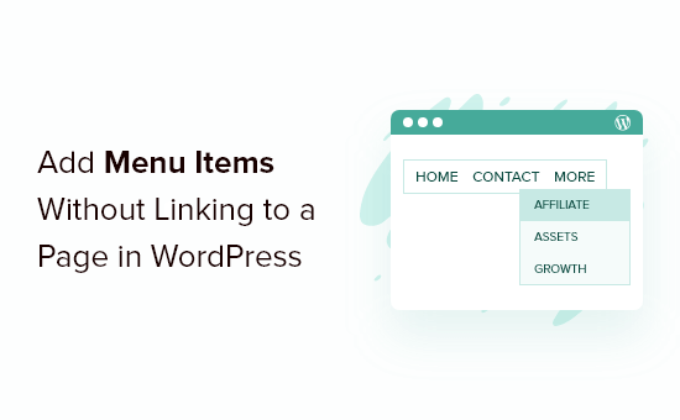
Add WordPress Menu items without links

Why Add Menu Titles without Linking to a Page?

WordPress offers multiple options to customize your website so you can reach your target audience and offers an exceptional user experience.

To provide a smooth user experience, it’s important that your WordPress site has a well-structured navigational menu. It makes it easy for users to find content and different pages on your site.

When you add menu titles, WordPress requires each menu to have a link to a page or a custom link by default. However, you may want to show a menu title but don’t want to link to a page under certain situations.

For example, you can have a categories dropdown where you want the title text to be ‘categories’ for the menu but don’t need to add a link. When users click on categories, it simply opens a sub-menu in the dropdown.

That being said, let’s look at how you can add a title to the WordPress menu without linking to a page.

Adding WordPress Menu Title without Linking to a Page

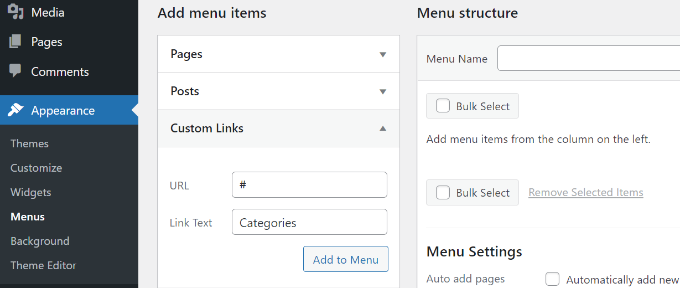
The first thing you need to do is add a new menu item to your menu. You can do that by going to Appearance » Menus from your WordPress admin panel.

Next, you want to add a custom link. You can see the ‘Custom Links’ options under the ‘Add menu items’ section.

If you don’t see Custom Links, then simply click the ‘Screen Options’ button on the top right corner of the screen. Next, check the box for ‘Custom Links’ from the given options.

Screen options in WordPress

After that, you’ll need to give it the label or menu title. In the URL field, go ahead and enter the hashtag (#) symbol and click the ‘Add to Menu’ button.

Add a custom link menu item

Your menu item will now be added to the WordPress menu.

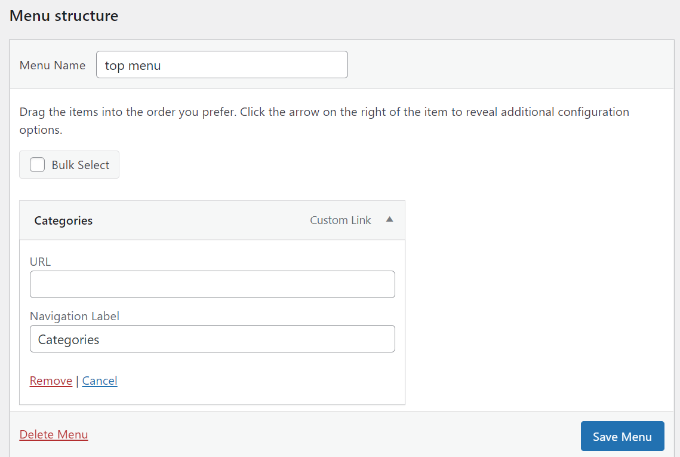
Next, you’ll need to click on the dropdown arrow next to this custom link to edit this menu item. Go ahead and remove the hashtag sign from the URL field and click the ‘Save Menu’ button.

Remove the hashtag sign and save menu

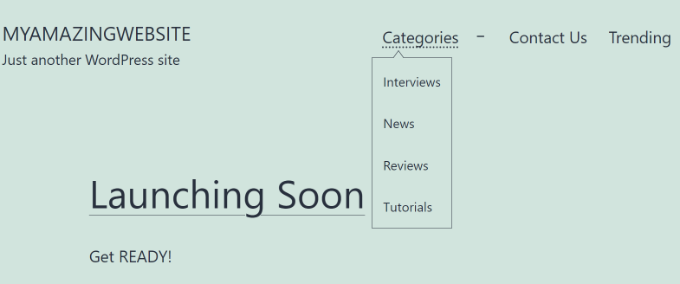
You can add sub menus to this menu item and link them to any page or enter a custom link that you want. Now, if you go to your WordPress blog, then you will see a menu item without a link in action.

Menu title preview without link

We hope this article helped you learn how to add titles in the WordPress menu without linking to a page. You may also want to check out our guide on how to register a domain name and the best AI chatbots software for your website.

If you liked this article, then please subscribe to our YouTube Channel for WordPress video tutorials. You can also find us on Twitter and Facebook.
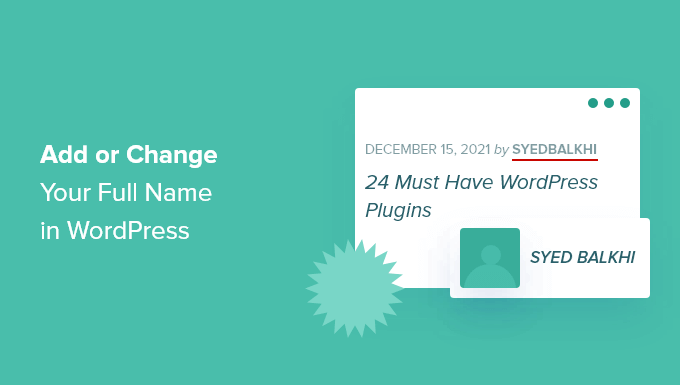
How to Add or Change Your Full Name in WordPress

Is your WordPress site showing the wrong name on your blog posts?

By default, WordPress will display the site owner’s username on their posts. This is usually something other than their full name.

In this article, we’ll show you how to add or change your full name in WordPress.

How to Add or Change Your Full Name in WordPress

Why Use Your Full Name in WordPress?

When you first set up your WordPress blog, it’s required to set up a username that you can use to log in. Often people choose usernames that are easy to remember and a mix of different words or letters.

When You Install WordPress, You Are Asked for a Username, Not Your Full Name

This username is then displayed on the posts that you author. This can look a little strange and is not very professional.

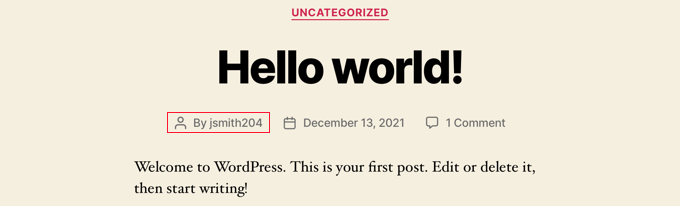
By Default, the Username Is Displayed on the Posts You Author

Luckily, WordPress has an easy way to change the display name to your full name without changing your username.

Using a full name instead of a username helps search engines recognize that the content is written by you. It also helps to establish your personal brand because your readers will become familiar with your name.

With that being said, let’s have a look at how to add or change your full name in WordPress.

How to Change or Add Your Full Name in WordPress

To change your display name, simply go to the Users » Profile page in your admin area.

If you are unable to see ‘Users’ in your WordPress admin menu, then this means you are not an administrator on this site. You can still make changes to your profile by clicking on the Profile menu.

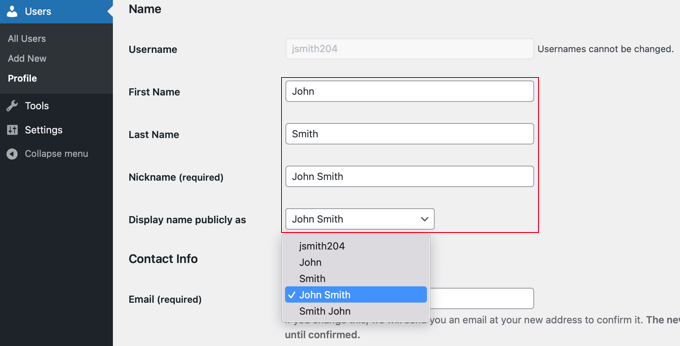
You will need to scroll down to the ‘Name’ section where you can see the options to add your first name, last name, and nickname.

There Are Options to Add Your First Name, Last Name, and Nickname

After filling in these fields, click on the dropdown menu next to the option ‘Display name publicly as’. You can now select from your first or last name, full name, nickname, or username to be displayed with your posts.

After selecting the name you want to use, you need to click on the ‘Update Profile’ button at the bottom of the page to save your changes.

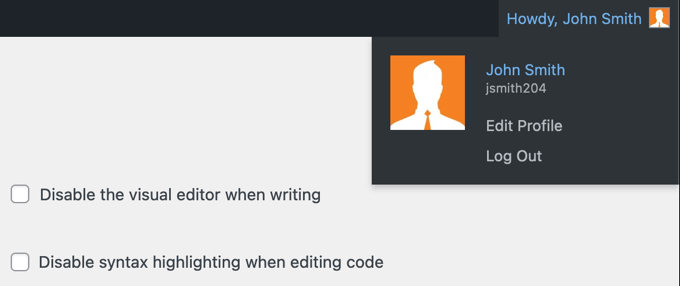
You will notice that the name you chose to display publicly will now appear in the top right corner of the WordPress toolbar next to ‘Howdy‘.

Your Name Will Now Appear in the Top Right Corner of the WordPress Toolbar

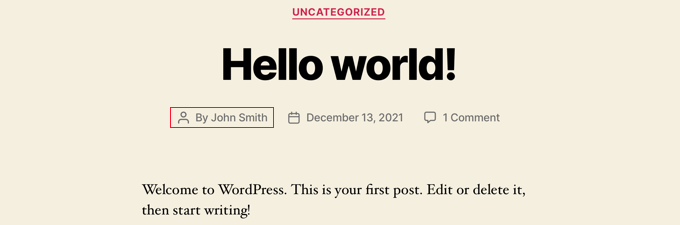
When you visit your website, you will see the posts that you authored now show your full name instead of your username.

You Will Now See Posts Showing Your Full Name Instead of Your Username

If you wish to change your display name in the future, then simply revisit your profile and repeat these steps with your new name.

We hope this tutorial helped you learn how to add or change your full name in WordPress. You may also want to learn how to increase your blog traffic, or check out our list of 24 tips to improve your WordPress performance.

If you liked this article, then please subscribe to our YouTube Channel for WordPress video tutorials. You can also find us on Twitter and Facebook.
How to Add New Users and Authors to Your WordPress Blog

Do you want to add new users and authors to your blog?

WordPress comes with a built-in user management system. This lets you add users with different roles and permission levels.

In this article, we will show you how to add new users and authors to your WordPress website.

Adding new users and authors to your WordPress website

Adding a New User or Author to Your WordPress Website

There are 3 ways to add new users to your WordPress website. You can add users manually, let users register themselves for free, or create a paid membership site where users pay to register.

Here’s what we’re going to cover in this article. Simply click on the quick links to jump straight to the section you need.

Video Tutorial

Subscribe to WPBeginner

If you’d prefer written instructions, just keep reading.

Manually Adding a New User or Author to Your Website

If you want to add a small number of people to your website, then this is easy to do with WordPress’s built-in user management system.

This method is ideal for:

  • Small businesses have several different employees managing their websites.
  • Organizations such as churches and nonprofits have volunteers updating their websites.
  • Blogs with multiple authors, such as a fashion blog that you are writing with some friends.
  • Online stores that have several people managing inventory, shipping items, etc.

You simply need to go to the Users » Add New page in your WordPress admin area.

Next, you just have to fill out the form to create a new user.

Fill out the form to add a new user to your website

On the form, you first need to enter a username. The user can use this or their email address to log in.

Note: The WordPress username can’t be easily changed later, but all the other details can.

Next, enter the user’s email address. Double-check that you are using the correct email address. Users will need this in order to reset their passwords and receive email notifications.

After that, you can enter the first name, last name, and website URL. Since these are optional fields, you can also leave them blank. Users can edit their own profiles to complete these fields later.
In the next step, you will need to choose a password. We recommend using an online strong password generator for this purpose.

We suggest using the ‘Generate password’ button to automatically create a strong password.

Below the password field, you will see a checkbox to send the user an email. If you check this, the user will receive an email letting them know how to log in. This will also have a link, so they can set a different password if they want.

The last option on the page is to choose a WordPress user role from the dropdown list.

The dropdown list of default user roles in WordPress

Each user role comes with a different set of capabilities. Subscriber is the least powerful role, and Administrator is the most powerful role. You need to choose a role depending on what tasks a user will be performing on your website.

You may already know what role you want to give your user. If so, select the role, then click the ‘Add New User’ button at the bottom of the screen.

Entering the details for your new user in WordPress

If you’re unsure about the role, don’t worry. We have a detailed explanation of the roles in the next section of this article.

Remember, some plugins create additional user roles.

For instance, WooCommerce adds ‘Customer’ and ‘Shop Manager’ roles. All in One SEO adds the ‘SEO Manager’ and ‘SEO Editor’ roles. Simply check the plugin’s documentation to find out about any additional roles that you see in this list.

Additional user roles created by WooCommerce and All in One SEO

Understanding User Roles in WordPress

WordPress comes with these default user roles:

  • Administrator
  • Editor
  • Author
  • Contributor
  • Subscriber

If you have a multisite installation of WordPress, there is also a ‘Super Admin’ role. These users can manage all the websites, whereas regular Administrators manage just one site.

Administrator

An administrator can perform all tasks on your WordPress site.

You should only assign this role to users who you fully trust. You should also feel confident about their technical skills.

With the administrator user role, a user can install WordPress plugins, change themes, delete content, and even delete other users. This includes other administrators.

You can learn more about the Administrator role here.

Editor

An editor can add, edit, publish, and delete their own WordPress posts. They can also do all of these actions for posts by all other users.

They cannot access website settings, plugins, themes, and other admin features.

This role is useful if you have an editor for your site who manages a team of authors and publishes content on a regular basis.

You can learn more about the Editor role here.

Author

Authors can add, edit, and publish their own posts. They can upload files, too.

They can’t edit or publish other people’s posts or access features like plugins, themes, settings, and tools.

You may want to use a plugin to restrict authors so they can only write in a specific category.

You could also let authors revise their published posts. Again, you will need to use a plugin to extend the Author user role.

You can learn more about the Author role here.

Contributor

A contributor can add and edit their own posts but cannot publish them.

However, they cannot edit other users’ posts or access features like plugins, themes, settings, and tools.

It’s important to note that contributors cannot upload media files, such as images. The easiest way to get around this is to get contributors to upload their post’s image(s) through a file upload form.

That way, the image(s) can be saved straight to the WordPress media library. This makes it easy for an editor or administrator to add them to the post.

You can learn more about the Contributor role here.

Subscriber

The subscriber role does not let users add or edit posts in any way.

With the default settings, subscribers can create a profile and save their details. This lets them enter them more quickly when leaving comments.

You can also use a membership plugin or LMS plugin to create members-only content that is available to subscribers. We will come onto that later in this article.

You can learn more about the Subscriber role here.

To find out more about all the different user roles in WordPress and how they relate to one another, check out our beginner’s guide to WordPress user roles and permissions.

Managing Users in WordPress

As an administrator, you can add and remove users from your WordPress site at any time. After you have added a user, you can edit their profile at any time and change any information including passwords.

Simply click on the Users tab in your WordPress admin to go to the user page. You can edit or delete a user at any time.

Managing users in WordPress

You can edit the user’s profile to change their password, change their role, and more. You can also bulk edit users to change their roles if you want to upgrade or downgrade several users’ roles at the same time.

Users can also edit their own profile by going to Users » Profile in the WordPress dashboard. There can add a profile picture and change most of their details, but they cannot change their role.

Open Your WordPress Site for Anyone to Register for Free

What if you want to let users register on your site for free?

It would be a lot of work to add each user manually. Instead, you can let them create their own account.

First, you need to go to Settings » General in your WordPress admin and check the ‘Anyone can register’ box.

Enabling public registration for your website

By default, new users will be given the Subscriber role. Go ahead and change this to any role you want using the dropdown.

Warning: We recommend only letting users register as ‘Subscribers’ or ‘Contributors.’ If you let users register as ‘Authors,’ they could publish a post without approval. Never use ‘Administrator’ as the default setting.

Don’t forget to click the ‘Save Changes’ button at the bottom of the page to store your changes.

You also need to add a login form to your site. The best way to do this is with the WPForms plugin. Just follow our guide on how to allow user registration on your WordPress site for help with this.

Tip: You can also disable the WordPress admin bar for subscribers or other user roles.

Another way to add new users to your site is to create a paid membership program that users sign up for.

This allows you to sell members-only content, add premium content behind a paywall, sell online courses, and more.

To do this, you need a WordPress membership plugin.

We recommend using MemberPress. It’s the best membership and course creation plugin with all the functionality and flexibility you need.

Just some of the setup options in MemberPress

MemberPress lets you lock specific posts and pages on your site so that only registered, paying users can access them. Many sites offer premium content like this as a way to make money online.

With MemberPress, it’s easy to create different access levels.

For instance, you might offer a Bronze, Silver, and Gold plan. Each of these plans would have its own user role. You could create separate courses that only users with certain roles could sign up for.

You also get access to powerful tools such as MemberPress’s reports to show you your average member lifetime value, how many members you have in total, and more.

MemberPress allows you to add drip content to create an evergreen membership site, and you can even sell group memberships in WordPress.

For a step-by-step tutorial on setting up MemberPress on your site, check out our ultimate guide to creating a WordPress membership site.

We hope this article helped you learn how to add new users and authors to your WordPress website. You may also want to see our comparison of the best email marketing services and how to add push notifications, so you can connect with your users after they leave your website.

If you liked this article, then please subscribe to our YouTube Channel for WordPress video tutorials. You can also find us on Twitter and Facebook.