As the WordPress block editor adds more site editing features, we have been asked if it is meant to be a replacement for drag and drop WordPress page builder plugins?
The WordPress block editor is quite intuitive and can be used to create beautiful content layouts. However, it is still no match for the powerful page builder plugins.
In this article, we’ll compare WordPress block editor vs page builder plugins to help you understand the difference.
WordPress Block Editor vs Page Builders (Explained)
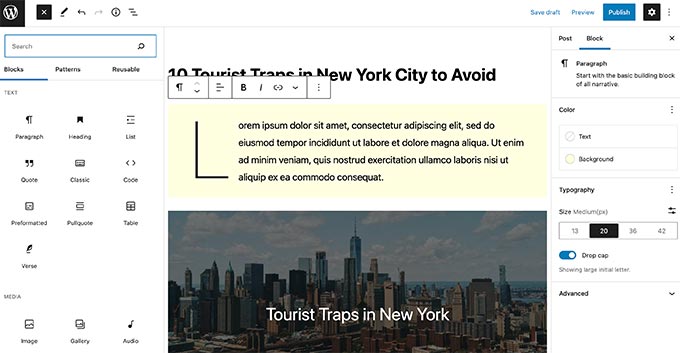
The block editor is the default editor in WordPress. It uses blocks for common website elements (hence the name, Block Editor).
When creating posts and pages on your WordPress site, you can use the block editor to add and edit your content. The block editor is also used for all your widget areas. And now, some themes called ‘block themes’ even support using the block editor for every area on your website.
Since the block editor allows you to use blocks for creating content layouts, it is easy to confuse it with a drag-and-drop page builder.
However, it is still nowhere close to being called a page builder.
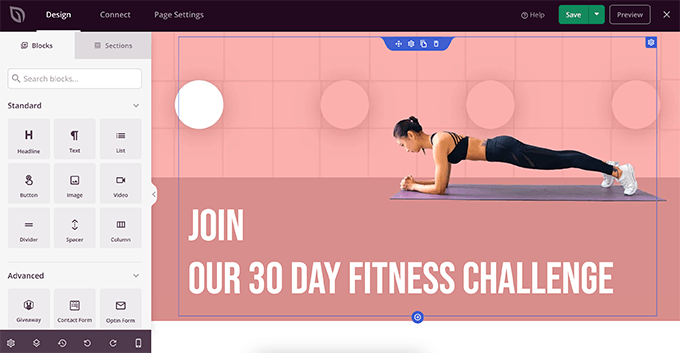
WordPress page builder plugins are drag-and-drop design tools allowing you to create custom WordPress website designs without writing any code.
They come with ready-made templates that you can use and offer much more design flexibility than WordPress block editor.
To understand better, let’s take a deeper look at the differences between WordPress block editor and Page Builders.
Key Differences Between Gutenberg and Page Builder Plugins
The biggest difference is that the block editor comes built-in with WordPress core software as the default editor.
On the other hand, page builder plugins are created and supported by third-party developers.
WordPress.org team does not call the default editor a page builder. Instead, they call it the block editor, and it’s presented as a modern way to edit your website in WordPress.
There’s a big reason for that, and it’ll become very clear as you read the differences between the two.
1. Theme Compatibility & Support
The WordPress block editor relies heavily on your theme styles. It does add some of its own CSS and even allows you to add custom CSS for blocks, but it doesn’t override your theme styles and settings.
While page builder plugins can work with your theme styles, they also give you the option to completely take over a page and override your theme’s styles.
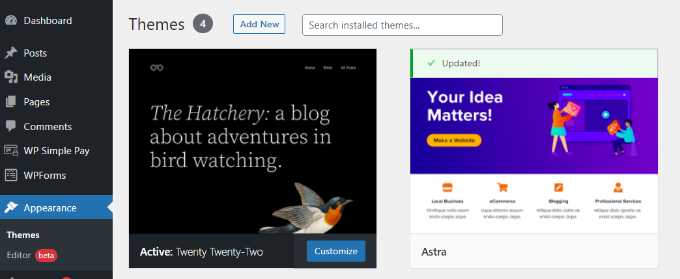
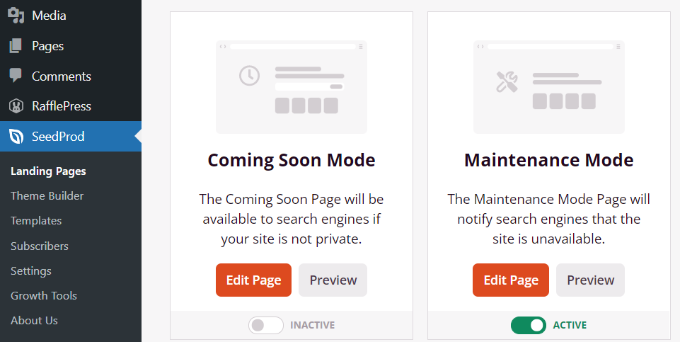
Some WordPress page builders like SeedProd are completely theme agnostic. This means that pages created with SeedProd would look the same even if you change your WordPress theme.
This is extremely helpful if you want to create custom layouts for all website pages.
2. Blocks and Widgets
WordPress block editor comes with a decent set of default blocks covering all the commonly used content elements. You can also save and reuse blocks in other posts and even on other WordPress websites.
It has a powerful API allowing plugin developers to create their own blocks. All top WordPress plugins also have their own WordPress blocks that you can use.
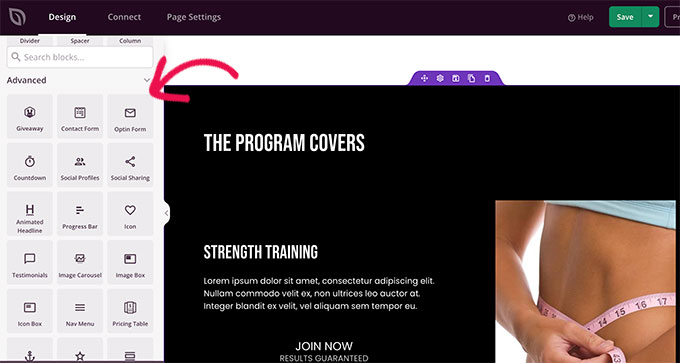
On the other hand, WordPress page builders come with even more blocks.
They offer advanced content elements, including carousels, sliders, call-to-action buttons, contact forms, countdown timers, and more.
You can also save individual blocks, rows, or entire templates to reuse later.
3. Formatting & Styling Options
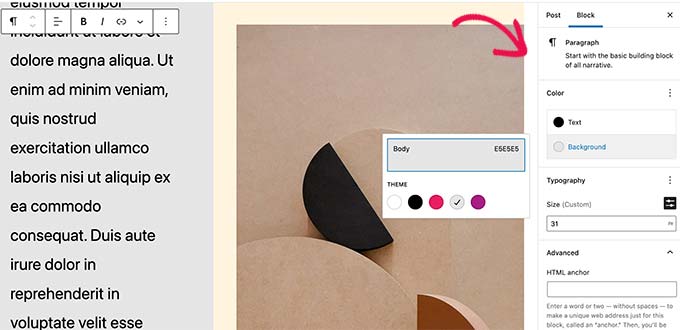
The blocks in the WordPress block editor come with their own styling and formatting options. However, these options are limited.
For more styling and formatting, you’ll have to add your own custom CSS for a block.
Page Builders, on the other hand, offer more styling options by default.
You can change the background colors of blocks, use gradients, use font-icons, select fonts, line height, adjust the width of elements, use styles on images, and more.
4. Templates, Patterns, and Sections
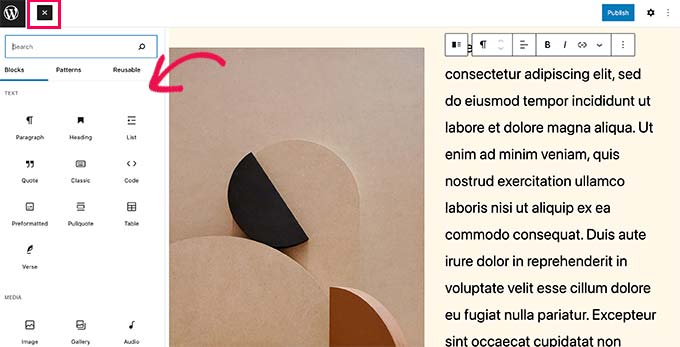
The block editor comes with patterns, which are sets of blocks to quickly insert commonly used areas on a WordPress blog.
For instance, you can use block patterns for headers, call-to-action buttons, columns, and more.
Your WordPress theme may come with its own patterns. You can also find and install patterns from WordPress.org’s patterns library.
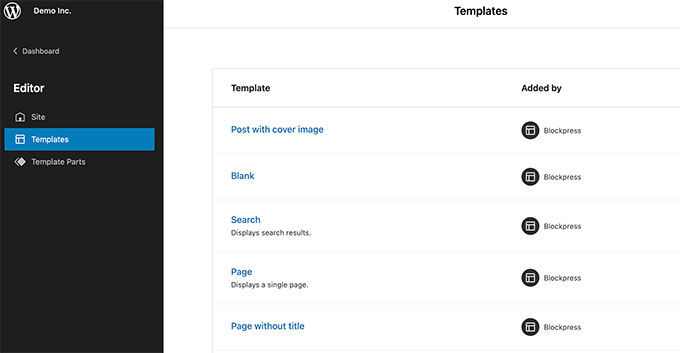
If you are using a block theme (themes that support full site editing), then you can also edit theme templates. Your WordPress theme may come with templates you can edit using the block editor.
However, these templates are generic and provide functionality to display common pages of a typical WordPress website.
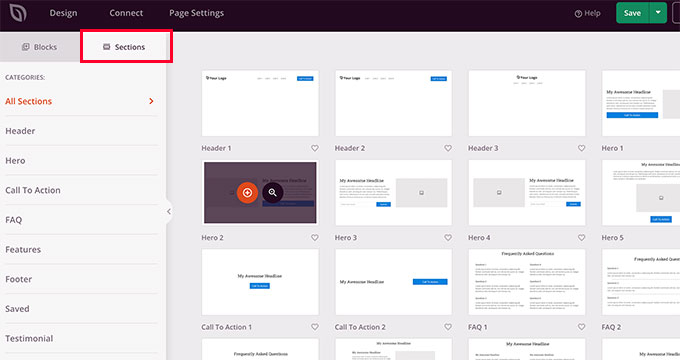
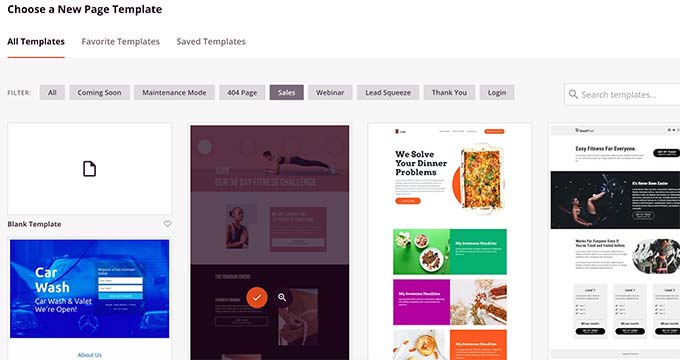
WordPress page builder plugins come with more pre-made templates and sections or patterns.
Unlike block editor, these sections and templates don’t rely on your WordPress theme for styling.
Most WordPress page builder plugins come with dozens of ready to use templates that are highly optimized for conversions.
Plus, you also get templates for specific business types and websites which makes it much faster to customize them for your own needs.
5. Drag and Drop Features
The WordPress block editor is not a drag and drop design tool (at least, not in its current form).
You can add blocks and move them up and down, but you cannot adjust their width/height using your mouse, move blocks next to each other, or create complex layouts.
The block editor comes with group and column blocks that can be used to create beautiful page layouts.
On the other hand, page builders allow you to drag and drop blocks/widgets, adjust their height and width, create columns and add blocks inside other blocks.
These drag and drop allow you to design your pages and complete websites easily.
6. Full Site Editor vs WordPress Page Builders
You can also use the block editor to edit your WordPress theme. However, you’ll need a WordPress theme that supports the full site editor to try this out.
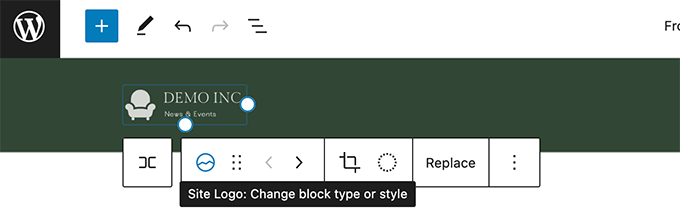
The WordPress full site editor comes with sitewide blocks like query block, site logo, navigation menus, and more.
You can edit your theme templates like header, footer, homepage, and more.
However, the full site editing feature requires using a supported theme. Your changes will disappear if you change your WordPress theme.
On the other hand, WordPress page builder plugins allow you to create individual pages to create your website. They can work with any WordPress theme, and you can change your WordPress theme.
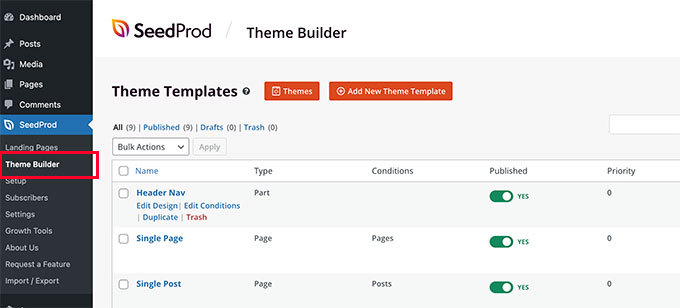
You can easily edit any section or page of your theme with the drag and drop builder. It even lets you select conditions for displaying each template. For example, you could display different sidebars for different sections of your site.
7. Development Goals
The default WordPress block editor is developed to make it easier for users to create content and edit their websites. It is intended to be used by everyone including bloggers, writers, photographers, and businesses.
The page builder plugins offer ability to create conversion and sales oriented pages without much effort. They are intended to be used by small businesses, aspiring designers, WordPress agencies, eCommerce stores, and more.
While the block editor helps you create better content, page builder plugins help you create better landing pages that help you increase sales, boost subscribers, and grow your business.
Can or Will the Block Editor Replace WordPress Page Builders?
In its current form, the block editor is a good content editor and an easy way to edit and customize your WordPress theme.
However, it is currently not a replacement for powerful drag and drop page builder plugins.
With that said, it is in the WordPress roadmap to expand block editor functionality and promote full site editing features.
We will have to wait and see the improvements to determine if block editor will ever come close to the powerful WordPress page builder plugins.
Which Page Builder Plugin to Use with the Block Editor?
All top WordPress page builder plugins work well with the WordPress block editor. You can take a look at our pick of the best WordPress page builder plugins, and how they stack up against each other.
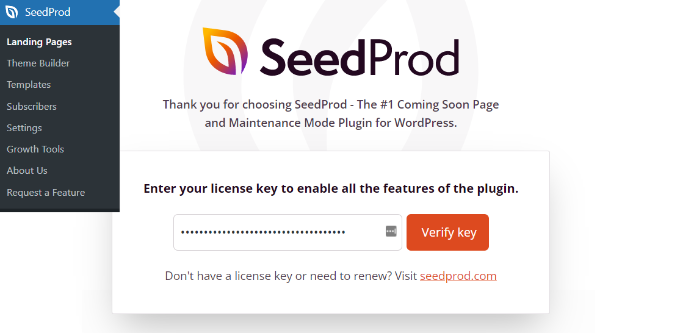
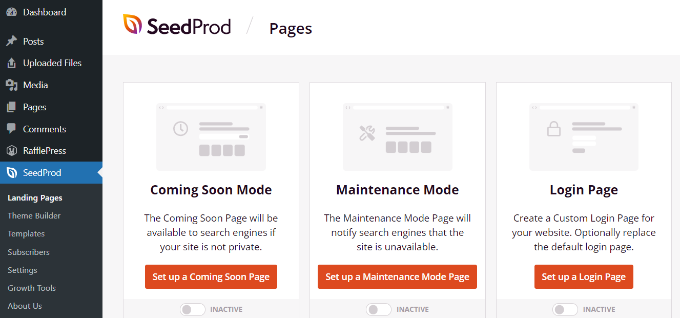
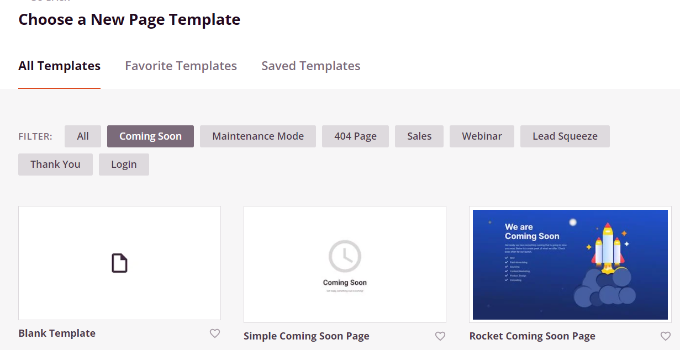
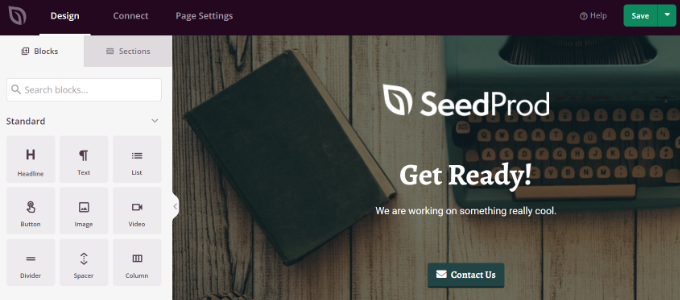
If you’re looking for an easy-to-use and powerful WordPress page builder, then we recommend SeedProd. It offers a drag and drop builder and over 200+ built-in themes to create any type of landing page without coding.
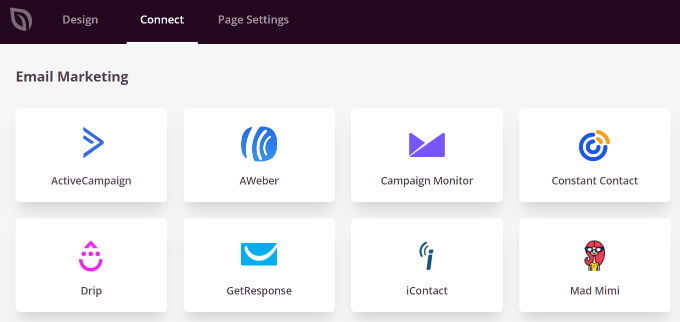
The plugin is lightweight and ensures that your pages load quickly, helping your rank higher in SEO. It also integrates with popular email marketing services such as Constant Contact, Drip, ConvertKit, and more.
Do you want to use Google Search Console to grow your website traffic?
Google Search Console is a powerful free tool created by Google to help website owners understand how Google sees their website. Unfortunately, most businesses don’t know how to effectively use the full power of Google Search Console to increase their website traffic.
In this article, we will show you how to properly use Google Search Console to improve your website SEO and get more visitors.
What is Google Search Console?
Google Search Console is a free tool offered by Google to help website owners monitor and maintain their site’s presence in Google search results.
It provides essential marketing data that you need to start tracking from day one. It also alerts you about errors, security issues, and indexing problems that may affect your website’s search rankings.
You can use all this information in your WordPress SEO strategy to increase your website traffic.
The sad part is that most businesses don’t utilize the full power of Google Search Console because most of them think that just adding their website to Google Search Console is enough.
There’s so much more that you can do with the tool.
If you’re not leveraging all of the powerful features that Google Search Console offers, then you’re missing out.
Luckily, we’re here to help. We have created this ultimate Google Search Console guide to help you grow your website like a Pro.
Note: Since this is a comprehensive guide, we have added a table of contents for easier navigation.
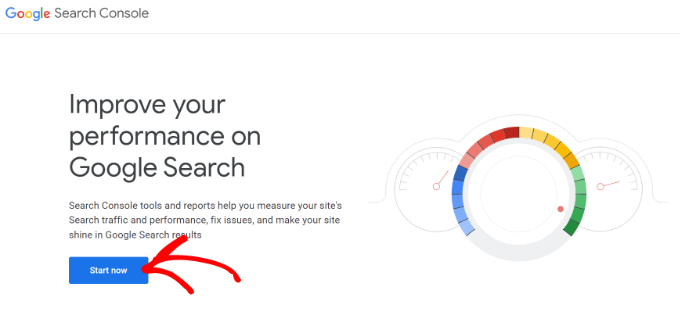
If you haven’t already done so, then you need to go ahead and add your website to Google Search Console. It is really simple and will only take a few minutes.
You’ll be asked to sign in using a Google / Gmail account. Once logged in, you will need to enter your website URL.
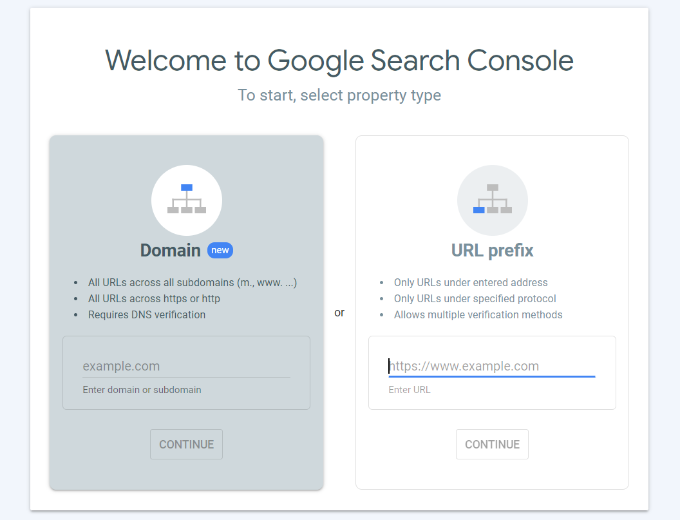
Google Search Console offers 2 methods for site verification, including domain name or URL prefix. We recommend using the URL Prefix method as it provides more flexibility.
Do remember that Google considers HTTP and HTTPS as two different protocols. It also considers https://www.example.com and https://example.com as two different websites.
You’ll need to make sure that you enter the correct URL of your website.
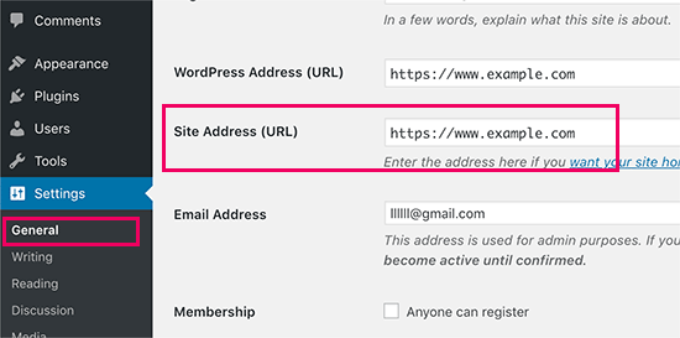
If you are unsure, then simply login to your WordPress admin area and go to Settings » General page. There you will see your website’s URL in the site address field.
After entering your website address, click on the ‘Continue’ button.
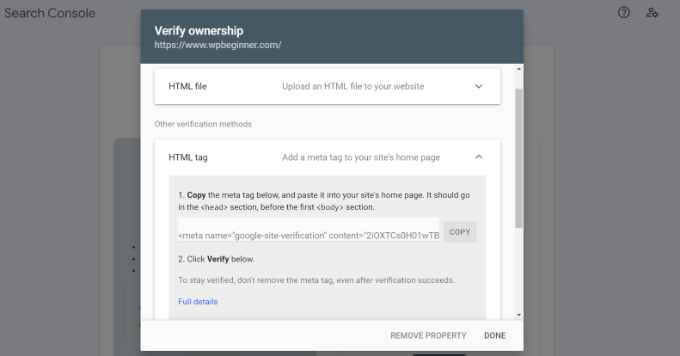
Next, you will be asked to verify ownership of your website. There are several ways to do that, but we will show the HTML tag method because it is the easiest one.
Click on the HTML tag to expand it and then copy the code inside it.
Next, you’ll need to add the code to your WordPress website so that Google can verify the ownership. However, this requires coding, which can be tricky for beginners.
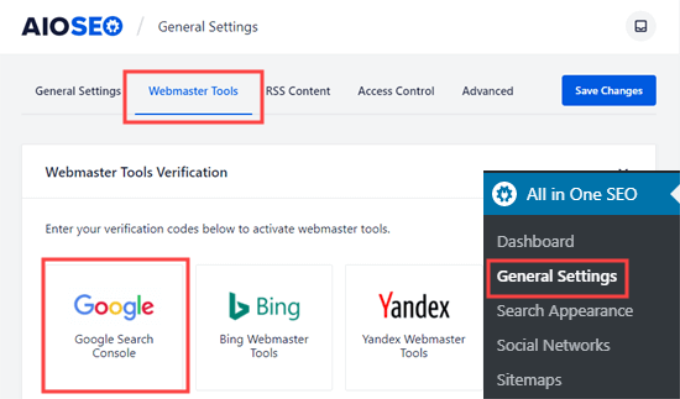
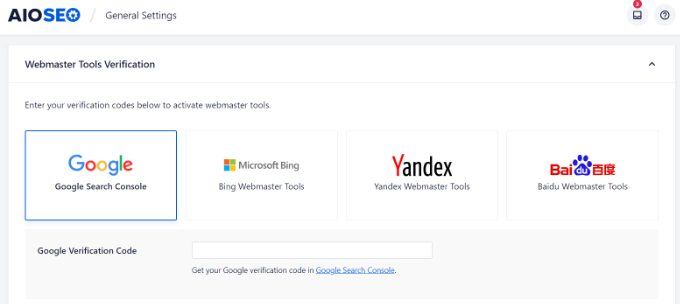
Upon activation, you can go to AIOSEO » General Settings page and then click the ‘Webmaster Tools’ tab. Next, select the ‘Google Search Console’ option under Webmaster Tools Verification.
After that, go ahead and enter the code you copied earlier from Google Search Console into the ‘Google Verification Code’ box.
Don’t forget to click on the ‘Save Changes’ button to store your changes.
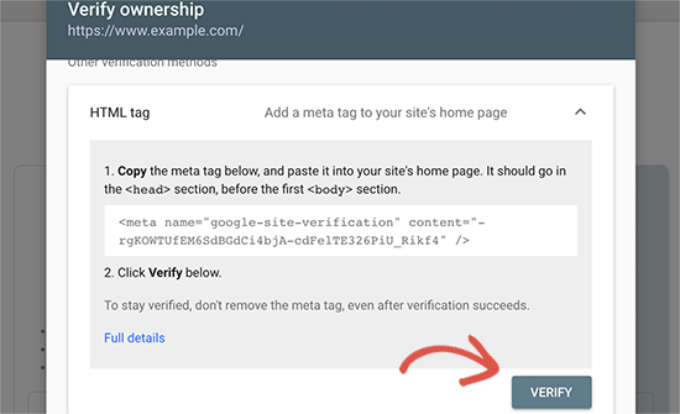
You can now go back to Google Search Console settings and click on the ‘Verify’ button.
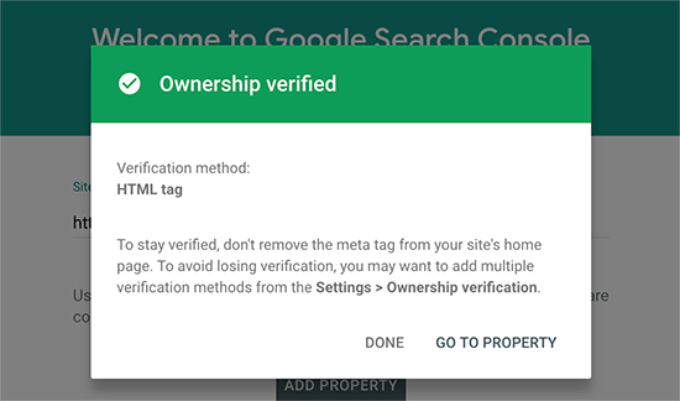
Google Search Console will now look for the HTML tag in your website code and show you a success message.
That’s all. You have successfully added your site to Google Search Console. You can now click on the ‘Go to Property’ link to visit your Google Search Console dashboard.
Note: if Google Search Console cannot verify your website after you have added the code in Insert Headers and Footer plugin, then you need to make sure to clear your WordPress cache and try again.
2. Adding an XML Sitemap
An XML sitemap is a way for website owners to tell search engines about all the pages that exist on their website. It also tells search engines which links on your website are more important than others.
Adding an XML sitemap to your website helps search engines better crawl your website. While it doesn’t give you a boost in search rankings, it can definitely help search engines index your content more efficiently.
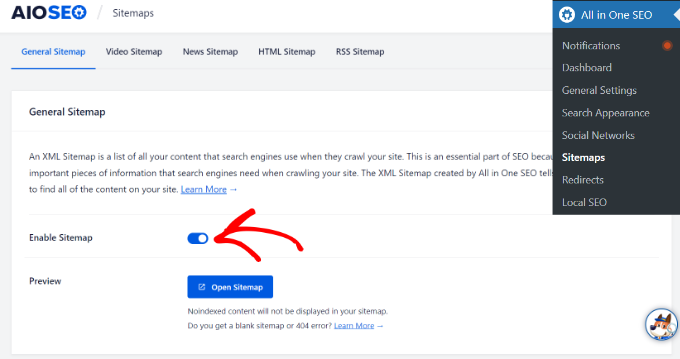
The best part is that if you installed All in One SEO (AIOSEO) in the first step, then the plugin automatically adds an XML sitemap to your site.
To see the sitemap, you can head over to All in One SEO » Sitemaps and make sure that the toggle for ‘Enable Sitemap’ is switched on.
The plugin will automatically generate an XML sitemap for your website, and you can find it at the URL that looks like this:
http://example.com/sitemap_index.xml
Don’t forget to replace example.com with your own domain name. You can now submit this URL in Google Search Console.
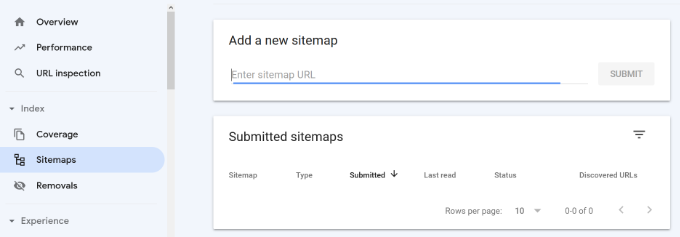
Next, head over to the Google Search Console dashboard and then click on the ‘Sitemaps’ option from the left column. After that, you can paste the URL and click the ‘Submit’ button.
Google Search Console will now check your sitemap and use it to improve your website’s crawling. You can go through our guide on how to add a sitemap page in WordPress for more details.
3. Connect Google Search Console to Google Analytics
Connecting Google Search Console to your Google Analytics account helps you analyze search console data in Google Analytics. This provides you with a new perspective on your top-performing content and keywords.
If you haven’t already done so, then you will need to install Google Analytics on your WordPress website.
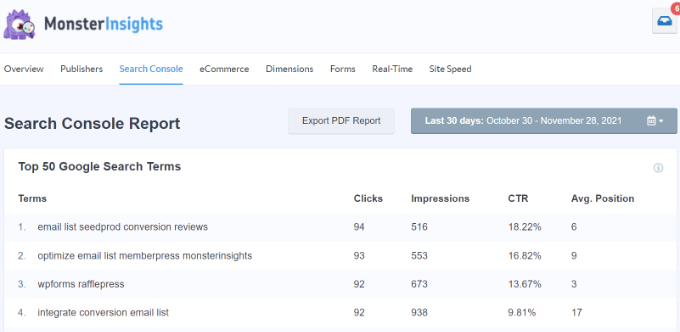
We recommend using MonsterInsights for that. It is the best Google Analytics plugin for WordPress, and it will automatically show your top keywords from Google Search Console in your WordPress admin area.
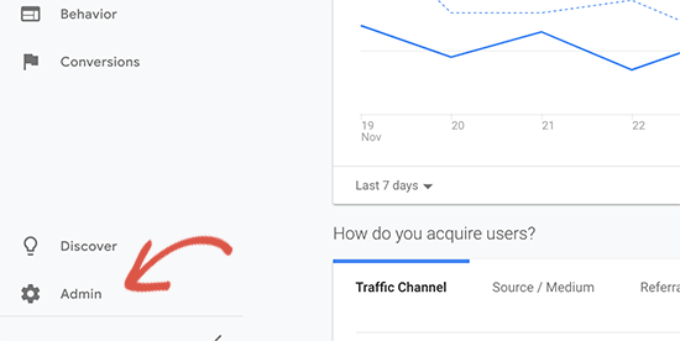
To connect Google Search Console to your Analytics account, you need to head over to Google Analytics dashboard for your website. From the bottom left corner of the screen, click on the ‘Admin’ button.
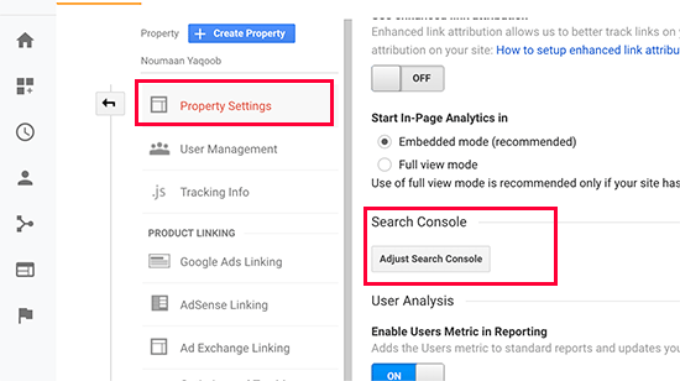
Google Analytics will now switch to the admin view. From here, you need to click on the ‘Property Settings’ section and then click on the ‘Adjust Search Console’ button.
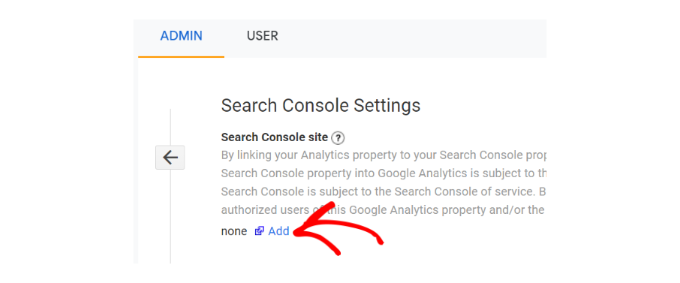
On the next screen, you need to click on the Add button to select your website.
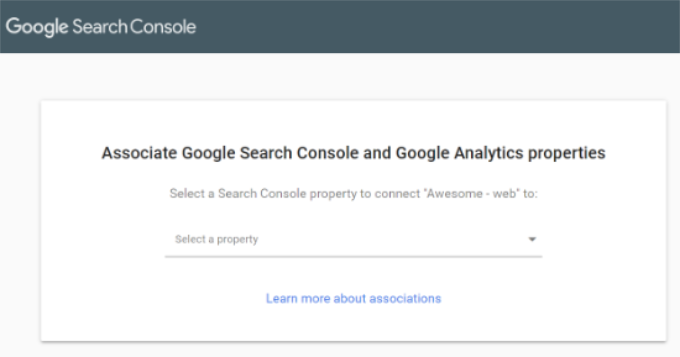
Analytics will now take you to the Google Search Console website showing you the list of all websites you have added to the search console. Select the property you want to link to Google Analytics from the dropdown menu.
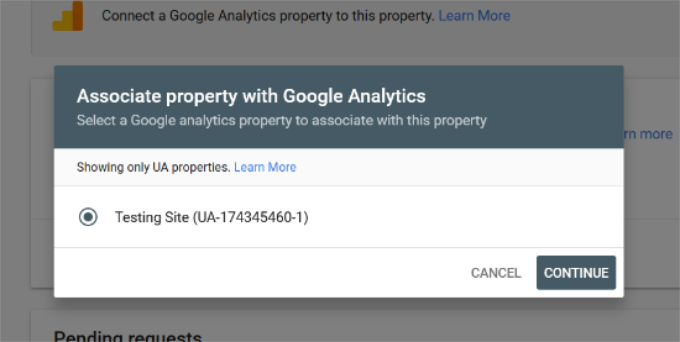
After that, you’ll need to select the Google Analytics property you’d like to connect with Search Console and click the ‘Continue’ button.
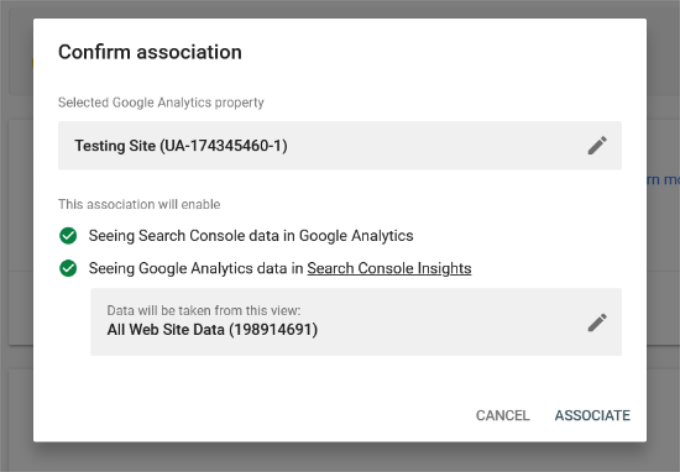
You’ll now see a popup window showing that you’ve successfully connected Google Analytics and Search Console.
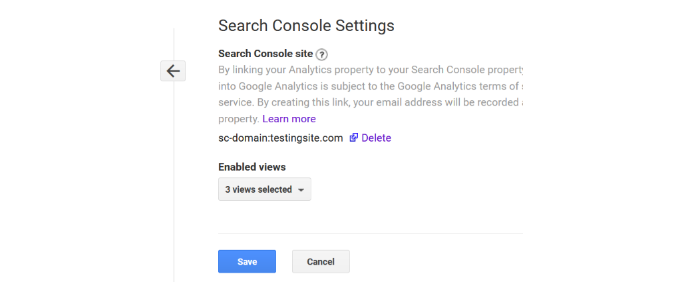
That’s all. You have successfully connected your Google Search Console data to your Analytics account. You can go back to the Google Analytics Search Console settings page to see the connected Search Console and click the ‘Save’ button.
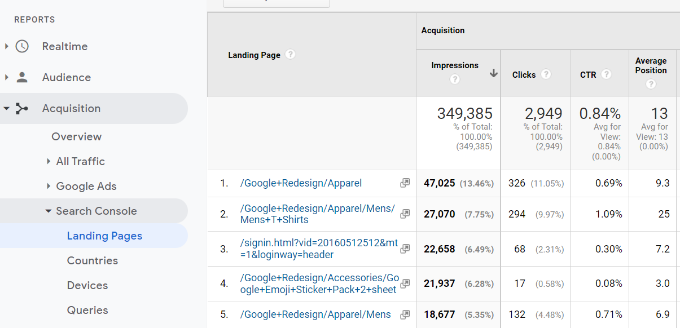
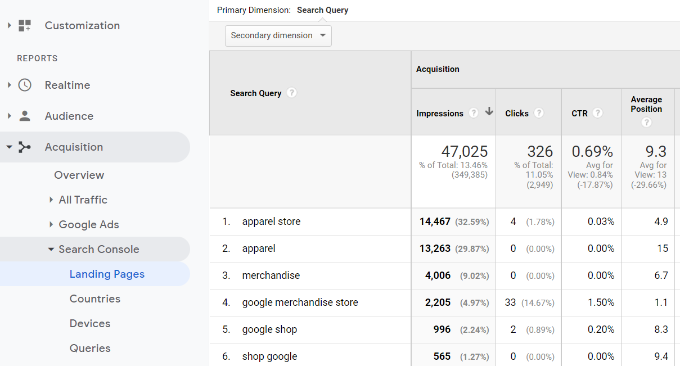
You can now view the newly unclocked Search Console reports in your Google Analytics account under Acquisition reports. It also helps unlock keywords not provided in Google Analytics.
The first report you will find there is the ‘landing pages’ report.
For each landing page, you’ll see the impressions (number of times a page appeared in search results), clicks, click-through rate (CTR), and average position in the search results. Combined with that page’s analytics parameters like bounce rate, sessions, and pages per session.
Clicking a landing page will show you the actual keywords that brought users to this landing page.
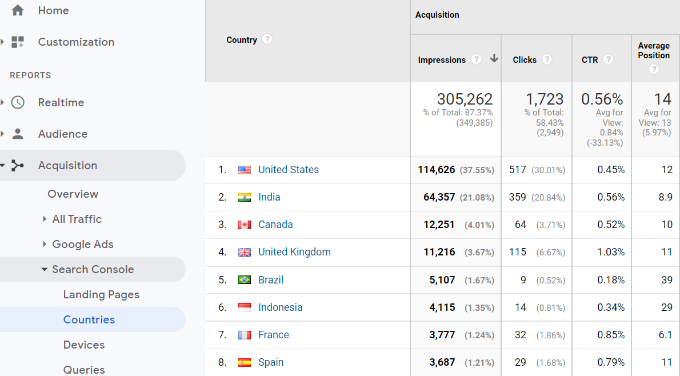
Next, you can Switch to the ‘Countries’ report, and you will see countries listed in the same order. This helps in creating content and geolocation marketing campaigns for people from different regions.
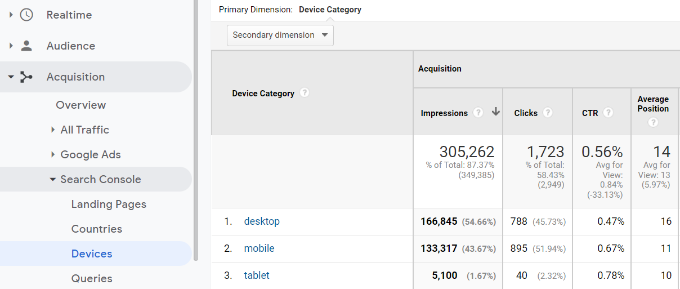
The devices report will show you how your site performed in desktop, mobile, and tablet search results.
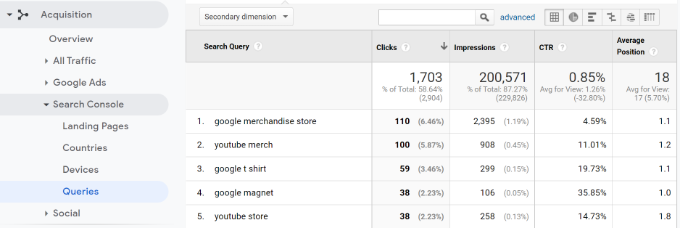
Next, Queries are the most important of all reports among this data. It shows you the keyword data missing from your Google Analytics reports. You can see which search terms are driving traffic to your site.
4. Finding and Fixing Search Indexing Issues
The most helpful feature of Google Search Console is that you can troubleshoot indexing errors.
These errors can affect your search rankings by stopping the search engine from crawling and indexing the pages on your website.
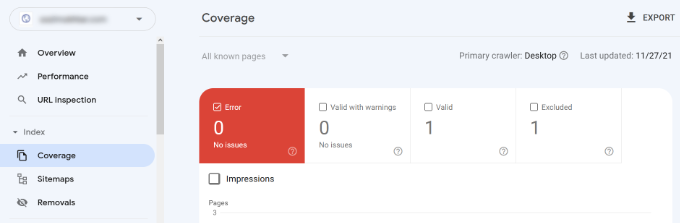
You can easily locate these errors under the Coverage report.
It shows you which pages from your website are indexed by Google and which pages resulted in an error or a warning.
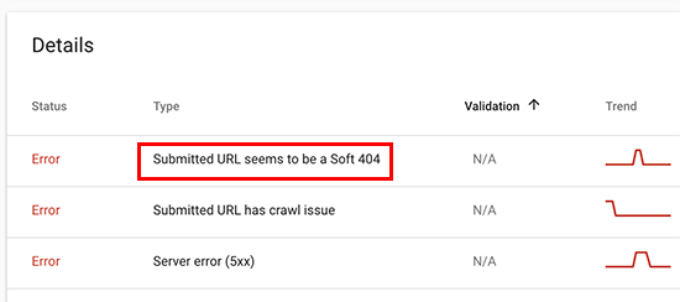
Next, scroll down, and you will see the detailed list of all the errors. Clicking on a link will open the detailed view, where you will also find the link to learn more about the error and how to fix it.
Following are a few common indexing errors you may see:
404 error – This error means that the crawler followed a URL and saw a 404 error.
Soft 404 error – This error occurs when the crawler sees a 404 error page, but the page’s status code is sending a 200 (success) message to the browser.
Server error – This means that your website server timed out or didn’t respond. This could happen if your website were under heavy traffic, was under maintenance, or unavailable for any other reason.
Not followed – This error occurs when Google is not able to follow a content type. This could be a flash, javascript, iframe, or other resources that the crawler cannot fetch.
Now let’s take a look at how to fix some of these crawl errors.
5. Fixing 404 Errors in Google Search Console
First, you need to keep in mind that not all 404 errors are equal. You can safely ignore some of them and only fix those that are actually an error.
For example, if you deleted a blog post and don’t want to redirect users to a newer post, then it is ok to let Google see a 404 error page. Google will eventually deindex that page if it keeps seeing the 404 error.
However, the reason Google wants you to look at those 404 errors is that you may not be aware of them. For example, you accidentally deleted something or forgot to redirect users to the new updated version.
Simply click on the error in the Index Coverage report, and it will show you all the pages displaying that error. Carefully review the pages and if you see a page that shouldn’t be there, then copy its URL and open it in a new browser window.
If you see a 404 error page in your browser, then this means that you need to fix this page.
Now, if it is a page that no longer exists but you have a newer or similar version of it, then you would want to redirect users to that page. See our guide on how to set up redirects in WordPress.
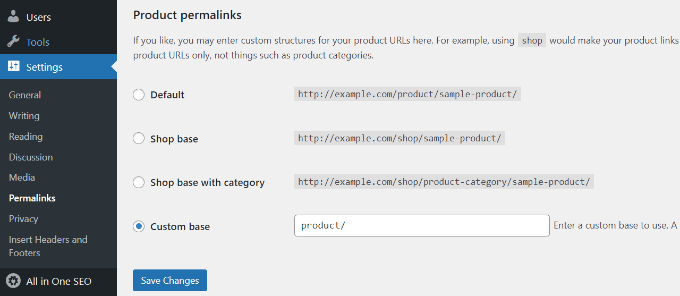
However, sometimes 404 errors may occur due to a misconfiguration in WordPress permalink structure. To fix this, simply visit Settings » Permalinks and then click on the ‘Save Changes’ button without changing anything.
6. Fixing Soft 404 Errors in Google Search Console
Soft 404 errors are a bit tricky to troubleshoot.
Basically, these errors occur when the Google bot sees what looks like a 404 error document instead of content. However, your server is sending a 200 (success) code. Normally, your server sends a 200 success code when a page is displayed without an error or redirect.
To resolve soft 404 errors, go ahead and click on the errors in the Coverage report to view the list of affected pages.
Now, you need to open the page in a new browser tab to see what’s happening. If the page displays correctly, then you can safely ignore the error.
On the other hand, if the page is showing a 404 error document, then you may want to investigate further.
Start by clicking the ‘Submitted URL seems to be a Soft 404’ link from the Coverage report. Next, you can open the link in a new tab to check if it’s not a false alarm.
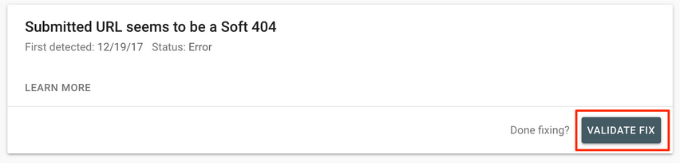
If the page is valid and you want it to appear in the search results, then simply click the ‘VALIDATE FIX’ button. Google will then recrawl the page and change the status error.
If the WordPress search function causes the soft 404 errors you are seeing, then the easiest solution is to stop the Google bot from crawling search URLs.
To do that you need to add the following lines to your robots.txt file.
User-agent: * Disallow: /?s= Disallow: /search/
Usually, Google Bot doesn’t crawl search URLs. However, some spammers might try to spam Google search console reports by linking to search URLs with random strings. This way, they hope you will see their link in your Search Console report and click on it.
If the affected URLs are not searched queries, then you may want to redirect them to a proper page on your site.
7. Fixing Server Error in Google Search Console
Server Errors in Google Search Console are caused by a number of reasons. The most common of them is when your server times out during a crawl, throws an unexpected error or does not appear to be online.
Use the ‘URL inspection’ tool to make sure that the affected URL is working.
If it is working, then you can ignore the error. If you are on a reliable WordPress hosting provider, then most server errors would disappear automatically.
However, if you can confirm the error by visiting the URL, then there are several things you can do to fix it. See our list of most common WordPress errors guide to find a fix for the specific error message you are seeing.
8. Finding and Fixing Security Issues
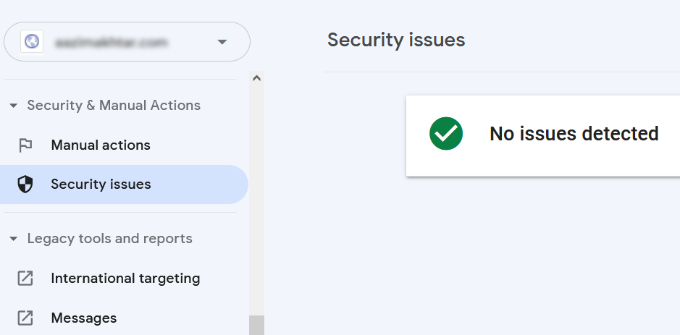
Security issues not only stop Google from crawling your website, but they could also cause a sudden drop in search traffic. Google may temporarily remove affected pages, show a warning to users, and drop a page’s ranking.
Security issues will be highlighted on the overview screen as you login to your Google Search Console account. The most common security issue is websites affected by malware and trojans.
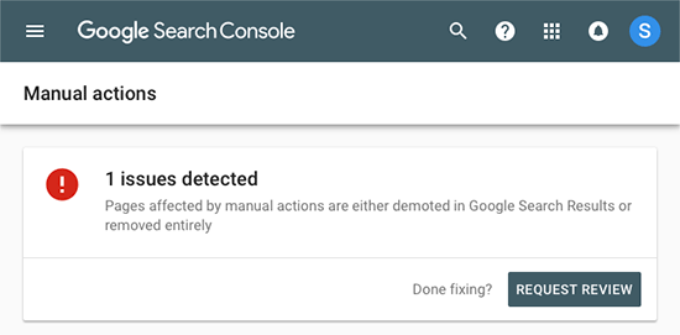
While security issues are automatically triggered, manual actions are the penalties that are imposed by human staff from the Google Search team after a careful review. If a manual action is taken against your website, then this is pretty significant and can immediately take away all your search traffic.
These manual actions usually occur when a website is involved in illegal activities, spamming, and other fraudulent or fishy activities.
Clicking on the Manual Actions link will show you the actions in your search console report. You will also find detailed information about the issue that triggered it and how to clean it up.
Once you have removed the objectionable content, you can click on the request review button. Your website will now be reviewed and reconsidered by the Google Search team, and they can decide on removing the penalty.
10. Using Google Search Console To Grow Traffic
Now that we have covered the technical bits, let’s get to the fun part of growing your website traffic by utilizing the data available in Search Console.
Google Search Console helps you uncover keyword data, find out your top-performing keywords, and discover hundreds of potential keywords where you can easily rank and get more traffic.
We will also look at links and how to use them to improve search rankings.
Ready? Let’s get started.
11. Mining Keyword Data in Google Search Console
Keywords are the search terms users type in search engines to find information.
Marketers and website owners can optimize their content to target desired keywords and improve their chances of appearing on top in search results.
Previously, keyword data was available in website stats and analytics reports in Google Analytics. However, Google encrypted that information in 2013 when they switched to HTTPS.
As a result, if you try to view search queries in Google Analytics, you’ll most likely see ‘not provided’ keywords. A simple solution to this issue is connecting Google Analytics with Search Console.
You can also view the keyword data in your Google Search Console reports.
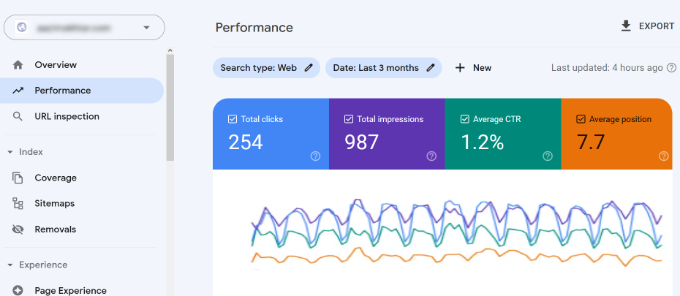
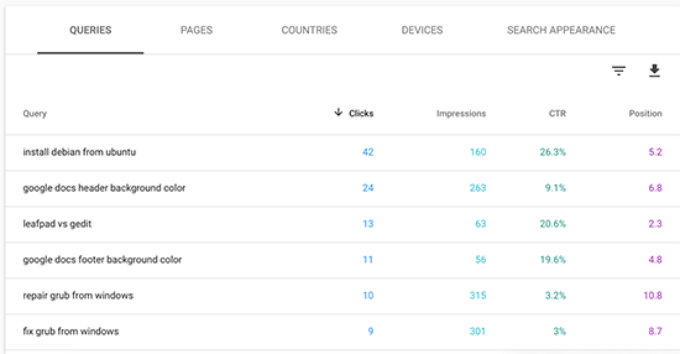
It gives you a full view of the keywords your website is ranking for, average position, clicks, and impressions (number of times your site appears for that keyword).
You can see this information in your Google Search Console reports under the ‘Performance’ tab.
On the top, you will see a graph of your website’s performance in search results. Below that, you will see the keywords data, which you can filter by position, impression, and click-through rate.
You can sort this data by clicking on any column or using the filter option to narrow down the results.
You can also switch to the Pages tab to see the performance of your pages in search results.
Clicking on any page in the list will filter the results for that page. You can then switch to the ‘Queries’ tab to see the keywords that bring the traffic to that particular page.
Now that we have covered how to browse and view this data, let’s see how actually to use this in your SEO and content planning.
12. Finding Low-hanging Keywords That You Can Easily Rank
A lot of your pages may be ranking on page 2 or 3 of Google search results for different keywords. These are the keywords that you can quickly work on to rank higher and get more traffic.
Let’s find out those keywords.
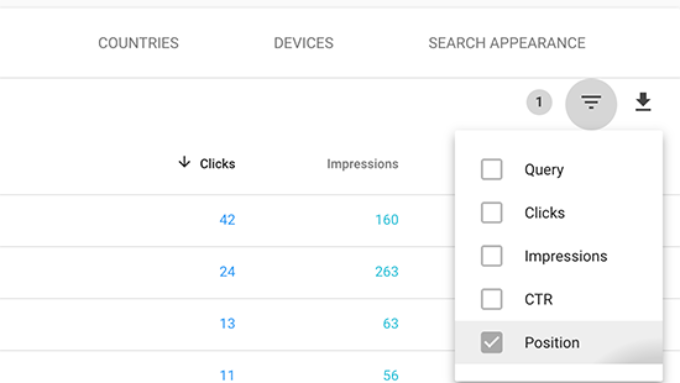
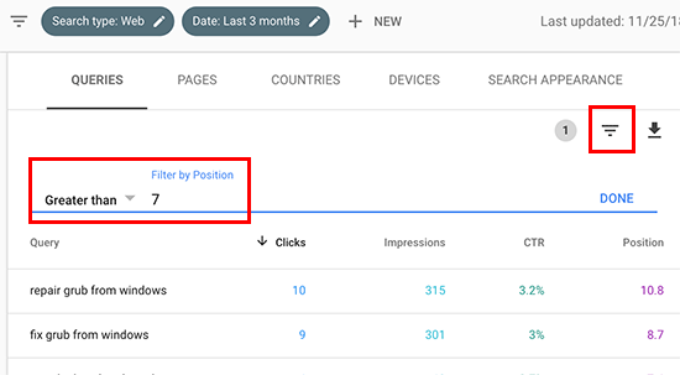
In your Performance report, click on the filter icon and then select the ‘Position’ option. Next, you’ll be looking for keywords where the average position is higher than 7.
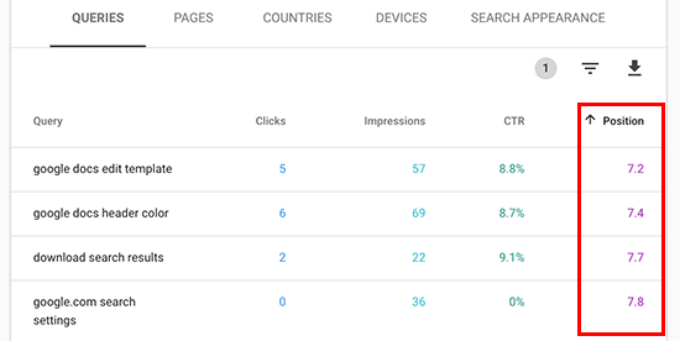
Search Console will now only show the keywords where your site appears on an average position of 7 or higher. Now, click twice on the position column to sort the list in ascending order.
As you scroll down, you will find tons of keywords that rank between 7 and 30. All these keywords are low-hanging fruits where you can easily rank higher.
To view more results, scroll to the bottom and select a higher number for ‘Rows per page.’
When choosing the keywords to work on, you would want to choose keywords based on their number of impressions. Higher impressions mean more search traffic for those keywords.
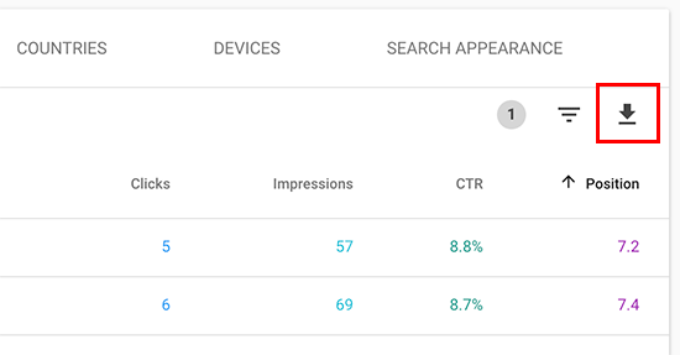
To do that, you can export the data in CSV format and then open it in spreadsheet software.
Now that you have mined the low-hanging keywords with higher impressions, the question is how do you improve your rankings for those keywords?
Here are some tips to help you improve your rankings for those keywords.
1. Improve the content by adding more useful information
The #1 reason your page isn’t ranking for a keyword is that Google finds other content more valuable. To counter that, you need to review your article or blog post and add helpful content.
Look at the articles ranking on top five positions for that keyword and cover all the information that your article is missing in more detail.
We are not saying that you should just add more text to it. You need to make it more useful, informative, and comprehensive.
2. Evaluate On-page SEO
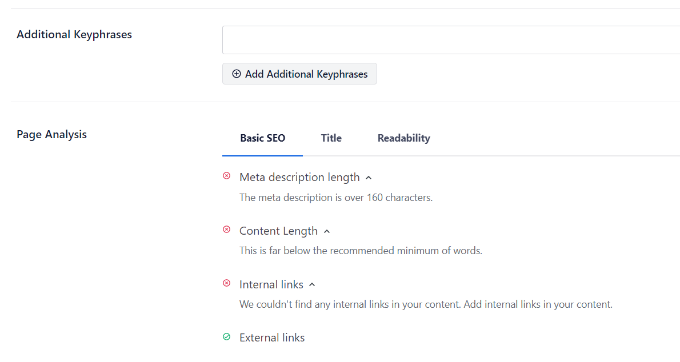
Use All in One SEO (AIOSEO) to improve the on-page SEO score for that article. It gives practical tips on improving a page by analyzing the content, keyword density, title, readability, links, and more.
You can also check out our guide on the SEO audit checklist to boost your rankings.
3. Increase time users spend on that page
Google considers it a success when users click on a search result and spend time viewing it. This means your content needs to be highly engaging and instantly provide users with the information they were looking for.
Here are some crazy simple things you can do to increase user engagement.
Use images – users find images much easier to look at than text. Adding more images makes it easier for users to scan the information and keeps them engaged.
Use videos – Videos are the most engaging form of content available. Adding video to a page significantly increases the time users spend viewing that page.
Make text more readable – Use smaller paragraphs, lots of white space, simpler sentences, and keep your style casual and conversational. All these things make reading easier for users.
Links play an important role in WordPress SEO. Search engines use them as a metric to determine how important a page is and where it should rank in search results.
The Links report in Google Search helps you see your website’s performance in terms of links.
It shows you external links, internal links, top linking sites, and top linking text. More importantly, it shows top linking sites, how often they link to your site, and how many pages they link to.
Let’s see how you can use these reports to get more backlinks, improve internal links, and boost your rankings.
14. Getting More Backlinks from Third-Party Websites
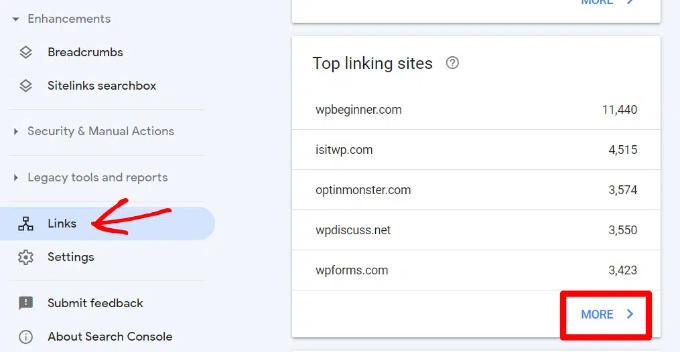
Search console shows third-party websites that have linked to your site in the ‘Top linking sites’ report. You can expand the report by clicking on the ‘More’ link at the bottom.
If you click on a domain name to expand the report, you will see all the pages they have linked to. Next, click on each page to get the exact URL linked to that particular page.
You can now use this data to get more backlinks for your site. Simply visit the website and see how they have linked to you. After that, see what other content they have where your site can be linked from.
Next, simply reach out to the website via email or contact form on their website.
First, thank them for linking to your article and then politely mention that they may want to include a link to an article of yours.
Now, this direct approach may not always work. In that case, you need to be creative. You can offer them to write a guest post for their blog, leave comments on their articles, follow them on social media, or retweet their articles.
Repeat the process for all important external links on your website. With consistent effort, you can get proper backlinks without spending any money.
15. Improving Internal Links to Boost Rankings
It is harder to get third-party websites to link to your content. However, it is way easier to link to your own content from your own site. This practice is called internal linking.
Internal linking helps search engines understand the context and relationships among different pages on your website. It also helps them understand which pages are important based on how often you have linked to them.
This is why you should make internal linking a habit when writing new content on your website or blog.
Now let’s see how to use the links reports in Search Console to help you build internal links.
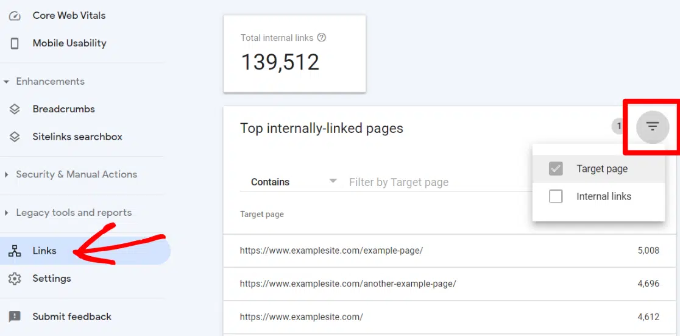
In Google Search Console, click on the Links report and then click on the ‘More’ link under the ‘Internal Links’ column. The report shows how often you have linked to other pages on your site.
Go ahead and click the filter icon and then select the ‘Target page’ option.
Search Console will now show you how many pages are linking to this page. You can now compare it with other pages and see whether pages with more internal links are ranking higher than posts with many internal links.
If that’s the case, then go ahead and start adding internal links to pages that you want to rank higher. Make sure you are only linking to the article when it makes sense. Adding links where they don’t make sense would create a bad user experience.
16. Using Core Web Vitals in Search Console
Did you know that Google now considers your website loading speed as a ranking factor?
In 2020, Google introduced Core Web Vitals that measures how fast your website is and help the search engine measure your site’s user experience.
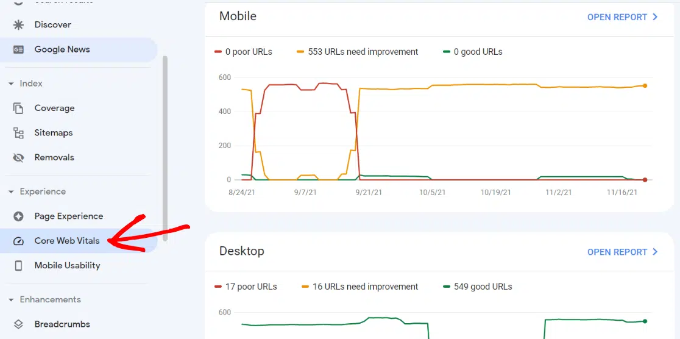
In Google Search Console, you can view the ‘Core Web Vitals’ report under the Experience menu on your left. It provides a complete report about your site’s speed score for mobile and desktop.
The best part is that you also get recommendations on how to improve your Core Web Vitals score and improve your site’s load time.
For more information, please refer to our guide on how to boost WordPress speed and performance.
17. Create Rich Snippets for Your WordPress Pages
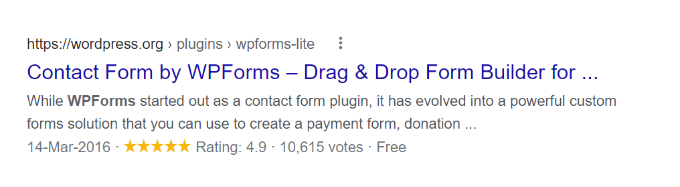
Rich snippets or schema markup allows Google to display additional information in its search results. These include star ratings, prices, reviews, and more.
Rich snippets make your page more noticeable in the search results. As a result, you get more clicks and website traffic.
Many WordPress themes automatically include some basic structured data. If you publish recipes, run a reviews site, or an online store, then rich snippets can give your site an SEO boost.
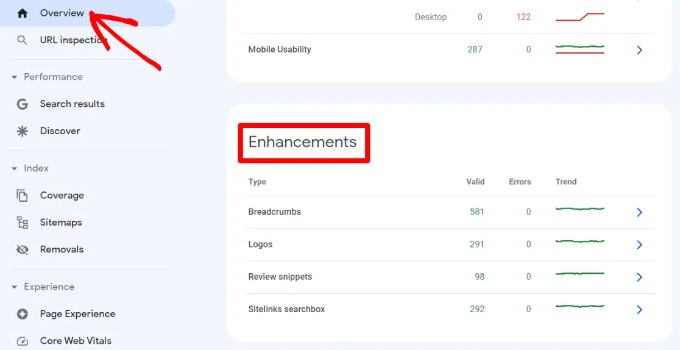
Google Search Console makes it very easy to find pages that are displaying rich snippets. It also shows the type of rich snippets for your website.
You can view them by going to ‘Overview’ and then scrolling down to the ‘Enhancements’ section.
The real useful part is that the report allows you to quickly look at pages that have errors while displaying rich snippets so that you can fix them.
18. Using Search Console to Improve Mobile Usability
Nearly 63% of all Google searches in the United States come from mobile devices. That’s why Google gives an SEO bump to mobile-friendly websites in the search results.
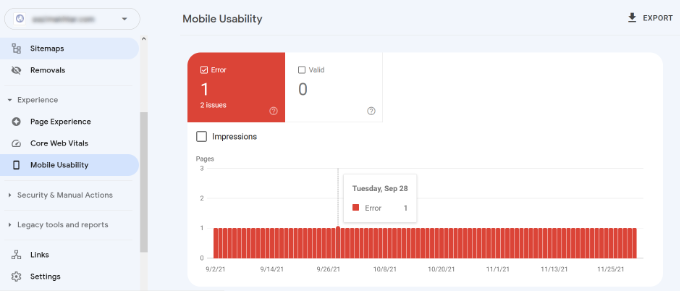
Google has a Mobile-Friendly test tool that allows you to quickly examine a page. The Mobile Usability report in Search Console tells you how Google sees your entire website in mobile performance.
If you see errors on this page, then this means that these issues may affect your site’s rankings.
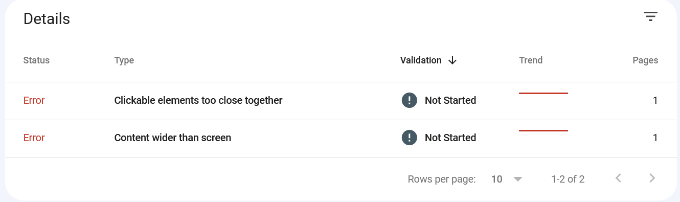
To see the affected pages, you can scroll down to the ‘Details’ section and click on the error.
Poorly coded WordPress themes or plugins cause most mobile usability issues. The easiest way to fix those issues is by using a better responsive WordPress theme.
19. Use URL Inspection Tool in Search Console
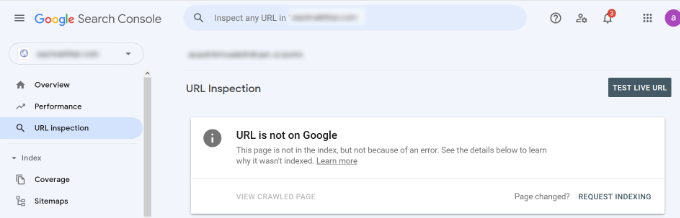
The URL Inspection tool in Google Search Console provides information about a page if it’s on Google search results or not.
You can check the status of a page and also request Google to recrawl a page. To start, simply enter a URL in the top search bar.
Google Search Console will then show you the status of the page is indexed by Google. If it’s not indexed, then you’ll see a message saying ‘URL is not on Google.’
You can click the ‘Requesting Indexing’ button and request Google to manually fetch the page from your website.
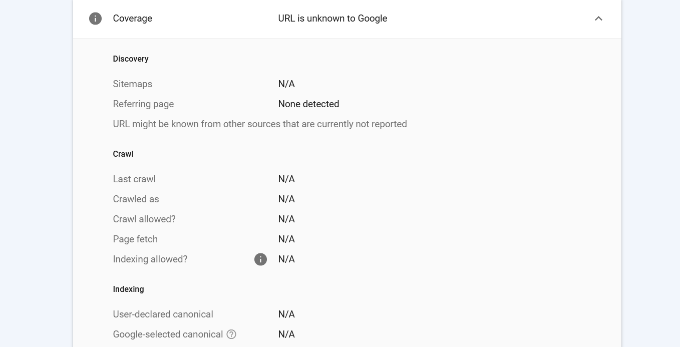
Besides that, you can scroll down and see more details in the ‘Coverage’ report. It will show information about sitemaps, crawl history, and indexing.
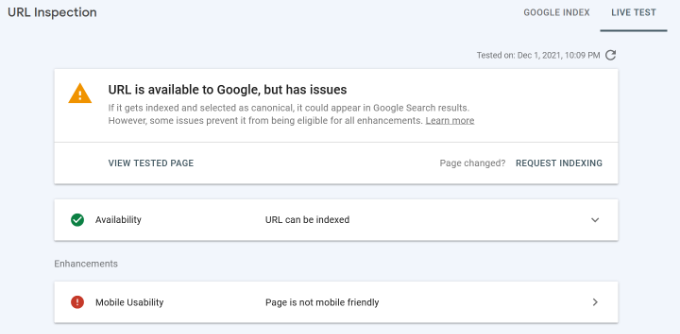
You can also live test a URL and see if there is an indexable version available. If there is, then simply click the ‘Request Indexing’ option.
20. Removing URLs from Google Search
So far, we have focused on using Search Console to get your content indexed and improve rankings in Google Search. However, sometimes you may want to remove content from Google Search as well.
One way to do this is to add a noindex meta tag to the page you want to remove from search results. However, depending on how often Google crawls your website, this could take some time before your page actually disappears from search results.
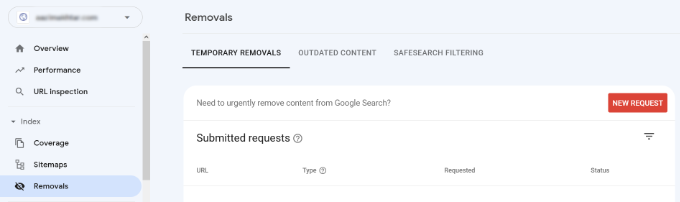
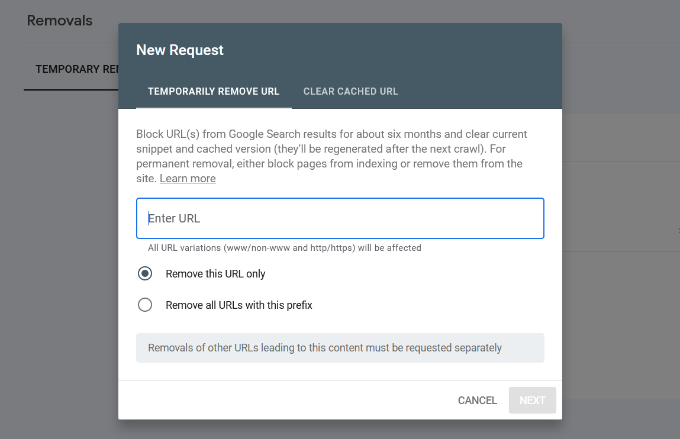
Search Console’s Remove URL tool allows you to request a URL to be removed from the search results. Simply click on ‘Removals’ under Index in the menu on your left.
Now click on the ‘New Request’ button, and a popup window will appear. Go ahead and enter the URL you want to remove, select whether you want to remove this URL only or with this prefix, and click the ‘Next’ button.
Google will now block the URL from its search results for about six months. You can add as many URLs as you want and see them in the Removals section in the Search Console.
21. Adding Users to Access Google Search Console
If you have a marketing team or you have hired someone to help you with SEO, then those users may need access to Google search console data.
Search Console allows you to easily add users and give them access to view all reports without sharing your Google account credentials with them.
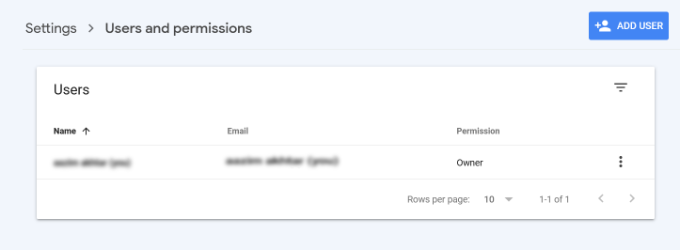
To add a new user, simply click on the Settings » Users and permissions option under Property settings and then click on ‘Add User’ button.
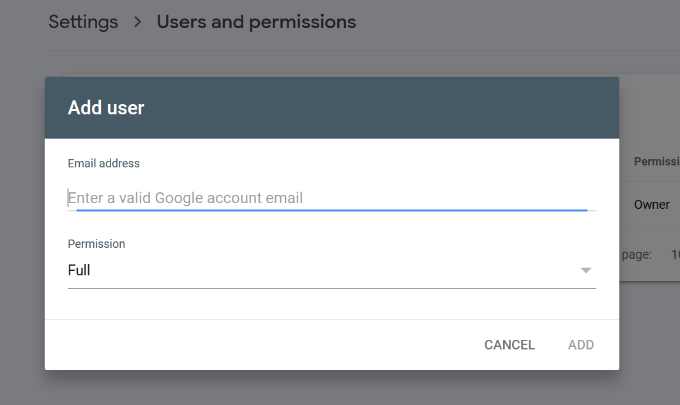
Next, you need to provide the user’s valid Google account email address and select permission to grant them.
There are two types of permission levels. The full permission level will give them access to everything, including the ability to add new users. Restricted permissions will allow them to view the data but not add new users.
After choosing a permission level, click on the ‘Add’ button to save your changes.
The user you added will now receive an email notification, so they can login and view Google Search Console data for your website.
Helpful Resources
Following helpful resources on WPBeginner will help you further improve your website’s performance in search engines.
Ultimate WordPress SEO Guide – Our complete step by step WordPress SEO guide will walk you through complete WordPress SEO setup like a pro.
WordPress Performance Guide – Step by step guide to improve your WordPress speed and performance for higher search rankings and better user experience.
WordPress Security Guide – Keep your WordPress site secure with this complete WordPress security guide for beginners.
Tracking User Engagement – This guide helps you learn how to track user activity on your website and use it to plan your growth strategy.
Convert visitors into Customers – If you run an online store, then this guide will show you how to convert search traffic into paying customers.
Starting a blog for the first time can be a nerve-wracking experience. There’s a lot of excitement, but at the same time, there’s a fear of the unknown. You want to do everything the RIGHT way and avoid all major pitfalls, so your blog can be successful. In our 12+ years of blogging, we have made countless mistakes and learned from them. Over the last decade, our blogs have received well over a billion pageviews. In today’s article, we will share the “expert tips” that we wish we knew before starting our first blog.
Pro Tip: We have a step-by-step guide on how to start a blog (the RIGHT WAY) from setting it up, to optimizing it, securing it, and then making money from it. This guide has been used by hundreds of thousands of visitors, and it’s 100% free.
Having that said, here are the lessons that WPBeginner founder, Syed Balkhi, has over the last 12+ years of blogging.
1. Choose The Right Platform
A lot of folks start with popular free blogging platforms like Blogger, Medium, or WordPress.com, but these blogging platforms are limited. You don’t want to waste your time there if you’re serious about blogging.
First, you’ll have to follow the terms and conditions of these platforms, and they have the right to shut down your blog without any notice. Also, there’s no guarantee that you will be able to export your content should they shut off your blog.
You can only use the features available on their platform which are limited. Most free platforms also restrict you from making money blogging.
WordPress.org, on the other hand, gives you complete freedom and control of your blog.
You can add features, make money, or do whatever you like. All of our blogs now use WordPress including WPBeginner. WordPress powers over 31% of all websites on the internet.
If you are thinking about how WordPress.org compares to other free blogging platforms, then we have done the research for you:
Choosing the right domain name is very important. I had a wildly successful blog called List25.com which had over 2.3 million YouTube subscribers and over 500 million video views. But in hindsight, I wish I didn’t add a number in the domain because it restricted us to only 25 items in a list.
Here are some quick tips on choosing the best domain name for your website.
Choose a domain name that is easy to pronounce, spell, and as short as possible.
Use your keywords and brand name in the domain name. For example, stargardeninghouston.com is more search engine friendly, than stargardeningcompany.com
Choosing the right web hosting is by far one of the most important decisions when starting a blog because this is where your website files are stored.
Many beginners like the idea of getting free hosting, but choosing a free website hosting is always a bad idea, and it will end up costing you more money and time in the end.
In the early days, one of my first websites was hosted on a free host which was going fine until one day they shut down without notice. My entire website was gone with no way to restore it. I lost months of hard work.
This is why it’s important to choose a reputable hosting company. Here are a few things you need to consider:
There are different types of hosting plans like shared hosting, managed hosting, VPS, and more. You need to pick a plan that suits your needs and budget.
Compare reviews of different hosting companies.
Support is important for beginners, and you want make sure that there are plenty of options to get help when you need it.
For those who’re just getting started, we recommend using Bluehost because they’re an official WordPress recommended hosting provider. They’re also offering our readers a free domain name + a 65% discount on hosting.
Our second choice for hosting is SiteGround. They’re also officially recommended by WordPress, and they’re known for great support.
Often users don’t think about backups until it’s too late. In the early days, I chose a cheap web hosting provider that wasn’t very well-known, and they had a hardware failure. I lost my entire website because I didn’t have a backup.
Many hosting companies offer limited backups. However, these backups are not guaranteed, and a hardware failure can cause you to lose data as well as the backup.
Backups are your first line of defense against brute force attacks, hacking, and data theft. They are the first step to improving your WordPress security and keeping your website safe.
There are plenty of reliable WordPress backup plugins that allow you to schedule automatic backups and store them in remote locations like Google Drive, Dropbox, Amazon S3, and more.
You can’t grow your site if you don’t know how people find and use your website. Like many beginners, I too relied on “guesswork” and “winging it” to get the job done until I learned the importance of website analytics.
Google Analytics is the best analytics software in the world used by millions of websites. It allows you to see your most popular content, where your visitors are coming from, and more.
It also helps you track user engagement across your website, which helps you improve your business using real numbers instead of guesswork. If you are running an online store, then you can use it to track customers and boost your conversions.
For quick setup, follow our step-by-step guide on how to install Google Analytics in WordPress.
6. Setup a Professional Branded Email Address
If you’re serious about your blog, then it’s important to have a professional branded email address. This goes a long way in negotiating deals with an advertiser because they think you’re a legit operation.
Plus it also helps with email deliverability when sending email newsletters. Which brings me to tip #7.
7. Start Building an Email List Right Away
Over 70% of people abandoning your website never return. You need a way to keep in touch with them. This is why you need to start building an email list.
Now you may think, why not just build a following on social networks like Facebook, Twitter, Instagram, and more?
While you should absolutely work on building a following on social media, you do not own these platforms. They can limit your reach to your own followers and can even block your account at any time.
On the other hand, email is still the most effective online marketing tool. You own your email list, and you can reach your audience without any limitations.
Not building an email list from day 1 is still my #1 regret, and this is a common regret shared by many blogging experts.
8. Setup Unique Contact Forms for Each Use Case
In the beginning, I had my email address publicly displayed on the blog. This led to tons of spam coming my way. Contact forms are very important and that’s why you will find a contact page on almost every website you visit.
It’s also important to have different forms for each use case, so you can easily filter the emails and be more efficient.
There are plenty of WordPress contact form plugins in the market. However, most WordPress contact form plugins are designed for developers. This is why I launched WPForms, with the goal of making it the most beginner-friendly contact form plugin for WordPress.
It has more than 5 million active installs with 10,000+ five-star reviews. There is also a free version called WPForms lite that you can try.
Often beginners just copy and paste images from the internet. This adds liability as your site grows. Don’t just use images from Google because you might have to pay thousands later in image copyright infringement fees. The copyright owner can also report the page displaying their work and ask Google to remove it from search results.
Considering these costs, it’s worth paying for a Shutterstock license to get high-quality vector images to use on your website.
However, if you are just starting out and don’t want to pay for licenses, then you can find several websites offering cc0 images. These images are royalty-free, and you can use them on your website.
Another way to add images to your website is by creating your own. However, most beginners are not graphic designers. Luckily, there are online tools like Canva which enable you to create professional images to use on your blog.
10. Onsite SEO Optimization is Important for Growth
If you’re serious about growing your blog and making it successful, then you need to pay attention to on-page SEO from the beginning.
SEO short for search engine optimization helps you get more visitors to your website from search engines. SEO strategies are divided into two categories, off-site and on-site SEO.
Onsite SEO helps you optimize your blog by making small adjustments in various areas. Now, this may sound a bit technical, and it is, but there are plenty of tools that can help you with this.
First, I would recommend you install AIOSEO on your website. It is the complete WordPress SEO plugin suite, and it will help you with the onsite optimization of your blog.
It also allows you to easily create and submit sitemaps to search engines. This enables your website to get listed in Google and start appearing in search results.
Next, you need to make internal linking a habit. Internal links are the links you create inside your content to your own blog posts, pages, and different areas of your website. Internal links help you increase your pageviews as well as guide search engines to understand the context and relationship between your content.
You can use an internal linking plugin like AIOSEO to automatically find internal linking opportunities and add them to your content easily.
For more SEO tips, see our ultimate WordPress SEO guide for beginners with step by step WordPress SEO setup.
11. Keyword Research is VERY Important
Often people write great posts, but they aren’t discoverable because they didn’t think about using the right keywords. Most beginners follow their best guesses to come up with ideas for blog posts. You don’t need to do that when there are tools that can help you find out what your users are looking for. You can use these keywords for your blog posts and increase your traffic.
You can use a free tool like AnswerThePublic to find the questions your users are searching for. You can then answer those questions in your blog posts to get more search traffic.
Want to know which keywords are bringing traffic to your competitors? Use SEMRush to steal your competitors’ keywords. It also shows you paid keywords where your competitors are running paid advertising campaigns.
12. Catchy Headlines are important for Social and SEO
People judge the book by its cover and blog posts by its headline. If you want to get a lot of shares, then you need to write catchy headlines.
Google even uses CTR (click-through rate) as a ranking factor, so you need to have catchy headlines to get more people to click on them.
How do you analyze your blog post headlines? Luckily there are several tools that will help you improve your headlines. Here is a list of tools that’ll help you create better headlines.
13. Repurposing Content is a Secret Weapon for Expert Bloggers
You don’t always have to come up with new blog post ideas. Expert bloggers repurpose their content into videos, images, collection articles, etc.
Following are some examples of articles we have compiled with repurposed content from our existing articles.
You can also repurpose articles as downloadable ebooks, audio files, or YouTube videos. Subscribe to our YouTube channel to see how we reuse content from our articles to create highly engaging video tutorials. This brings me to my next tip #14.
14. Videos are a Great Way to Boost Engagement and Stand Out from the Crowd
Videos are the most engaging form of content on the internet. Users are actively looking for video content, which is why YouTube is the second largest search engine in the world.
Using videos on your blog allows you to keep users on your site and help them discover more content.
Over the years, I have learned that you should never upload videos to WordPress. Instead, I recommend using video hosting services like YouTube.
Your blog posts are displayed in reverse chronological order (newer posts appear first). This means your older posts are buried down and are not easily discoverable.
One way to fix this is by sharing your older articles on social media. Often beginners think that it’s not ok to recycle old content. It’s completely fine and expert bloggers do it all the time.
The easiest way for new blogs to start making money is by displaying ads using Google AdSense. While Google AdSense is great, you need to diversify your income stream. We have seen bloggers losing all their income when AdSense blocked their accounts for a policy violation.
Another way to boost your ad revenues is to monitor who’s advertising on your site. You can then go to them directly to eliminate the middle man.
17. Consistency is Key
You don’t have to post every day. But you have to be consistent in your schedule. At WPBeginner we post once a day, 5 days a week. Some popular blogs publish several new posts each day.
Choose how frequently you will publish and then stick to that frequency. If you are just starting out, then you can start with 3 posts per week and then gradually increase your pace.
If you’re not disciplined, then it’s easy to slip and this is how most blogs die. You need to keep yourself motivated and don’t get distracted from your goals.
18. Streamline a Flow for Storing Your Blog Post Ideas
There are plenty of online tools that you can use to store your blog ideas. As a professional blogger, you will often come up with blog post ideas during conversations and everyday chores. It is important to jot them down before you forget.
You can use tools like Asana, EditFlow, or Evernote to store new ideas, plan content strategy, and manage your editorial calendar.
This is extremely important because there will be days when you are out of ideas to write about. Having an idea bank will help you stay consistent with your publication schedule.
19. Setup a Place to Manage All Your Passwords
Passwords are the gatekeeper to your WordPress website as well as your online accounts. They are also the most common target of hacking attempts.
This is why it is recommended to use strong and unique passwords for all your accounts. I am often asked by beginners how to remember all those strong and unique passwords?
Well, you don’t need to. There are excellent password managers like LastPass and 1Password, which securely store all your passwords, auto-fill them for you, and can generate strong passwords to use.
Whatever you do, just make sure that you DO NOT use the same password everywhere!
20. Connect Multiple Emails with Your Gravatar
Gravatars are the profile images used by WordPress. It is super easy to start using Gravatar, but what most users don’t know is that you can connect multiple email addresses to your gravatar.
This allows you to use the same brand image for your comments while using different email addresses.
Leaving comments on other blogs is a great way to bring attention to your new blog and get more traffic.
21. Comment on Other Blogs and Networks to Grow Your Brand
Blogs are an inherently social platform, allowing people to comment and engage with content. To grow your brand, you need to utilize this feature by participating in other blogs in your niche.
When we first started, we commented on all relevant blogs. It’s important that you take part in relevant blogs and Facebook groups to grow your brand. This grass-roots effort is essential for your blog’s growth.
It helps you get the word out about your blog, get noticed by influencers in your niche, and make new connections on the way.
22. About Page and Start Here Pages Are Very Important
You need a place to share your story as well as give new users a place to start. This is why you need to add an about page to your blog. It allows your users to learn more about you, your story, and build a personal connection with your brand.
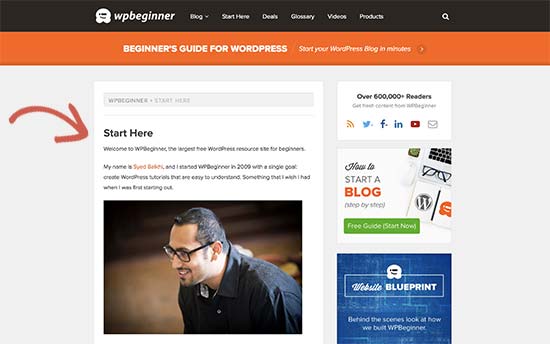
You should also add a Start Here page to walk your new users through your most important content. This walking tour helps you quickly get new subscribers for your blog and establish your brand as an authority.
23. Social Media is Important But Always Remember It’s Rented Land
Remember MySpace or Orkut? We have seen social networks come and go. While social networks can be a great source to drive traffic to your blog, you should always focus more on items that you control (i.e. your blog, newsletter, push notifications).
In 2011, I lost 40% of traffic when I redesigned WPBeginner simply because we switched color schemes which confused users. Consistency in your brand’s color scheme and website is crucial for building brand recognition.
There are thousands of free and paid WordPress themes which makes it tempting for beginners to switch their website’s design and colors. You need to pick a design and stick with it so that your users can become familiar with your brand’s color and design,
You should use your brand’s colors and logo on your merchandise like t-shirts, mugs, stickers, etc. You should also stay consistent across your social media profiles.
25. Leverage Social Proof When You Can
Social Proof is a marketing tactic that eases a customer’s mind by showing them that other customers already trust the brand, product, or website they are viewing.
As humans, we prefer to learn from other people’s experiences and decisions. Marketers use this social phenomenon by adding social proof to their marketing campaigns and websites.
You need to use this to help establish trust and grow your blog / business. You can add social proof by sharing your total subscriber count, adding website logos where you are featured, displaying your growth indicators, number of downloads, and more.
26. Website Speed is Very Important
Nobody likes slow websites. Search engines like Google give an SEO advantage to faster websites. As a blogger, you need to optimize your website for speed and faster page loads.
The key to faster websites is choosing the right WordPress hosting. A bad host can slow down your website and no matter what you do on your end, you will never be able to improve performance.
Next, you need to start using a WordPress caching plugin. There are excellent free plugins like WP Super Cache which help you serve a cached version of your website with just a few clicks.
You can also combine that with DNS-based firewalls like Sucuri or Cloudflare. These firewalls block bad traffic which reduces your server load. They also serve static content through their CDN servers which gives you a significant speed boost.
For complete step-by-step instructions see our ultimate WordPress speed and performance guide for beginners.
27. Content Upgrades and Exit Popups are Magic
Content upgrades and exit popups work like magic. When you are first starting out, you might think that these things don’t work, but they do and that’s why you see them everywhere.
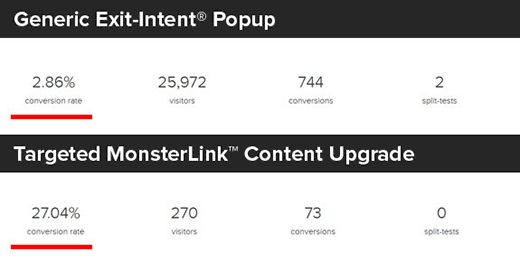
I used exit-intent popups on WPBeginner and increased our subscribers by 600%. Later, I ran a similar experiment with content upgrades on my personal website and got a 27% conversion rate on a single page.
As your blog starts growing, you will get a ton of positive feedback and encouragement from your users. However, you will also get some haters who will criticize you and try to bring you down.
You need to ignore these haters and not waste your energy or time on them. To make sure you are not distracted, turn on comment moderation and disable new comment notifications.
29. Don’t Obsess Over Perfection
When writing a blog, I recommend not obsessing over perfection. It’s completely ok to make mistakes as long as you fix them.
Some folks might get upset over grammar or spelling mistakes, but you can fix them and move on. Remember, it’s human to make mistakes.
You can use tools like Grammarly to help catch some errors.
My advice for new bloggers is to write and develop your own voice / style. Often blogs with more personalized writing do better than those that are written like research papers.
30. Always Use the Best Tools to Get Ahead
All experts have a toolkit that helps them stay ahead. These online tools are made specifically for bloggers and website owners. They will help you be more efficient, so you can make your blog successful.
Following are just some of the tools that I have found very helpful in my journey.
Knowing the cost of building an eCommerce website is important because it helps you calculate the investment you will need to start your new online business idea.
The challenge is that there are many factors involved in making an eCommerce website, and all of them will affect the overall cost of your business.
If you don’t have a clear action plan, then you can easily end up overspending. But don’t worry, we are here to help.
In this article, we will break down all the information to give you a clear idea of how much does an eCommerce website cost. We will also show you different ways to avoid overspending and maximize profits.
Ready? Let’s get started.
How to Calculate the Cost of Building an Ecommerce Website?
The best way to calculate the cost of building an eCommerce website is to compare different eCommerce platforms, tools, add-ons, and additional services that you will need based on your business requirements.
This is the only way that will give you an accurate cost of an eCommerce website.
Since there are multiple ways to create an online store, most online eCommerce website cost calculators end up being completely inaccurate (so it’s best that you avoid them).
To keep this article focused, we will break down our eCommerce cost analysis into the following major expenses:
There are many different eCommerce software and platforms that you can use to make an online store. For the sake of this article, we will use the following top eCommerce platforms:
That being said, let’s start calculating the cost of making an eCommerce website, and how to save money with smart choices along the way.
1. Hosting Costs
Every website on the internet needs web hosting. This is where your website’s files are stored. You’ll also need a domain name which is your website’s address on the internet, e.g. wpbeginner.com.
When it comes to eCommerce hosting, there are two routes that you can take for your eCommerce projects. Each of them has different costs and technical requirements.
Let’s take a look at both of them.
1. Hosting Costs for Self-Hosted eCommerce Website
WooCommerce is the most popular eCommerce platform in the world powering millions of small and large online stores.
WooCommerce itself is available as a free software which means you can download and use it for free to create as many eCommerce websites as you like.
As your business starts growing, you will eventually need to upgrade your hosting plan to handle more traffic.
This means your hosting costs will start increasing as more customers visit your website. Hopefully, by that time you’ll be making enough money (sales) to justify the increasing costs of hosting.
Here are the advantages of a self-hosted eCommerce site:
You get complete freedom to build your eCommerce site the way you like.
You can save a ton of money by only paying for what you need.
You can make unlimited sales, add unlimited products, and use any payment gateway platform that you like.
With that said, some non-techy users don’t want to learn how to install their own eCommerce software and prefer a done for you solution instead. That’s where the SaaS eCommerce platforms come in.
2. Hosting Costs for SaaS eCommerce Platforms
Ecommerce platforms available as SaaS (Software as a Service) do not require you to install software, manage it, or host it yourself.
Your website hosting price is included with the software. You don’t need to worry about managing website hosting.
The two of the most popular SaaS eCommerce platforms are Shopify and BigCommerce.
They both offer incredibly easy and highly scalable eCommerce platforms to sell your products online. Both platforms include SSL, but you’ll need to purchase a domain name separately. See our guide on how to register a domain name for instructions.
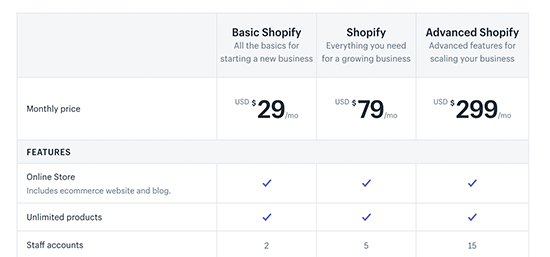
For both platforms, each plan comes with a different set of features that you need to review, so you can choose the right plan for your needs.
There are some major differences between Shopify and BigCommerce, and we will discuss them throughout the article.
For example, the BigCommerce Standard plan limits you to $50,000 in online sales per year. After that, you will need to upgrade your account.
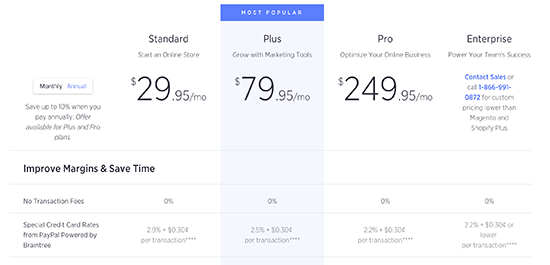
Shopify on the other hand forces you to use Shopify payments. If you want to use another payment gateway, then you will be charged an additional 2% fee for each transaction made on your eCommerce store using a third-party payment gateway. The fee drops to 1% and then 0.5% for their higher-paid plans.
Please keep in mind that this cost estimate is for starter to medium-sized online stores. For high-volume stores, you will likely have to upgrade to Shopify Plus or BigCommerce Enterprise which costs in the thousands per month.
On the self-hosted site, you will have to upgrade your hosting plans with WP Engine, Liquid Web, or whichever hosting provider you are using.
Based on the hosting cost analysis above, a self-hosted eCommerce site with WooCommerce comes out as a winner. See our guide on how to start an online store.
2. Payment Processing
Many beginners don’t look at payment processing fees when choosing an eCommerce platform. This can have a serious impact on your business because it will significantly increase your costs and lower your profits.
Let’s see how different eCommerce platforms handle payments, and how much it would cost you to accept payments from your customers.
Payment Costs in WooCommerce
WooCommerce is an open-source software, so it has many payment platform integrations. This means self-hosted eCommerce websites using WooCommerce are free to use any payment gateway they want.
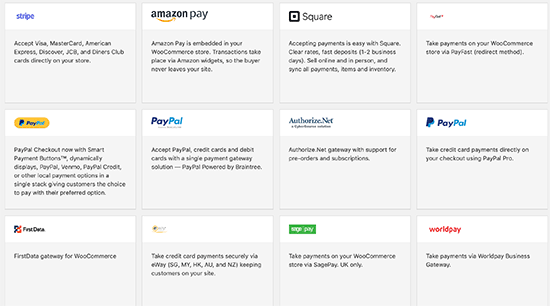
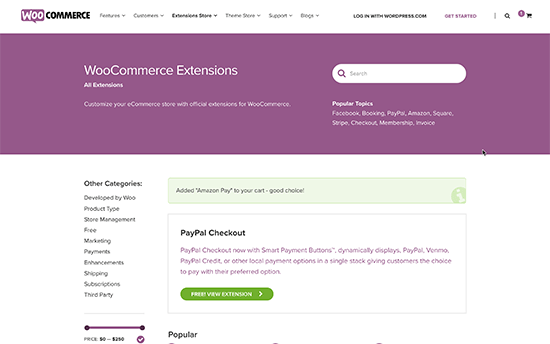
By default, WooCommerce supports PayPal and Stripe payment gateways to accept credit card payments. You can also choose from dozens of other payment services which are available as extensions.
You will only be paying the processing fees to the payment gateway service you choose. Each one of them has different rates for different regions, currencies, and services.
Another advantage is that WooCommerce has extensions and integrations available even for some lesser-known regional payment services. This is a big advantage for eCommerce websites catering to customers in specific countries.
Using WooCommerce, you can compare the rates for different payment services and choose the best option for your business.
WooCommerce also does not put a cap on how many sales you can make on your website. This gives eCommerce websites the freedom to choose their payment service and not pay any overage fees.
WooCommerce payment processing costs:
Payment processing fees vary depending on the payment gateway, currency, and region. Here is a quick overview of popular payment gateways in US dollars.
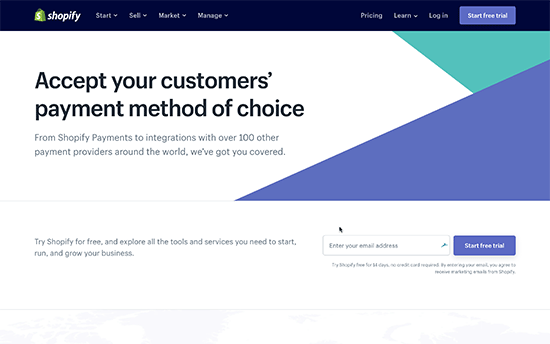
Shopify offers its own payment solutions called Shopify Payments which lets you accept credit card payments on your website. It also offers many third-party payment gateways including regional and cryptocurrency payment services.
Shopify Payments is available only in 13 countries at the time of writing this article. You will need to carefully read payment terms for your country as you are not allowed to sell certain items in some countries.
If you choose to use a third-party payment service, then you will pay that particular payment gateway’s fees + 2.0% additional fee to Shopify. This might not seem a lot at first, but it can become a significant amount in the long term.
Considering that most payment services charge 2.9% of the transaction amount on average, this means you could end up paying up to 5% of the total transaction as payment processing charges.
Now if you are in one of the 13 countries supported by Shopify, then you get almost the same rate as PayPal.
However, if you are not in those select countries, then you will pay 2% additional charges to Shopify for each transaction which could significantly reduce your profit margins.
Shopify Payment processing costs
Shopify Payments: 2.9% + 30¢ per transaction
Third-party payment services: The payment gateway fees + 2% additional fees paid to Shopify for each transaction.
Payment Costs in BigCommerce
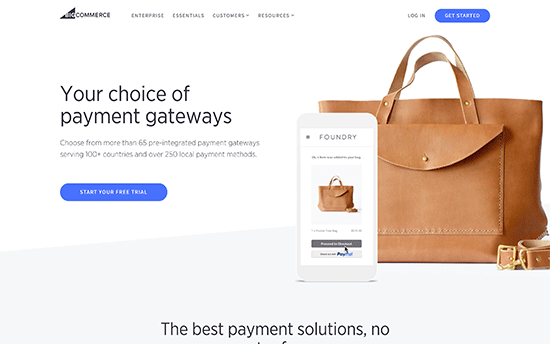
BigCommerce allows you to choose from over 65+ third-party payment gateways. These payment platforms provide a wider global reach than Shopify, but it is not as large as WooCommerce.
The biggest advantage of using BigCommerce is that it does not charge additional transaction fees. This means you only pay for each transaction to the payment service provider you choose (similar to WooCommerce).
The charges for each transaction will depend on payment service, currency, and country. You can choose from all popular payment services like PayPal, Square, Stripe, Authorize.net, and many more.
Estimated Costs for Payment Processing on an Ecommerce Website
Your payment processing costs will depend on your eCommerce platform and the payment services you choose. Here is an average estimate of the payment costs.
WooCommerce: PayPal or Stripe – 2.9% + $0.30 for transaction
Shopify : Shopify Payments – 2.9% + 30¢ | Additional 2% per transaction for third-party payment gateways
BigCommerce: PayPal or Stripe – 2.9% + $0.30 per transaction
Note: These costs do not include any fees that may be charged by your bank.
When looking at payment processing costs, both WooCommerce and BigCommerce are tied for the lowest costs.
3. Ecommerce Website Design Costs
The eCommerce industry is growing at an incredible rate. Each day new online stores are popping up and chances are that there will already be significant competition in your area of business.
This is where design comes in.
Giving your website a professional and customer-centric design helps you get ahead of the competition.
Now you might be thinking, well I’m not a professional web designer, how do I come up with a design that helps my store stand out and make more sales?
Well, most eCommerce platforms realize this problem, so they offer ready-made website templates. Store owners can customize the layouts using simple drag and drop tools.
Store owners can also purchase premium designs that come with additional features, priority support, and unique layouts. Of course, you can also hire a developer to design a completely custom template from scratch with custom features.
Let’s see how much it costs to design an eCommerce website on different platforms.
WooCommerce Design Costs
WooCommerce is the most flexible option in terms of design and appearance. It is built on top of WordPress, the most popular website builder, which means you can choose any WordPress theme to use with WooCommerce.
However, you would want to select a WooCommerce specific theme for best results.
Luckily there are thousands of WooCommerce themes that you can choose from. Many of them are completely free and some are available for a small fee, starting from $30.
Here are the top WooCommerce themes with tons of customization options.
Astra – A popular WooCommerce theme with dozens of ready-made sites that you can install with 1-click.
Divi – A powerful WooCommerce theme with dozens of templates, a built-in page builder, and beginner friendly customization options
Ocean WP – One of the top all-purpose WooCommerce themes on the market with tons of customization options
WooCommerce also gives you access to amazing WordPress page builder plugins. These drag and drop tools allow you to create custom product pages and custom landing page layouts within minutes.
If you don’t want to use a free or paid WooCommerce theme, then you can hire a WordPress developer for custom WooCommerce development.
Custom themes are unique and made specifically for your business. They allow you to incorporate custom features and turn your ideas into reality.
A custom theme can become very expensive depending on the features you need, and the expertise of your developer. The overall cost of a custom website development could start from $1500 to $6000 for an average-sized eCommerce business.
An enterprise-level custom theme with its own companion plugins can cost from $10,000 to $30,000.
An easier and more cost-effective way to create a custom theme is to use SeedProd. It’s a powerful drag and drop website builder that allows you to create a custom theme for your WooCommerce store, without editing any code.
You can get started quickly with one of the 28+ ready-made WooCommerce themes. Each theme can be customized for your brand by pointing and clicking.
Plus, SeedProd comes with full WooCommerce integration.
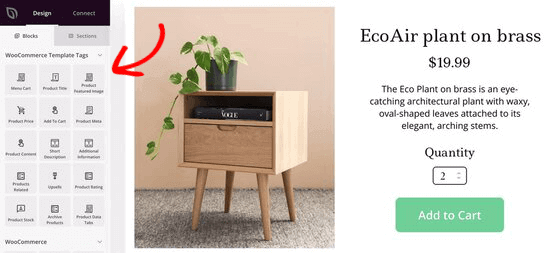
Simply drag and drop the WooCommerce template tags or blocks to create a custom WooCommerce checkout, cart, featured product grids, product ratings, and more.
Shopify Design Costs
Shopify offers ready-made templates that you can use as a starting point for your eCommerce store. It also offers built-in tools to customize the layout, colors, and other settings.
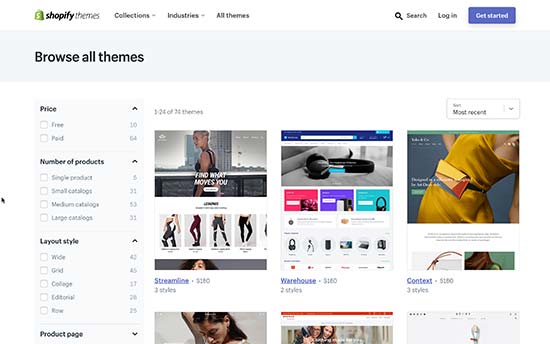
There are currently 10 free and 65 paid themes available on the Shopify website. This is a very small number, especially when compared to thousands of themes available for WooCommerce.
On average, a paid theme for Shopify starts from $160. You may find cheaper themes on third-party theme marketplaces where Shopify themes may be available for as low as $59.
You can also hire a developer to make you a custom Shopify theme. However, Shopify is not as popular among developers as WooCommerce, which means your hiring pool will be quite small and rates will be higher.
Depending on the developer you choose and their rates, a custom design development for Shopify can cost between $5,000 to $30,000 USD.
BigCommerce Design Costs
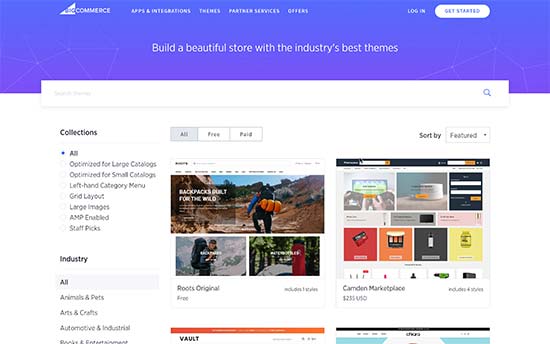
BigCommerce also offers paid and free themes. There are currently 12 free themes in multiple styles and more than a 100+ paid themes in the store.
Each of these themes is fully customizable using an intuitive user interface. You can add your own business logo, custom colors, and choose different layout styles for your store.
All themes are mobile responsive and designed for higher conversion rates. They strictly adhere to BigCommerce platform guidelines and coding standards, so you get the same user experience regardless of which theme you choose.
You can also find BigCommerce themes from third-party marketplace websites. However, these themes may not be as good in quality as those available in the official store.
BigCommerce also allows developers to upload custom made themes. You can find a developer for hire on BigCommerce’s official partner’s directory or freelance marketplaces like UpWork.
Pricing for paid BigCommerce themes start from $160+. A custom BigCommerce theme can cost you somewhere between $3,000 to $30,000, depending on the developer or agency you hire for the job.
Estimated Design Costs for an Ecommerce Website
WooCommerce – Free, $99 for premium, and $5,000 for custom
Shopify – Free, $160 for premium, and $5,000 for custom
BigCommerce – Free, $160 for premium, and $5,000 for custom
Note: Both BigCommerce and Shopify have limited themes both free and paid. WooCommerce gives you access to thousands of free and paid themes, large pool of developers, and a lot more flexibility in design.
4. Cost of Add-ons and Extensions
It is simply not possible for an eCommerce platform to bake all the features you’ll need into one software. Even if they tried, things would get messy and the software would become difficult to use.
To fix this problem, most eCommerce software are made with a modular approach. This allows the core software to be extended using add-ons and apps.
These add-on or extensions allow you to add new features to your eCommerce website and extend its functionality. Many of them are paid and buying them will increase your cost of making an eCommerce website.
Let’s compare the costs of add-ons and extensions on popular eCommerce platforms.
WooCommerce Extensions and Add-ons
When it comes to add-ons and extensions, no other eCommerce platform comes even close to WooCommerce. There are thousands of both free and paid add-ons available for WooCommerce that you can use.
You also need to keep in mind that WooCommerce runs on top of WordPress, which gives you access to 59,000+ free plugins as well.
There is a plugin or add-on available for any feature that you can think of.
Want to see some examples? See our expert-pick of essential WooCommerce plugins showcasing the most popular WooCommerce add-ons (most of them are free).
Pricing for paid WooCommerce addons start from $19 and can go as high $299 (depending on licensing plans and features of a plugin).
If that’s not enough, and you want a custom feature, then you can hire a developer to make a plugin for you. It could cost you anywhere from $500 to $10,000 USD depending on how much work is required or the rates of the developer you hire for the job.
Shopify is a SaaS platform and the core software is tightly integrated to provide maximum security and stability to all users.
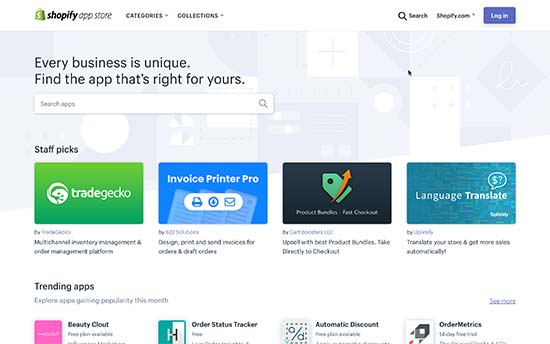
However, they do offer APIs for developers to integrate their own services and solutions into Shopify. These addons are available as third-party apps on the Shopify app store.
There are hundreds of apps available both free and paid. The prices for paid apps vary and most of them are available on a monthly subscription basis.
Shopify also allows you to add private apps made specifically for your store. The app needs to be stored and run elsewhere, and you can generate Shopify API keys to manage the app’s access permissions.
Shopify Addon Costs: Free – Varied monthly subscription apps. Custom app: $5,000+ depending on developer rates and skills.
BigCommerce Addons Cost
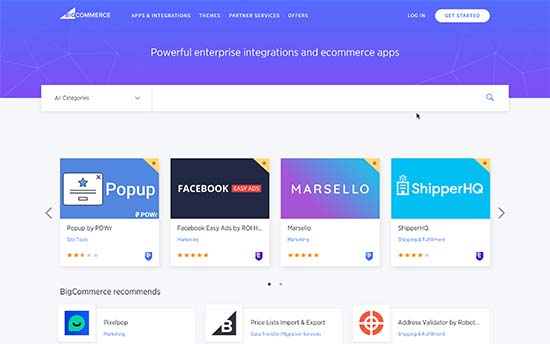
Similar to Shopify, BigCommerce also allows you to install both free and paid apps. Many of these third-party apps are available on a monthly subscription basis.
You can also hire developers to create custom apps for a single store. These apps are stored as a draft app and you can only use it on that particular store.
BigCommerce Addon Costs: Free – Varied monthly subscription apps. Custom app: $1000+ depending on developer rates and skills.
Estimated Cost of Addons on an Ecommerce Website
This one is hard to calculate because each online store will use different apps for their own needs.
Ofcourse using more paid add-ons will cost more and increase your total costs significantly. Add-ons with recurring billing will be an ongoing expense for your business.
We are assuming that you will be careful with paid add-ons to give a very conservative estimate of the costs.
Add-on costs: Free – $1,000 USD
WooCommerce addons and WordPress plugins overall are cheaper since they’re billed on annual basis whereas Shopify and BigCommerce apps are billed on monthly basis.
5. Total Cost of Building an Ecommerce Website
Now that we have covered different spending areas for an eCommerce website, let’s take a look at how much would be the total cost of building an eCommerce website.
As mentioned earlier that each eCommerce platform gives you the flexibility to choose how much money you would spend. This would obviously affect your overall costs.
Following are the estimated total costs of building an eCommerce website.
WooCommerce Enterprise – $10,000+ (Dedicated hosting servers, custom design and features, paid plugins and services).
Shopify – $1,000 – $10,000+ (Your costs would increase dramatically when you make more sales and if you are using a third-party payment service).
BigCommerce $1,000 – $10,000+ (Your costs will increase when you make more sales as you will be asked to upgrade your plan).
A WooCommerce / WordPress eCommerce site costs between $500 and $3000 USD for a starter eCommerce business. This gives you the best value for your money as it is the most robust, flexible, and easy to use platform.
You wouldn’t have to pay additional transaction fees
WooCommerce doesn’t cap your sales or number of products you add
You can use it with any third-party service
It has the best design options to improve conversions and make more sales
If you would rather not maintain hosting by yourself, then BigCommerce saves you money by not charging you a transaction fee for using your preferred payment services.
You can also use BigCommerce with WordPress, allowing BigCommerce to handle your store and WordPress to manage marketing content.
Lastly, Shopify could be a cheap option for making an eCommerce website but only if you use Shopify Payments to accept credit card payments on your website.
Now that you have made your eCommerce site. What’s next?
The real fun part comes when you start growing your eCommerce business. This part is painful and overwhelming for most beginners, but it is also the most rewarding.
It is painful because it can be excruciatingly slow if you are not using the right tools. By using proper tools to grow your business you can boost your sales and skyrocket conversions.
While these tools will also add up to your overall costs, their ROI is so high that it automatically justifies the expense.
Following are our top picks for the best marketing tools to grow your eCommerce business with their costs.
As your eCommerce site starts getting visitors, you’ll learn that most visitors leave without making a purchase. Wouldn’t it be great if you could stay in touch with them so that you can convince them to buy?
It is the best lead generation software in the world because it helps you convert abandoning website visitors into leads and customers. OptinMonster works with any kind of website and all eCommerce platforms.
The best way to stay in touch with website visitors is by email, which is still the preferred mode of communication by customers.
You need to start building an email list on your eCommerce store from day 1. Basically, you are losing money each day you are not collecting emails.
The easiest way to start with email marketing is by using Constant Contact. It is the best email marketing software on the market allowing you to send targeted messages to subscribers and increase your sales.
The best source to get free traffic to your website is search engines. To utilize them, you will need to keep learning eCommerce SEO.
SEMRush is the best SEO tool on the market. It allows you to see the keywords your competitors are ranking for and how you can beat them by ranking higher.
In just a few clicks, it provides you a ton of optimization ideas that you can implement with minimal effort.
Normally you can just add your landline or mobile number to your eCommerce website. However, it doesn’t look very professional and can end up hurting your business.
Nextiva is the best business phone service on the market. It allows you to use one number on multiple devices, phonesets, mobile phones, and even computers.
It runs on voice over internet protocol technology also known as business VoIP. Compared to traditional landline phones, it is way cheaper and allows you to efficiently handle calls for your business.
One of the easiest way to increase your store revenue is to use push notifications. They allow you to communicate with customers after they leave your website.
Push notifications have one of the highest engagement rate out of any communication platform.
You can use it to send bulk push messages, cart abandonment notifications, automated drip messages, sale announcements, and more.
Cost: Free to start and grows based on the number of subscribers.
6. PPC Marketing
Starting an eCommerce website will not instantly start making money for your business. It will take some time before you can get search traffic to your website. Meanwhile, you’ll still be paying for hosting and other services.
This is where PPC marketing can help.
PPC or pay-per-click marketing allows you to display ads for targeted keywords in search results. You can use SEMRush to find the PPC keywords your clients are targeting and plan an effective strategy within minutes.
The best place to start with your first PPC campaign is Google Ads. It is super-easy to use and even absolute beginners can get started without any help.
PPC campaigns don’t need to cost a lot of money. You can set a small budget, run a very targeted campaign, and then increase the budget to get more leads and sales.
PPC is not just for eCommerce startups, you can continue using PPC marketing alongside your SEO efforts to get targeted traffic to your store.
Cost: You can start as low as $100 and increase budget as you need.
How much would it cost to properly grow an eCommerce business?
Basically, it depends on you. Your goal should be to find the right balance of tools start building upon it. Keep trying new tools as your business grows and you have more budget to expand.
Estimated Cost of Growth Hacking: $1000 to Unlimited
We hope this article gave you a good idea of how much does an eCommerce website cost in real numbers. We recommend being thrifty and only spending when it is essential for your business.
Are you wondering if there is a difference between coming soon and maintenance modes?
The answer is: Yes. They are both used for different purposes and search engines treat coming soon mode differently from maintenance mode.
In this article, we’ll explain the difference between coming soon vs maintenance mode so that you can choose the best option for your needs.
What is Coming Soon Mode vs. Maintenance Mode, and Why Does It Matter?
Coming soon mode is used when your website has not yet been launched. Maintenance mode is used when your website is temporarily offline for maintenance.
It’s easy to get these 2 modes confused. Several WordPress plugins such as SeedProd let you put your site into either coming soon mode or maintenance mode. You may not be sure about the difference.
It’s extremely important to use each mode correctly, because if you choose the wrong option, then it can harm your WordPress site’s SEO rankings.
When to Use a Coming Soon Page
You should use a coming soon page after registering a domain name but before you have finished creating your website.
A coming soon page lets you generate buzz about your upcoming site before launching it. Plus, it allows Google to start sending you visitors.
It’s best practice to have an email newsletter signup form on your coming soon page. This allows people to get an email when your site goes live, and also helps you to get a head start on building an email list.
Let’s take a look at how to create a coming soon page in WordPress.
How to Create a Coming Soon Page
To create a coming soon page, you first need to install and activate the SeedProd plugin. For more details, see our step-by-step guide on how to install a WordPress plugin.
Upon activation, you should be prompted for your license key. You will find this in your account area on the SeedProd website. Simply enter the key and click the ‘Verify Key’ button:
After that, you can go to SeedProd » Landing Pages from your WordPress dashboard and click the ‘Set up a Coming Soon’ button.
Then, simply pick a template for your coming soon page. There are over 150 different templates to choose from.
All you have to do is hover over a template and click the orange tick mark button.
You will now be taken to SeedProd’s drag and drop page builder.
Go ahead and change anything you want using the blocks given in the left-hand sidebar.
For instance, you can drag and drop standard blocks for text and images, or choose Advanced blocks to add a countdown timer, contact form, icons, and more.
Besides that, there are options to change the font, background image, text and color of the button, and more.
If you would like to integrate your coming soon form with your email marketing service, then simply go to the ‘Connect’ tab at the top and select your email marketing service.
You then need to follow the on-screen instructions to connect your coming soon page with your email service.
Once you’re happy with your coming soon page’s design, head over to the ‘Page Settings’ tab at the top. After that, click on the Page Status toggle and switch the status from Draft to Publish.
Don’t forget to click the ‘Save’ button at the top and then exit the landing page builder.
Next, you’ll need to go to SeedProd » Landing Pages from your WordPress dashboard and click the toggle under the Coming Soon Mode to make your page ‘Active.’
Your coming soon page is now live. To view it, log out of your website and visit any page.
When to Use Maintenance Mode
You can use maintenance mode if you need to briefly take your site offline for changes or updates.
For instance, you might want to use maintenance mode while changing WordPress themes. This ensures that your site functions correctly and looks good with the new theme.
Another good time to use maintenance mode is to add an online store to your site. You can leave your website online but put your store into maintenance mode.
Maintenance mode lets search engines know that your site is currently down. It does this by returning the header code 503. That way, your site’s SEO won’t be affected by downtime.
It’s good practice to let users know that your site will be back soon, too. You can do this by putting a message on your maintenance page. You might want to add an email form so they can get an email alert once your site is back up.
Tip: When you update plugins, themes, or core WordPress, your site will automatically go into maintenance mode for a few seconds. If your site gets stuck in this mode, we have instructions on fixing the WordPress maintenance mode error.
How to Put Your Site in Maintenance Mode
To put your site in maintenance mode, you’ll need to install and activate the SeedProd plugin. You can follow our guide on how to install a WordPress plugin for more details.
Upon activation, you can head over to SeedProd » Landing Pages from your WordPress admin panel and then click the ‘Set up a Maintenance Mode Page’ button.
Next, you can select a template for your maintenance mode page.
SeedProd offers numerous templates to get started.
After that, you can customize the page in the SeedProd landing page builder.
Simply drag and drop blocks that you want to add to the template and edit the text, font, size, layout, color, and more.
You can now add an email marketing service under the ‘Connect’ tab.
Simply choose a service and follow the on-screen instructions to set it up.
Next, head over to the ‘Page Settings’ tab.
Simply click the Page Status toggle to Publish your maintenance mode page.
Once that’s done, go ahead and click the ‘Save’ button and exit the page builder.
When you are ready to put your site into maintenance mode, simply go to the SeedProd » Landing Pages in your WordPress admin area and then make the maintenance mode page ‘Active.’
Remember, maintenance mode should only be used when your site is down for maintenance. If you have not yet launched your site, use coming soon mode instead.
We hope this article helped you understand how to choose coming soon vs. maintenance mode. You may also want to check out our guide on the must have WordPress plugins for your website and our guide on how to install Google Analytics in WordPress.
If you liked this article, then please subscribe to our YouTube Channel for WordPress video tutorials. You can also find us on Twitter and Facebook.